It’s mind-boggling.
It seems as if 90% of the websites we review on a monthly basis identify list building as one of their biggest goals.
And yet the vast majority of those websites?
They have hardly any opportunities for their visitors to subscribe to their email lists.
That’s like bemoaning your lack of matches on Tinder when you haven’t even swiped right on anybody.
Does this sound like you? If so, I get it. There are a number of reasons you might be neglecting your opt-ins. Reasons like:
- You don’t know how to collect emails from your website.
- You’re overwhelmed with possibilities and need more direction on which to choose.
- You don’t know how to find the tools and plugins to get these opt-in forms on your site.
- You just don’t know the best practices to set them up.
Regardless of why you’re not collecting emails yet (or collecting emails passively), I’m here to help.
I’m going to show you every single place to put an opt-in form on your website, complete with the tools to make it happen, and the best practices the pros use to make these methods uber-effective.
Oh, and they’re ranked by effectiveness.
I've also created a cheatsheet of all of all of these opt-in opportunities so you can jump right in.
Click here to get the FREE cheatsheet now
If you’ve already gotten a handle on the tools and best practices, here’s the TL;DR:
- Opt-in #1: The Landing or Squeeze Page
- Opt-in #2: The In-Content Email Capture
- Opt-In #3: Product Page Calls to Action
- Opt-In #4: A Link as a Menu Option
- Opt-In #5: Before the “Read More” Tag on Your Homepage
- Opt-In #6: The Hospitable Welcome Mat
- Opt-In #7: The Classic Pop-Up
- Opt-In #8: The Attention-Grabbing Feature Box
- Opt-In #9: Below your Menu on Pages
- Opt-In #10: On Your About Page
- Opt-In #11: The Contact Page Capture
- Opt-In #12: The Slider Subscription Form
- Opt-In #13: The Side Pop-Out Button
- Opt-In #14: The Easy Comment Checkbox
- Opt-In #15: The 404 Squeeze Page
- Opt-In #16: The Breadcrumbs Subscribe Link
- Opt-In #17: The Top Bar CTA
- Opt-In #18: The Traditional Sidebar Form
- Opt-In #18.1: The Custom Sidebar Capture
- Opt-In #19: The Hidden Footer Form
- Opt-In #20: The RSS Subscription Link
These are sorted by estimated expected conversion rate. If one of these opt-in forms is predicted to convert at 3-5%, you can expect for every 100 visitors, 3-5 people will subscribe.
These estimates are based on our data, our own opt-ins, and research of other websites and conversion rates. These are the opt-in rates you should be able to get if you follow the best practices.
Read on to learn exactly why these work, how to make them work for you, and how to squeeze every last email out of your opt-ins.
Opt-in #1: The Landing or Squeeze Page
Expected Conversion Rate: 20-40%
What’s top dog when it comes to opt-in opportunities on your site?
I’ll take The Landing Page for $1,000, Alex!
A landing page can convert anywhere from 20-40% of visitors The landing page is so effective for one simple reason:
It isolates the call to action.
Think about it. When your visitor is on your website, there’s a lot they can do. They can click your menu options, look at your slider, read your content, listen to your podcast…
When they land on a squeeze page, they have to make a decision. It’s a simple decision. It’s a yes or no, rather than a "should I go here, or here, or there, oh! Squirrel!" distraction.
The decision is: should I opt in, or not?
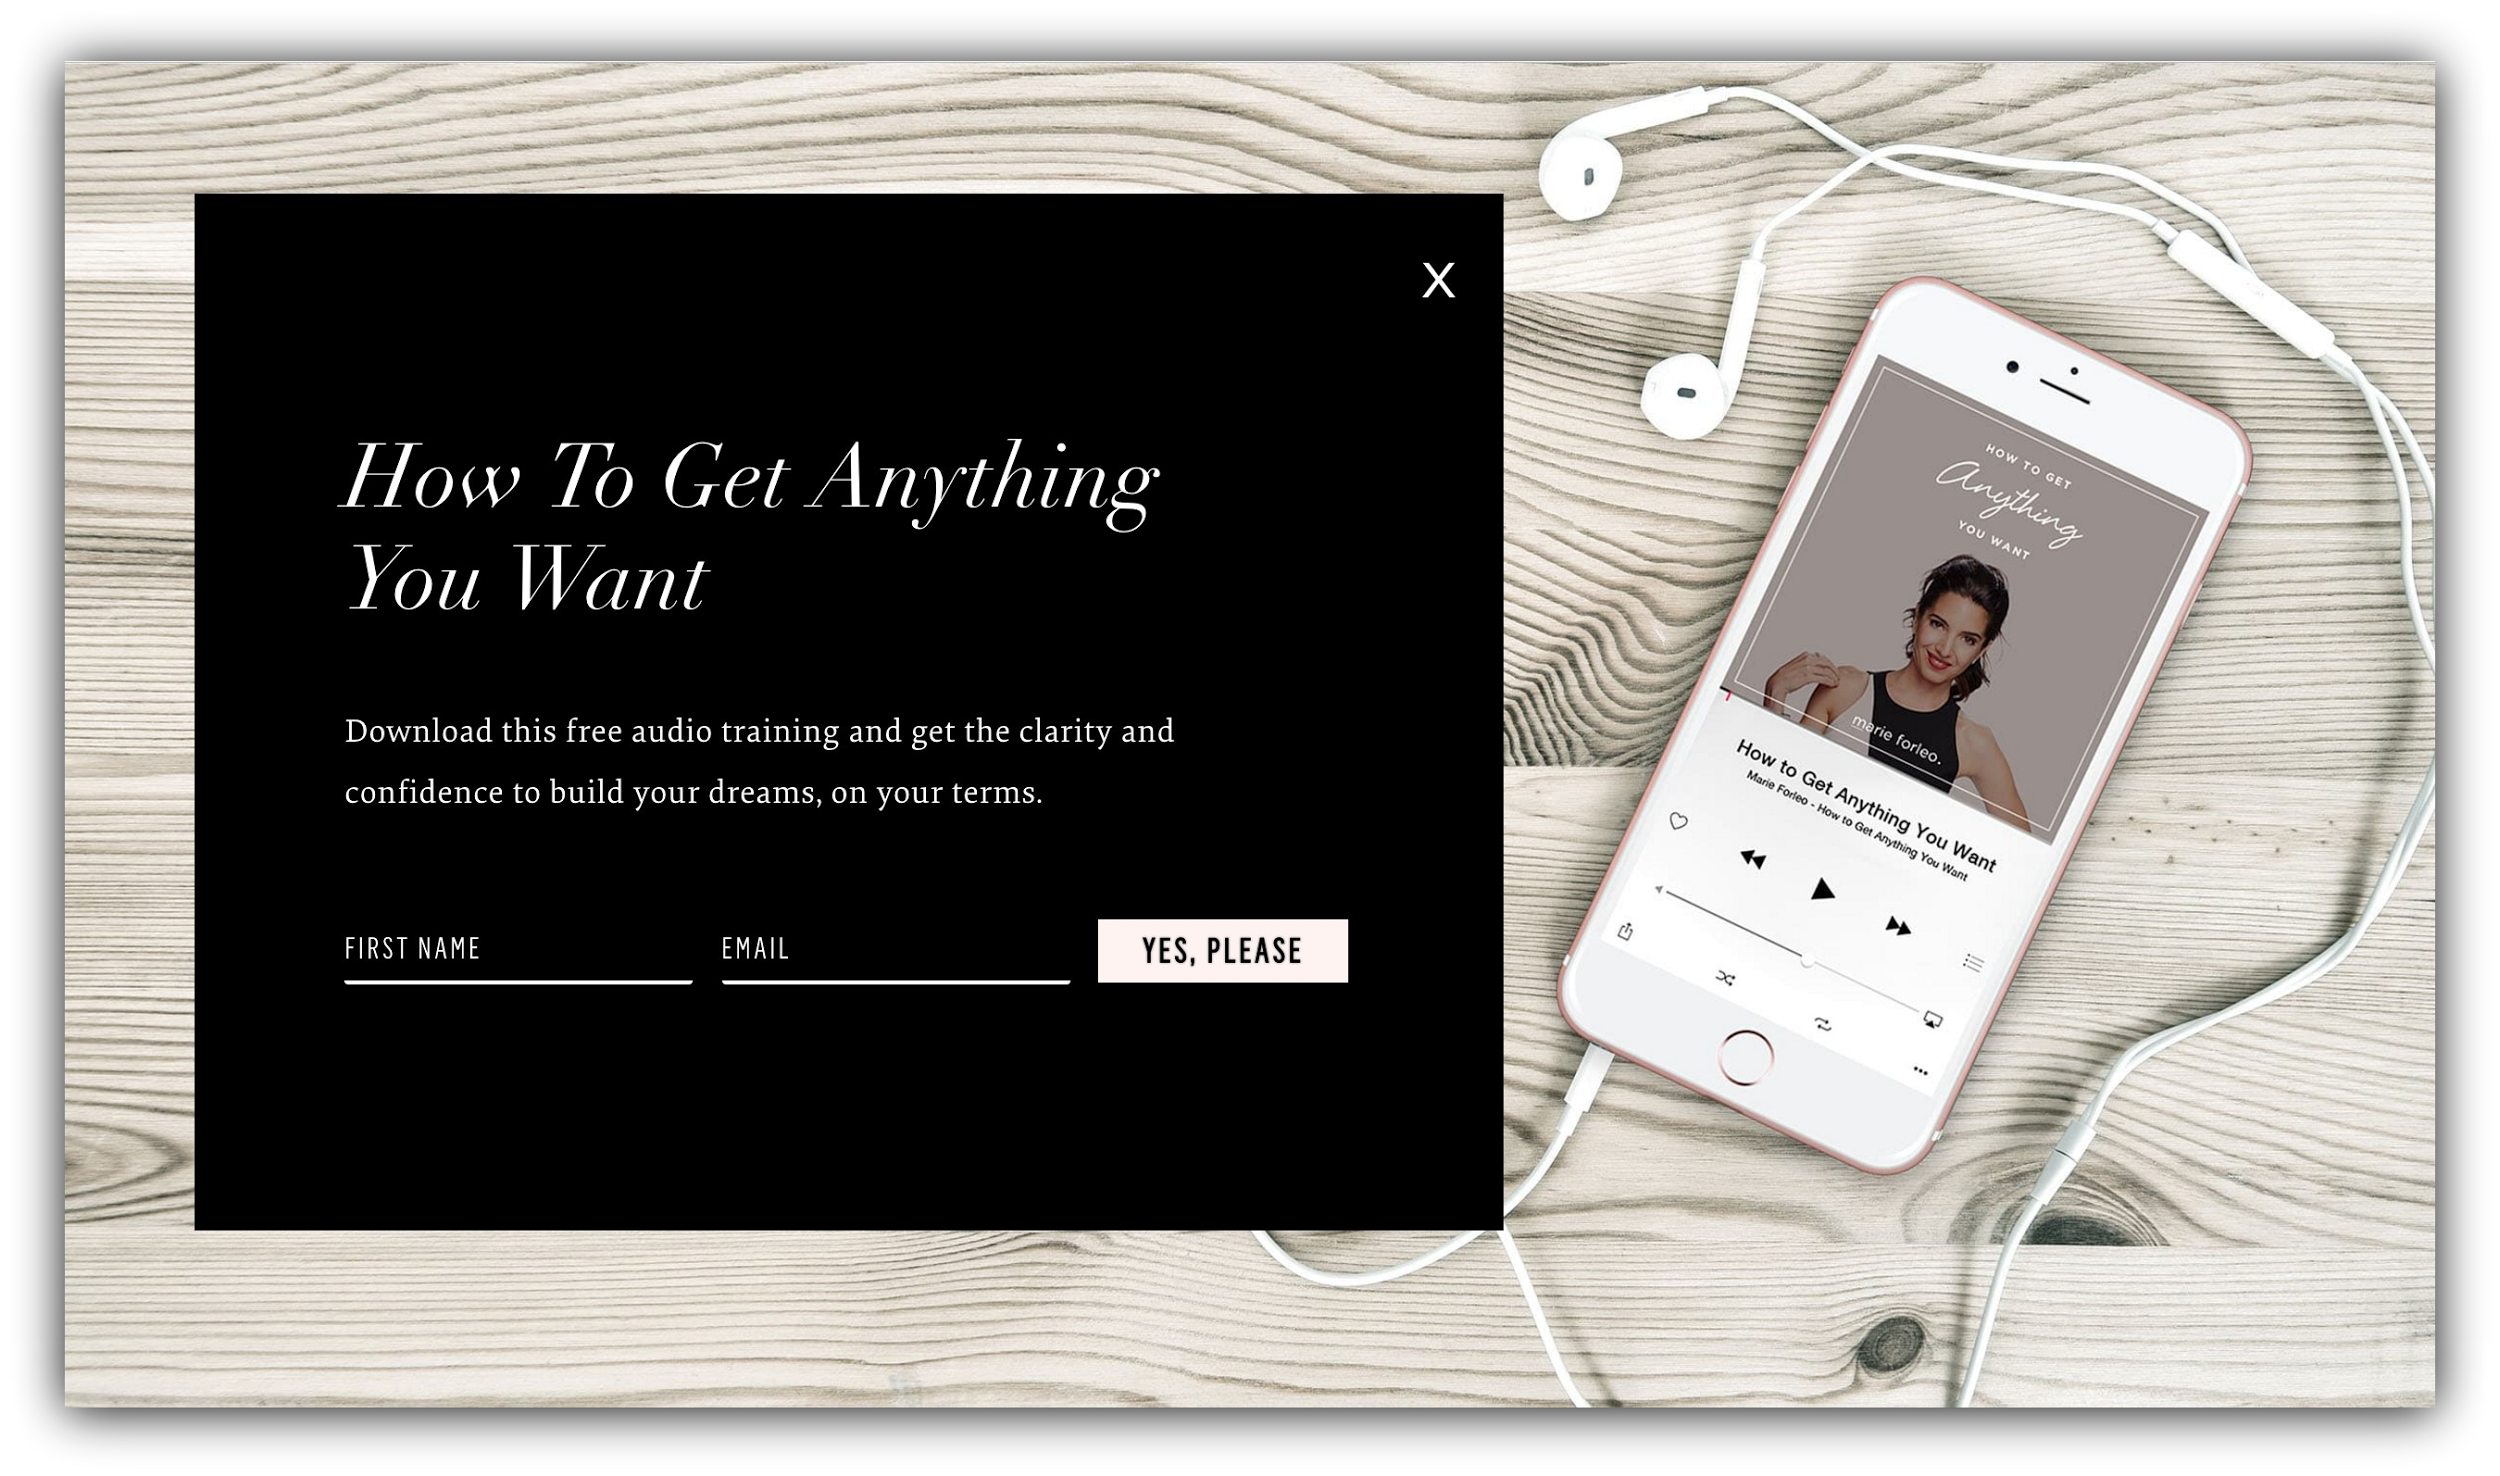
There are two ways you can make landing pages work for you. The first is to make your homepage a squeeze page, so that anybody who navigates to the main page of your site is given the option to subscribe.
Check out how Marie Forleo isolates her call to action by using a landing page on her homepage:
If you’d rather your audience land on your natural homepage rather than a squeeze page when they type in your URL, you can still harness the power of the landing page.
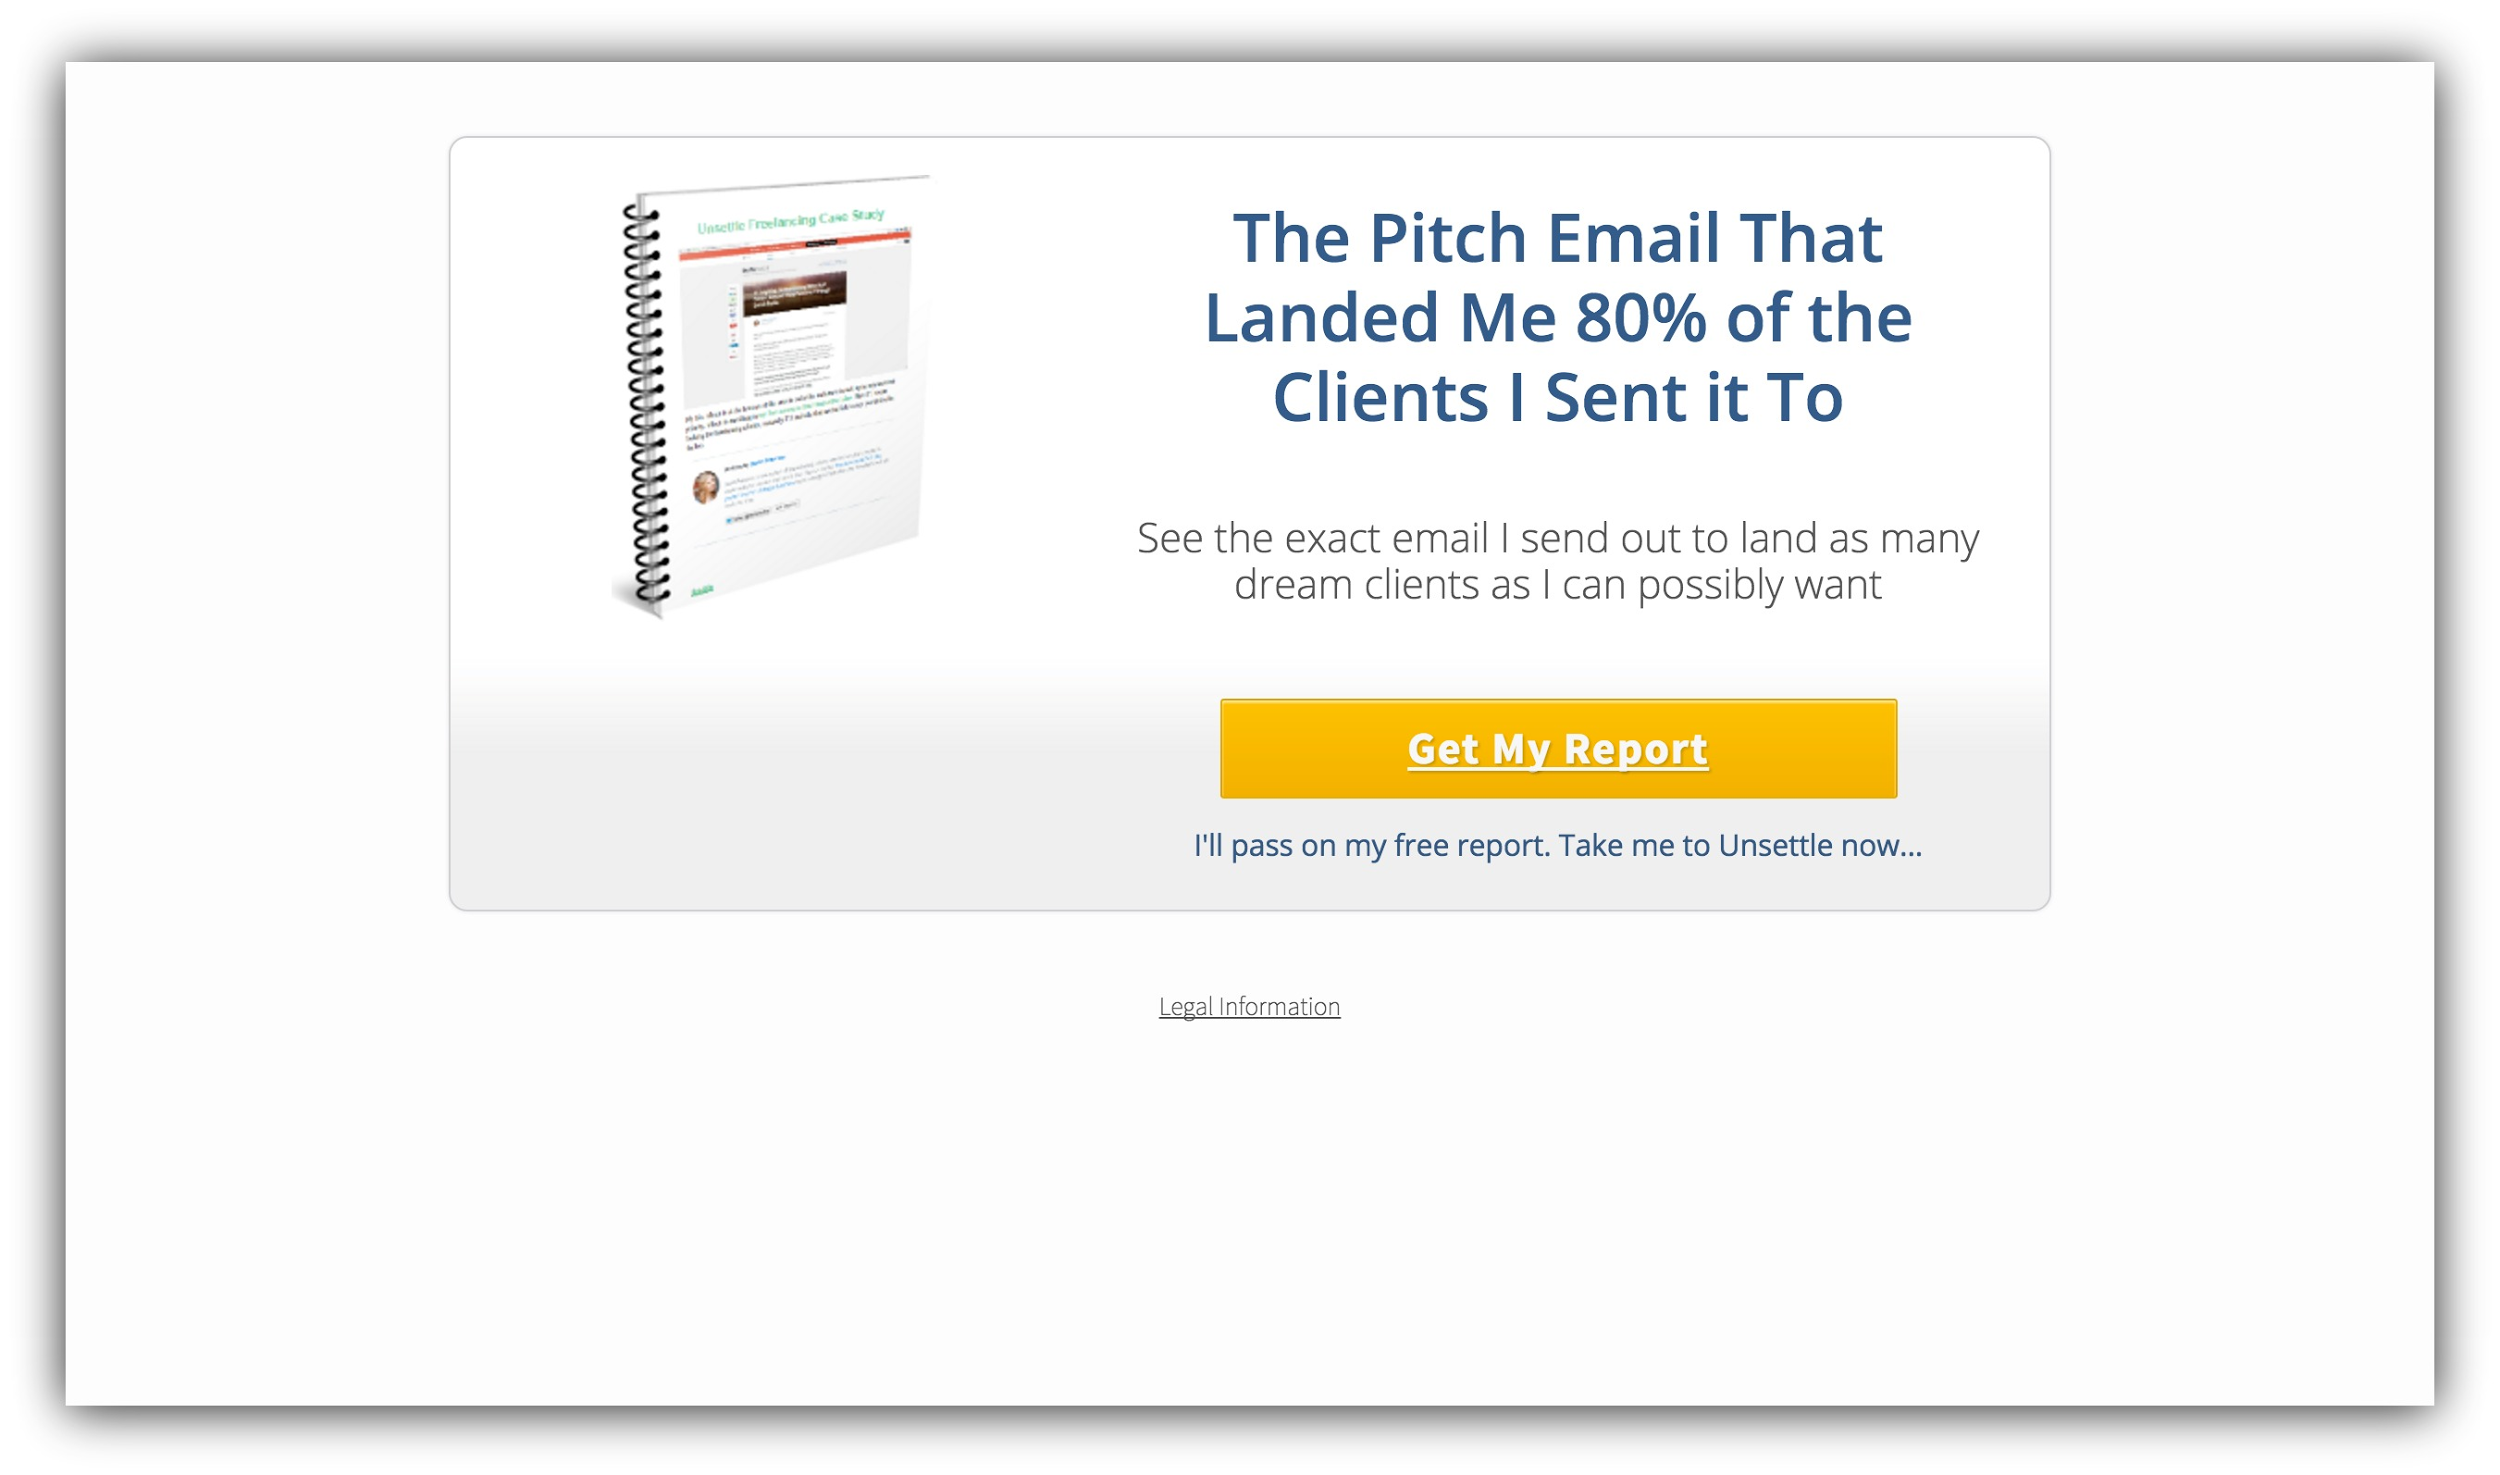
Instead of setting your homepage as a squeeze page, use a landing page as a means of offering a content upgrade, webinar, or another compelling offer for your audience in exchange for their emails.
For example, the landing page I created for a content upgrade that I offered with a guest post for Freelancer’s Union converted at over 43%:
Whether you use a landing page as your homepage or simply redirect your traffic to one for a content upgrade, this is hands down one of the highest converting opt-in opportunities available.
How to Make This Work For You:
-
Boost your opt-ins like crazy by offering something for free. If your squeeze page is set as your homepage, offer something your general audience would find irresistible. If your squeeze page is paired with a piece of content, make sure your content upgrade is enticing.
-
Pay attention to the copy you use on your landing page. You don’t need to litter it with words. Simple is better.
-
Follow this guide to the perfect landing page. Use lines of sight, action colors, and compelling headlines to craft the perfect call to action.
-
-
Tools: Most themes have the option to set a landing page as your homepage built in. You can use a paid landing page program like Unbounce or Instapage to purchase landing page templates and integrate the program with your email service provider.
Opt-in #2: The In-Content Email Capture
Expected Conversion Rate: 10-50%
Let’s say you were reading an article.
You’re really into Tim Ferriss’ Slow Carb Diet, and you’re reading about how it all works, but there’s one problem: you aren’t sure how to prepare any of the meals on the approved eating list.
You read on for a second, and lo and behold, there’s a call to action…
The website owner is giving away a free Slow Carb recipe eBook in exchange for your email. The perfect solution to your problem.
You’d definitely give up your email address for something that solves the problem you’re experiencing, right? That’s what makes the in-content opt-in so effective.
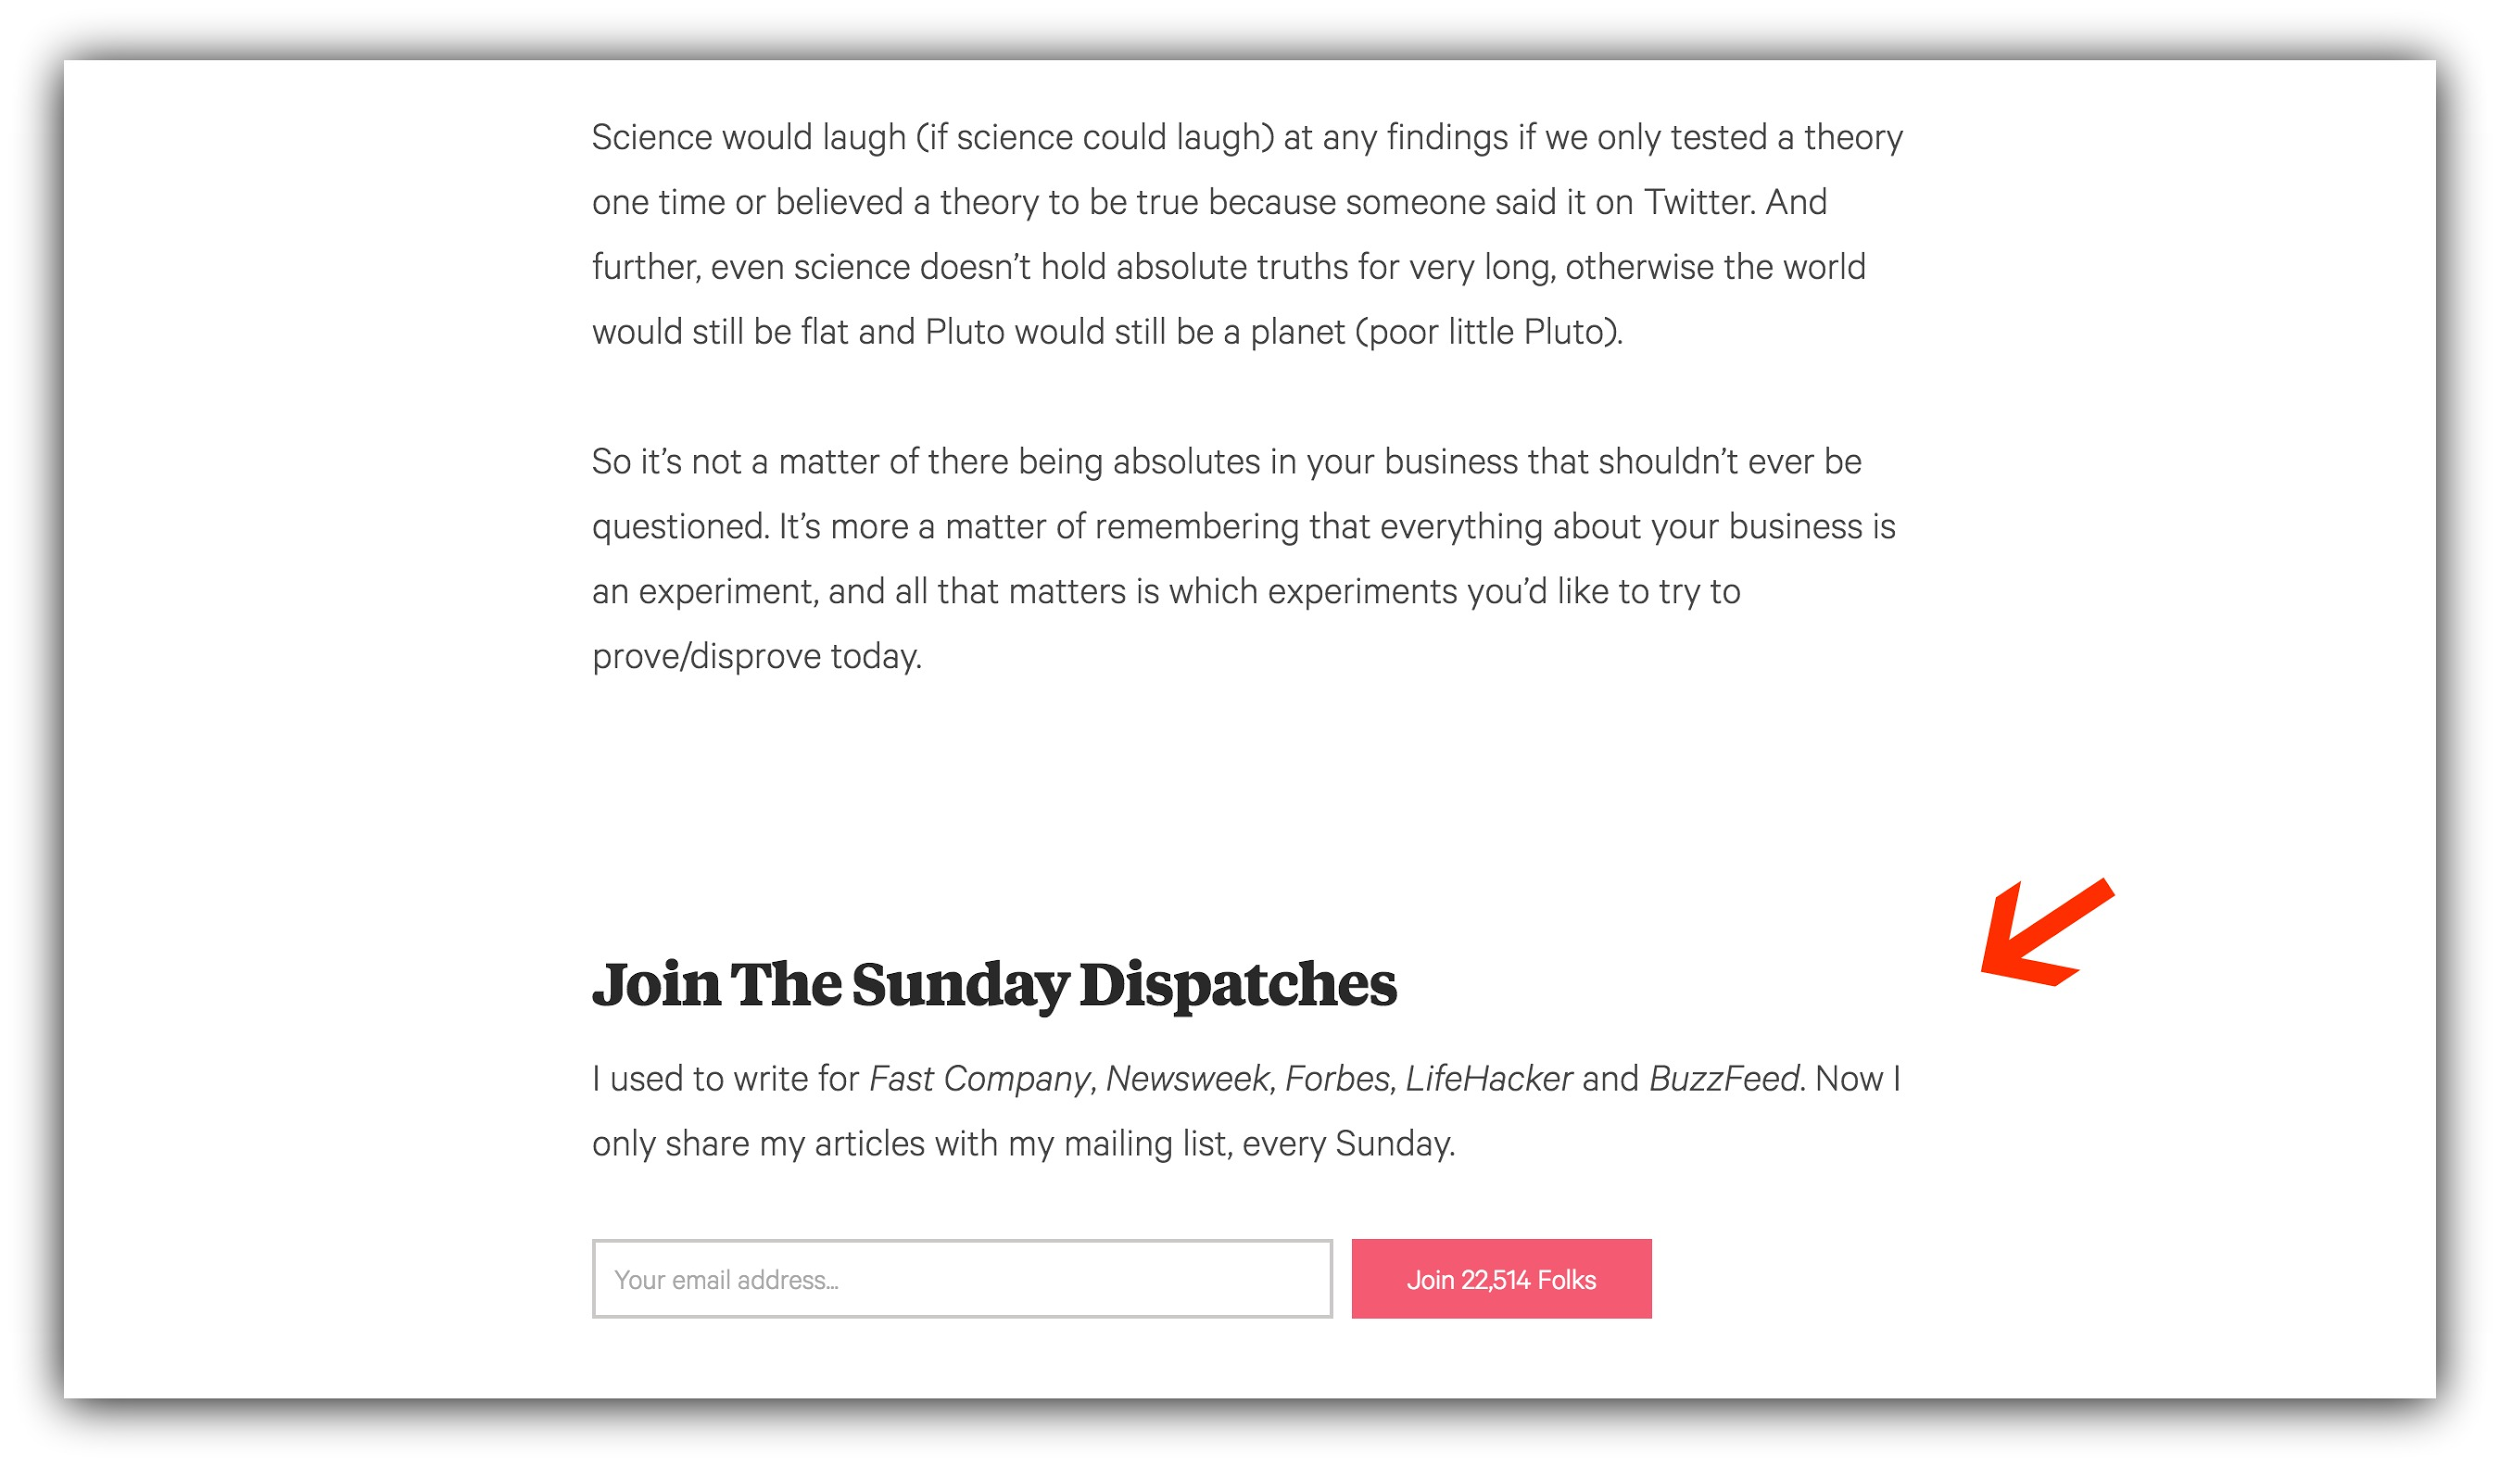
There are several places in your content you can put this type of call to action. For example, you can place an opt-in form at the end of your content in a signup form like Paul Jarvis:
In a blurb like Leo Babauta:
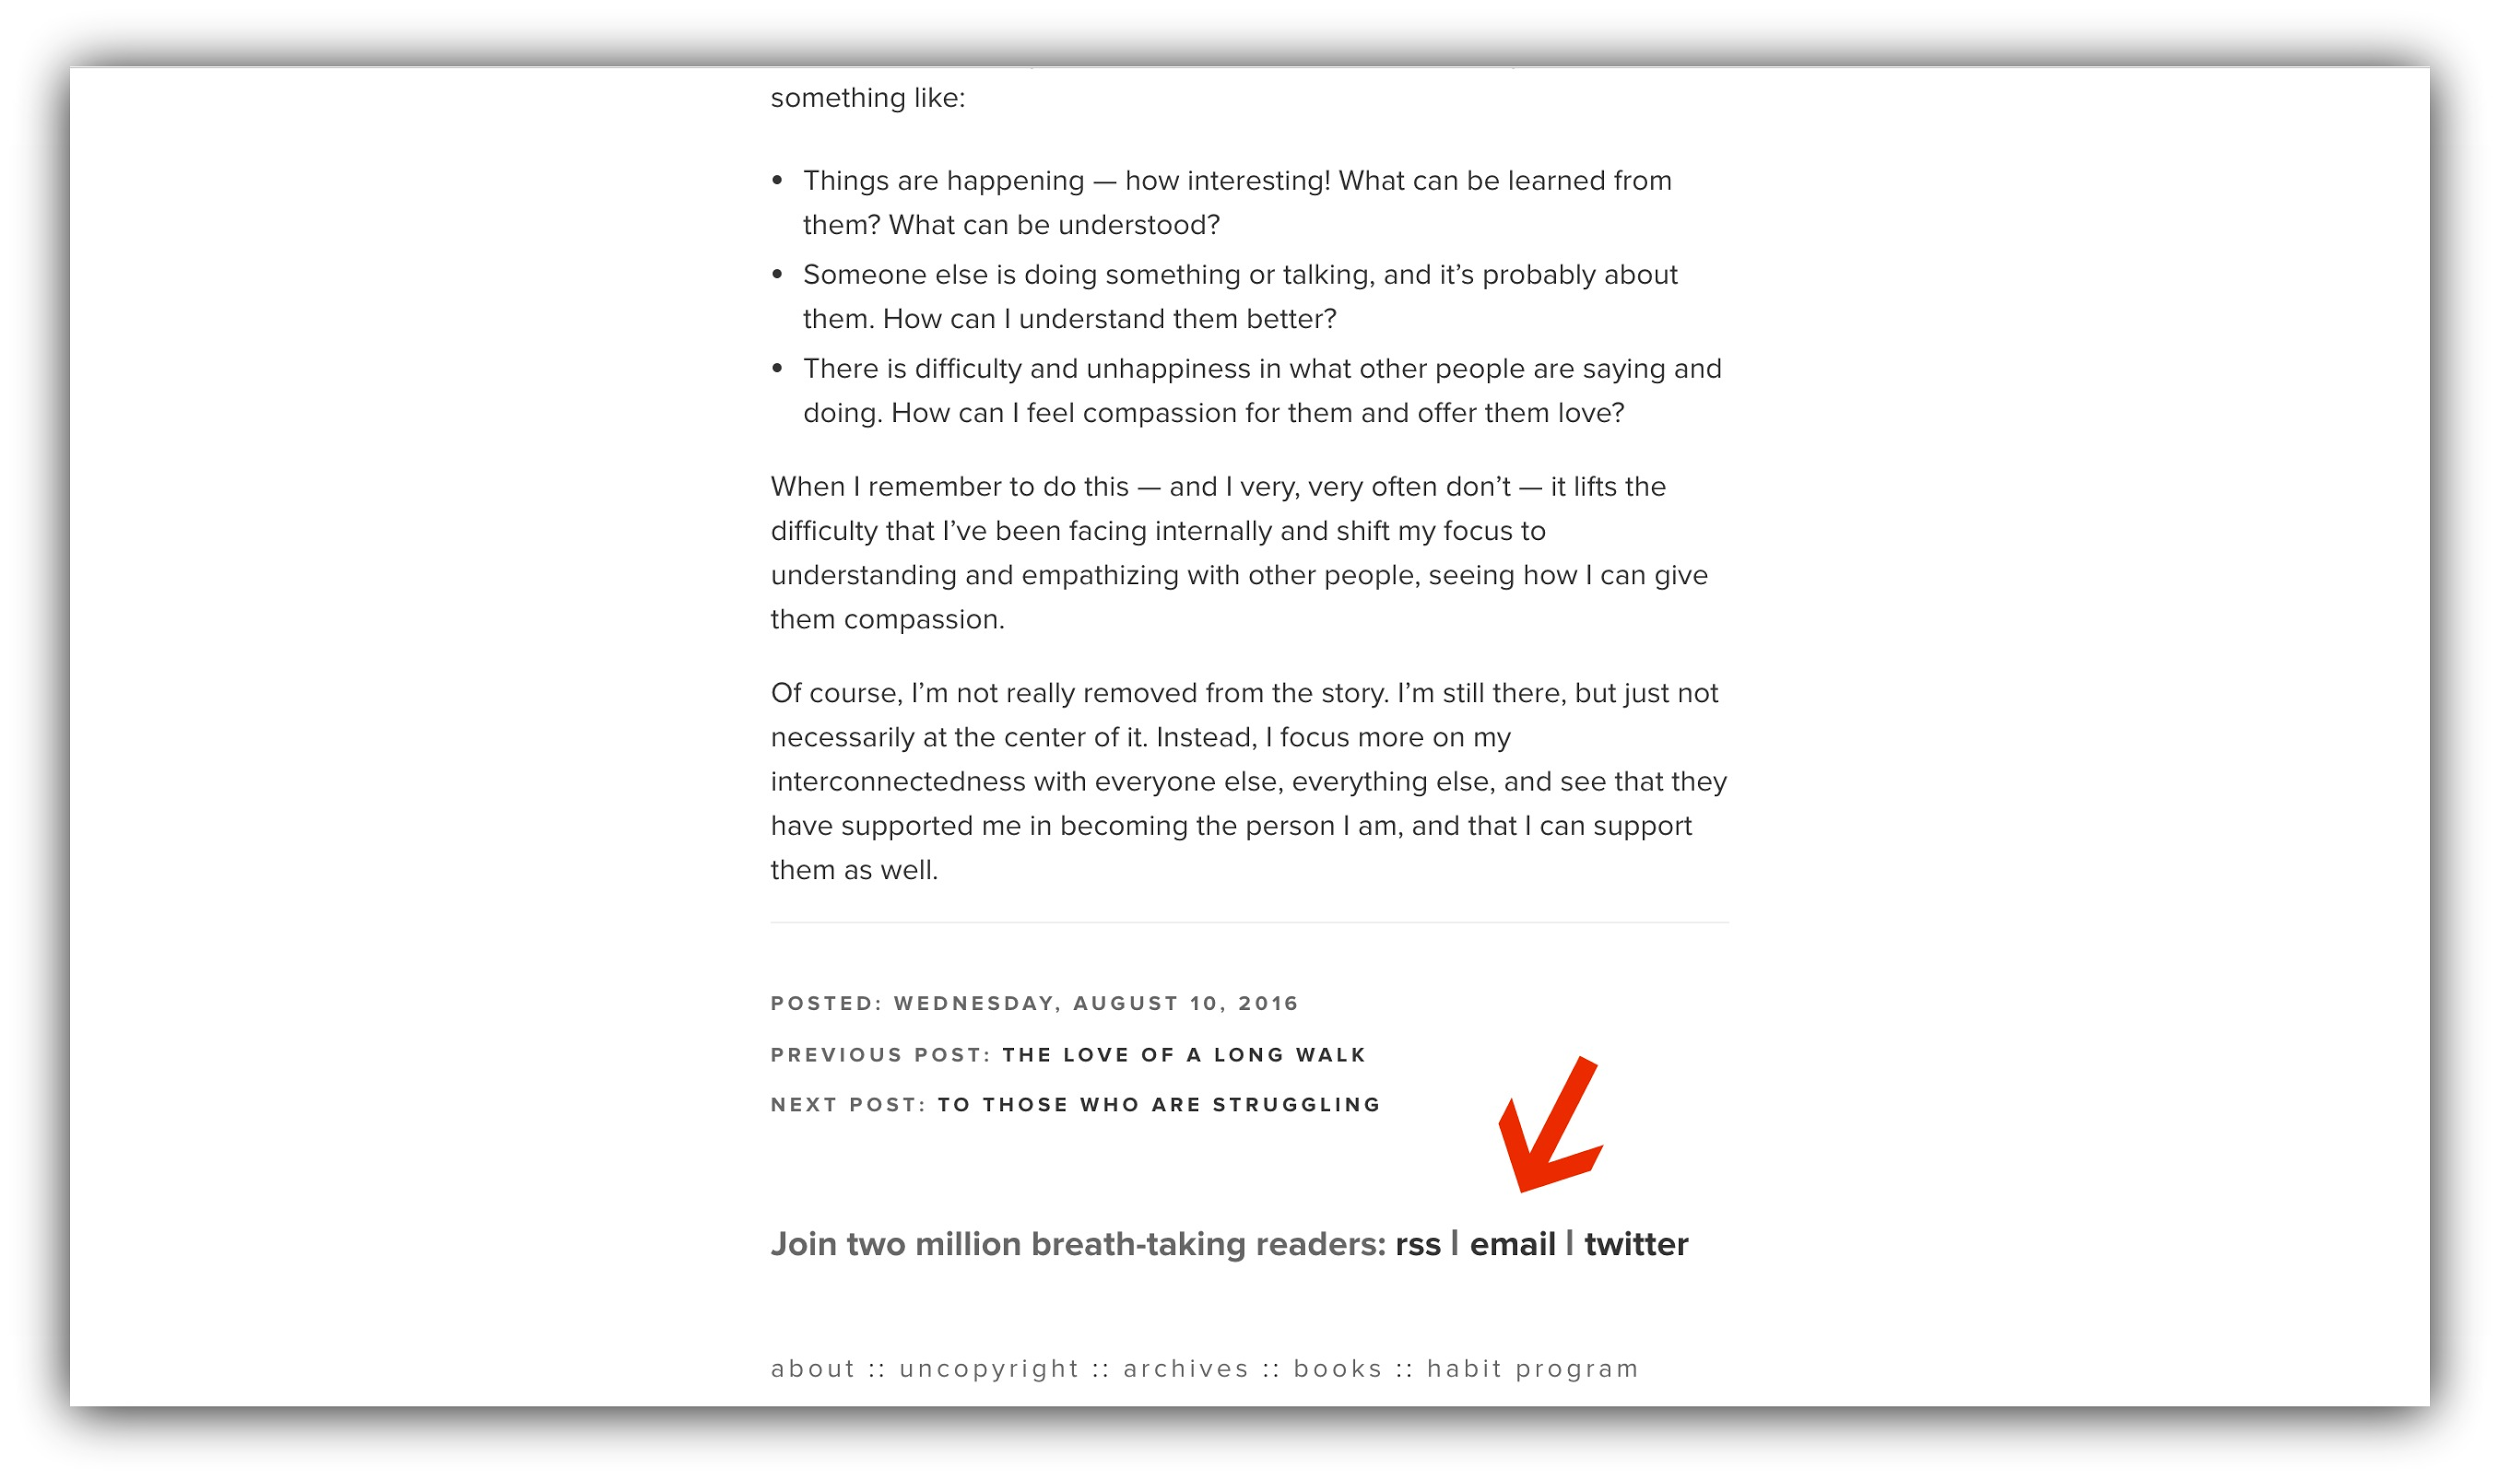
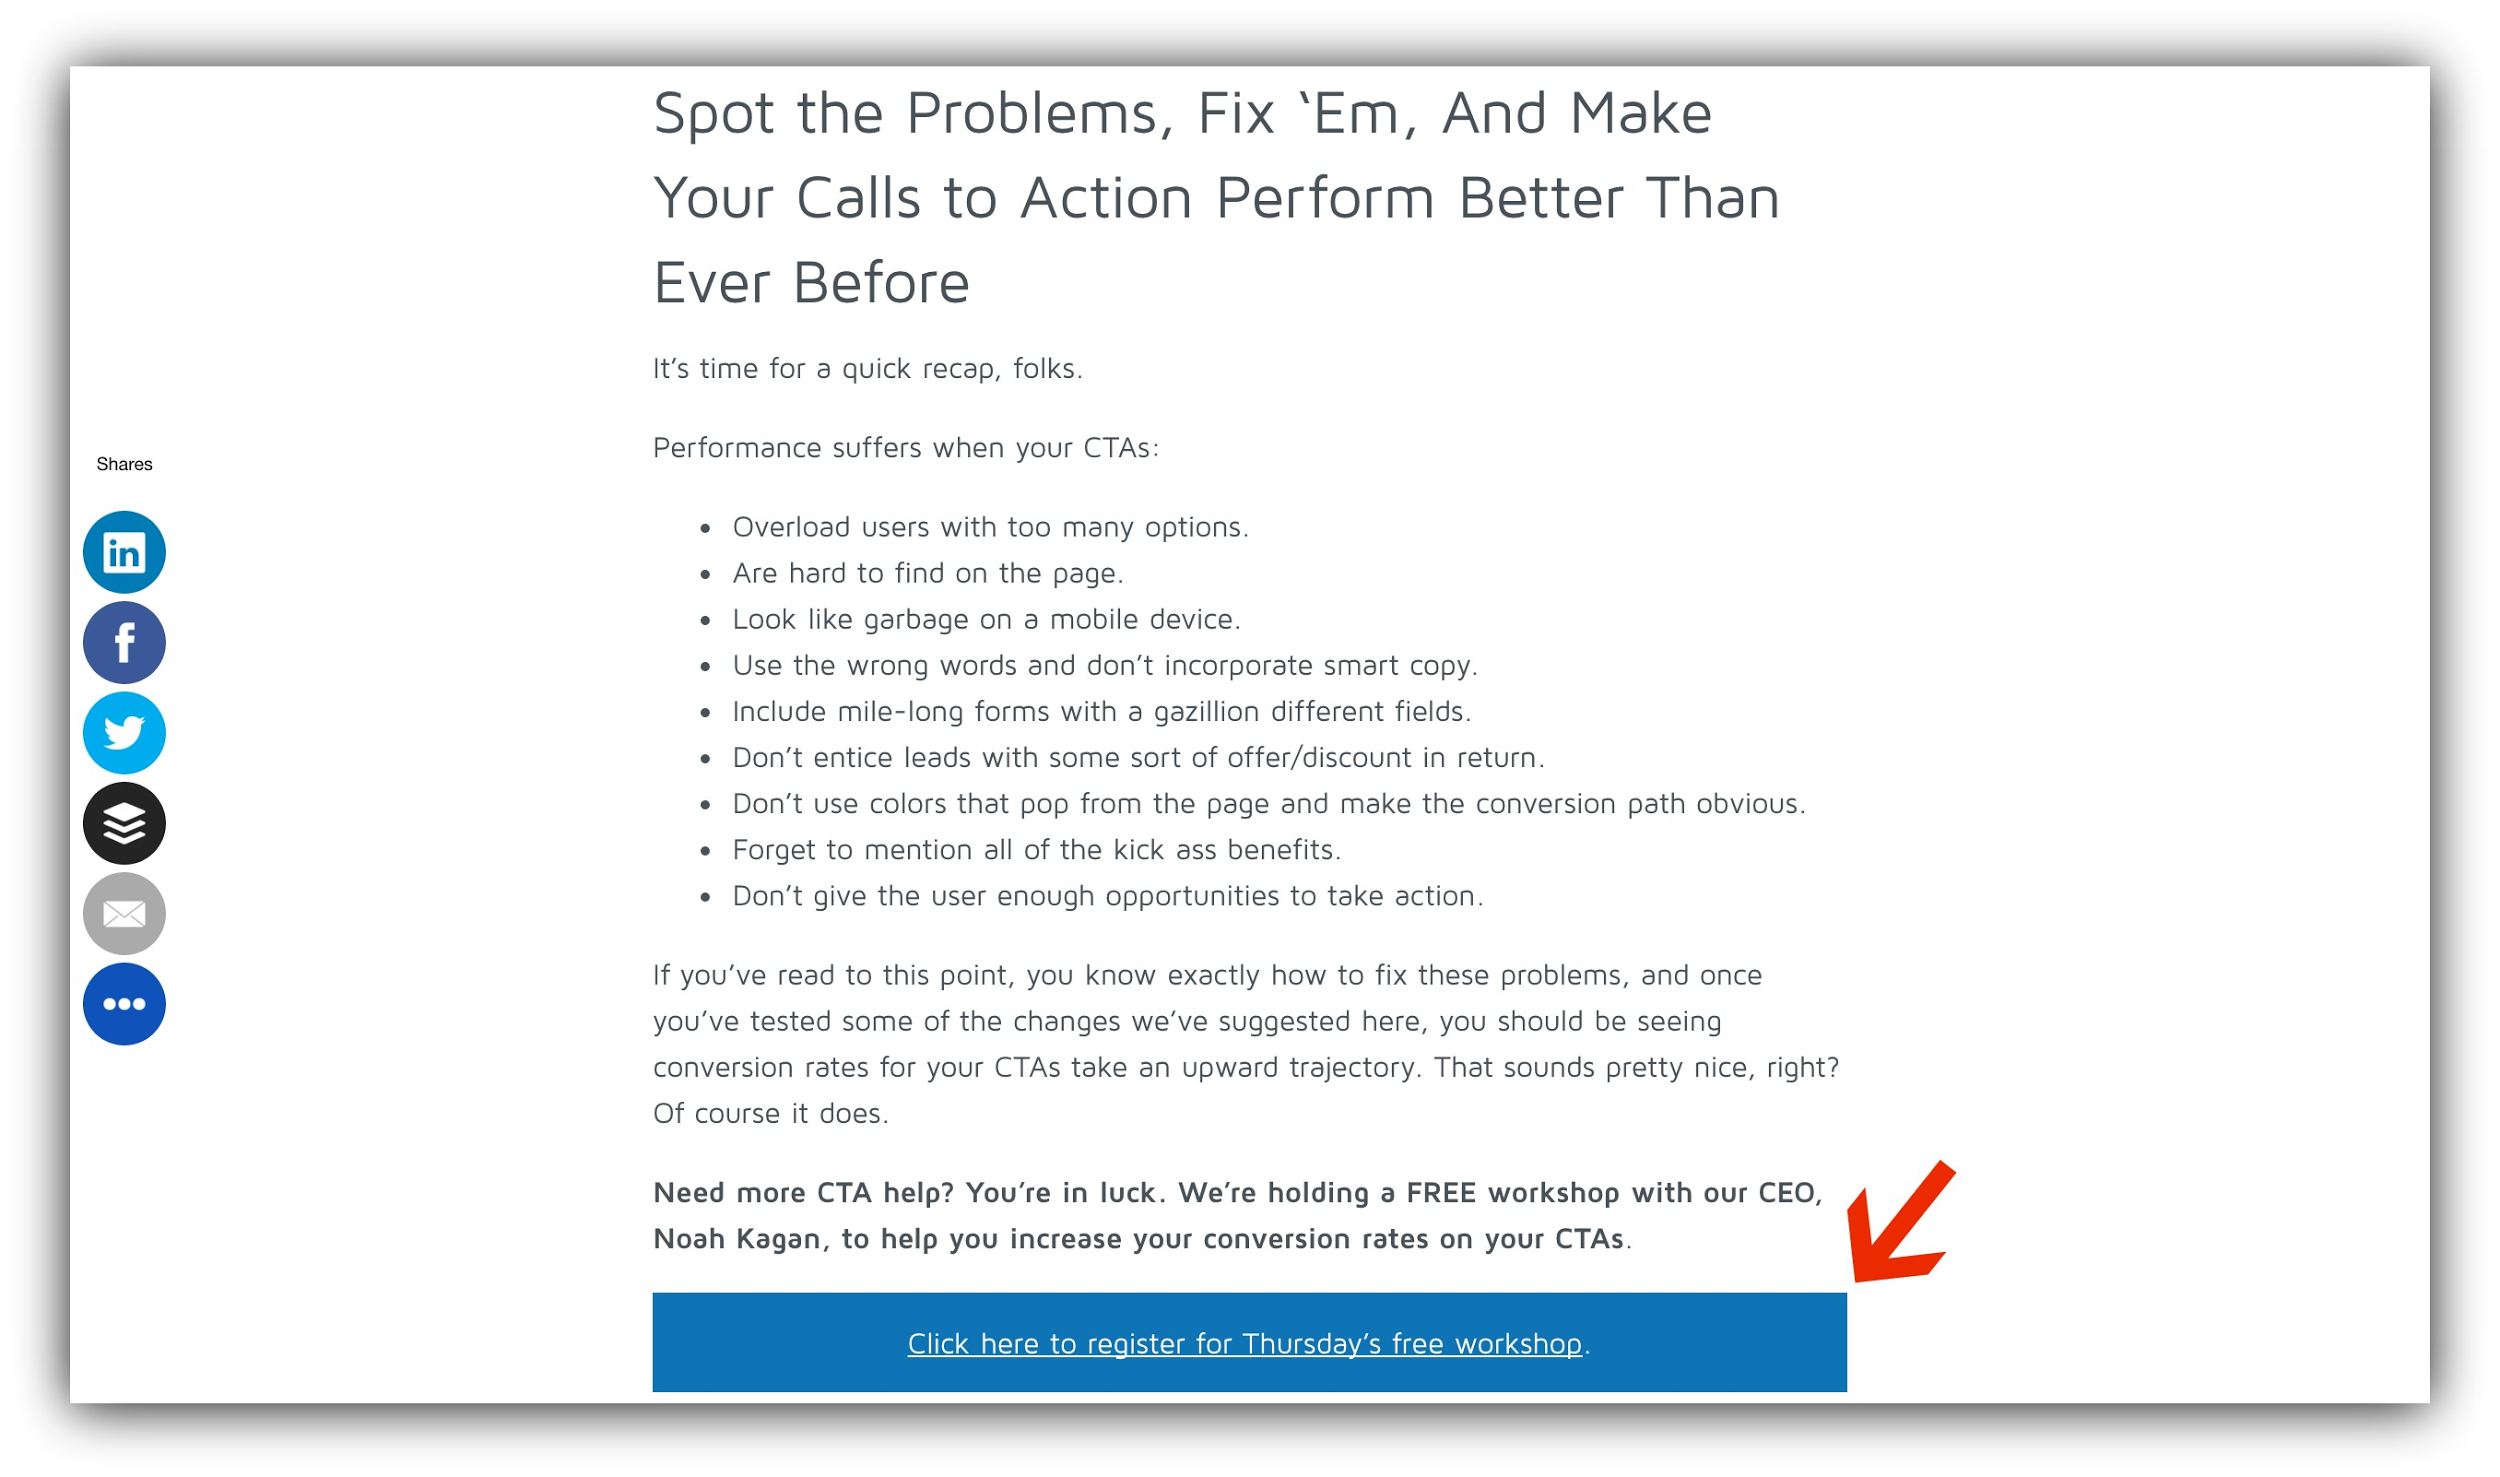
With a 2-step opt-in form like we do with almost all of our guides:
Or even in an in-content menu option at the beginning of your articles or podcast episodes:
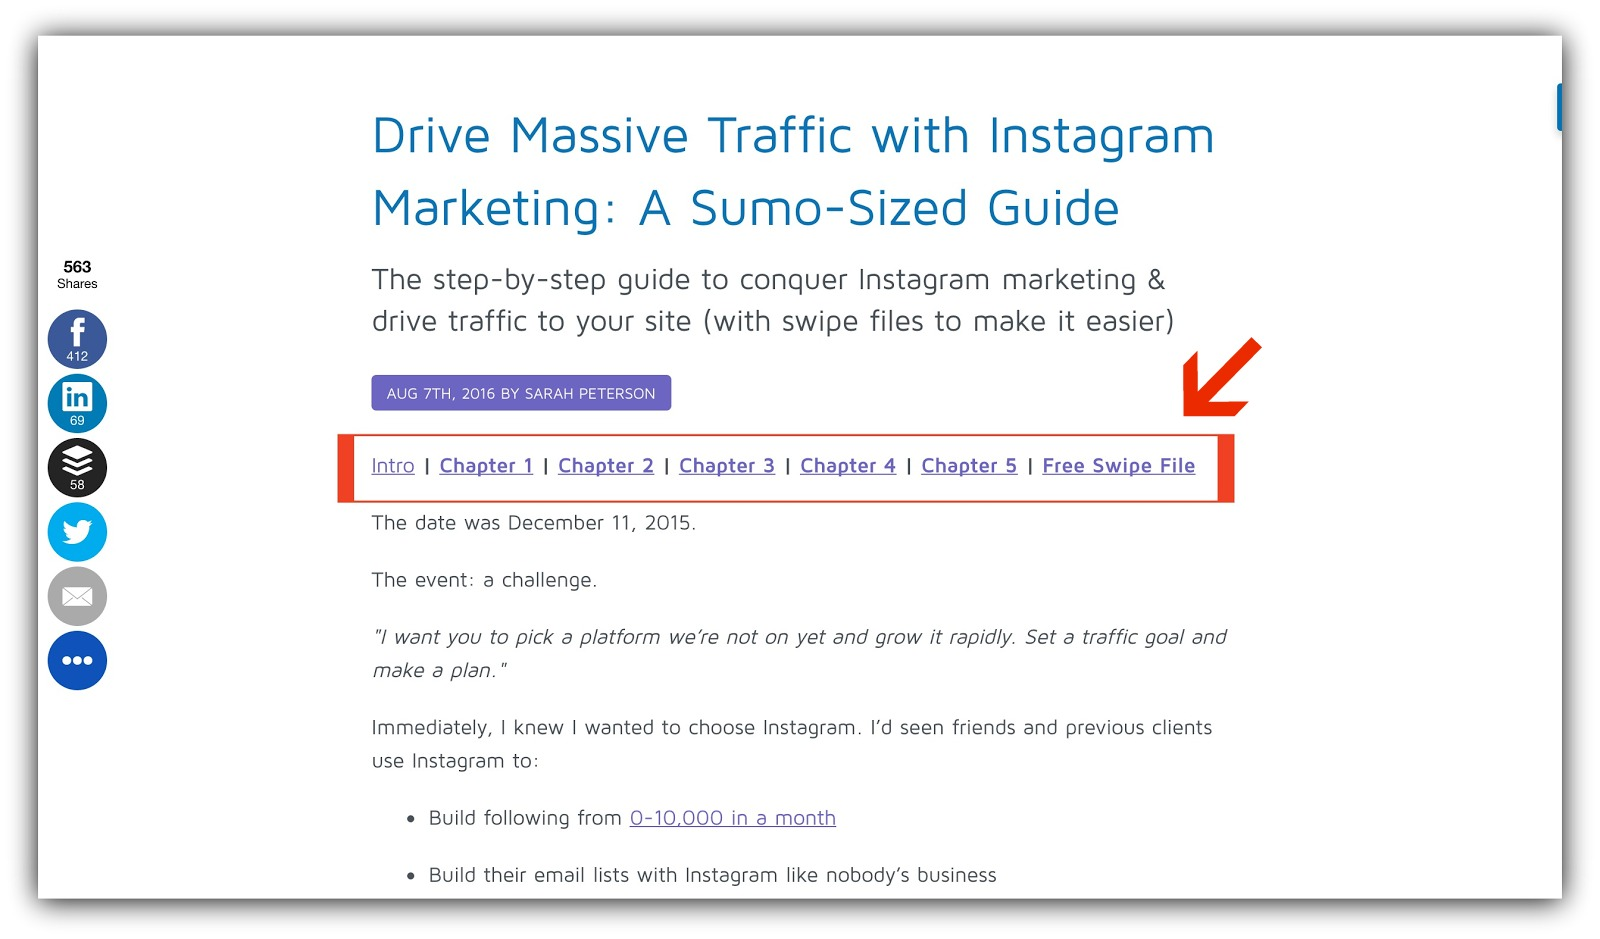
We’ve done this a few times, for a cool 73% conversion rate:

Regardless of where you put the call to action within your content, you’ll find that this opt-in form will help you collect loads of emails.
How to Make This Work For You:
-
In content opt-ins are uber-effective, but they’re made even more effective with a two step opt-in. This is when you place a link, image or button in your content for the user to click, triggering a pop-up. Since your visitor is actually asking for the pop-up, they’re far more likely to convert.
-
Integrate the call to action in with the rest of the content seamlessly. You don’t want your call to action to interrupt the reader’s flow, but compliment it.
-
Pair this with a content upgrade specific to the piece of content. This will help the reader stay engaged with the content while also adding extra value.
-
-
Tools: For a two step opt-in, set up a pop-up in List Builder, and make whichever image or text you choose a Click Trigger. Your email service provider should have embeddable forms if you want to include the form directly in your content.
Opt-In #3: Product Page Calls to Action
Expected Conversion Rate: 10-20%
The other day, I was looking for a new pair of ankle booties. A staple in every woman’s wardrobe, ammirite?
So I was perusing a handful of stores I tend to frequent online, and found a pair that fit the bill. I clicked onto the page, and there, under the product description to the right of the image of the booties, there was a call to action.
The store was offering up a discount in exchange for my email address.

Suddenly those booties looked a lot more appealing – so not only did this store land the sale, but they also get access to my inbox.
So that’s why this opt-in opportunity is so effective if executed properly. Throw up some calls to action on your product pages and rake in the emails.
How to Make This Work For You:
-
Pair your opt-in opportunity with the offer of a discount or free shipping to also increase your browser to sale conversion rate.
-
Reduce cart abandonment substantially and increase your conversion rate by putting a pop-up with your discount offer in front of your customers right before they click away from the product. Use List Builder to do so.
-
Throw up a countdown timer to build some scarcity into your offer for even higher conversion rates. Boom!
-
-
Tools: Use List Builder to create an exit intent pop-up. Put it in Smart Mode to let Sumo determine when the visitor is about to click away from the page to re-engage the visitor:
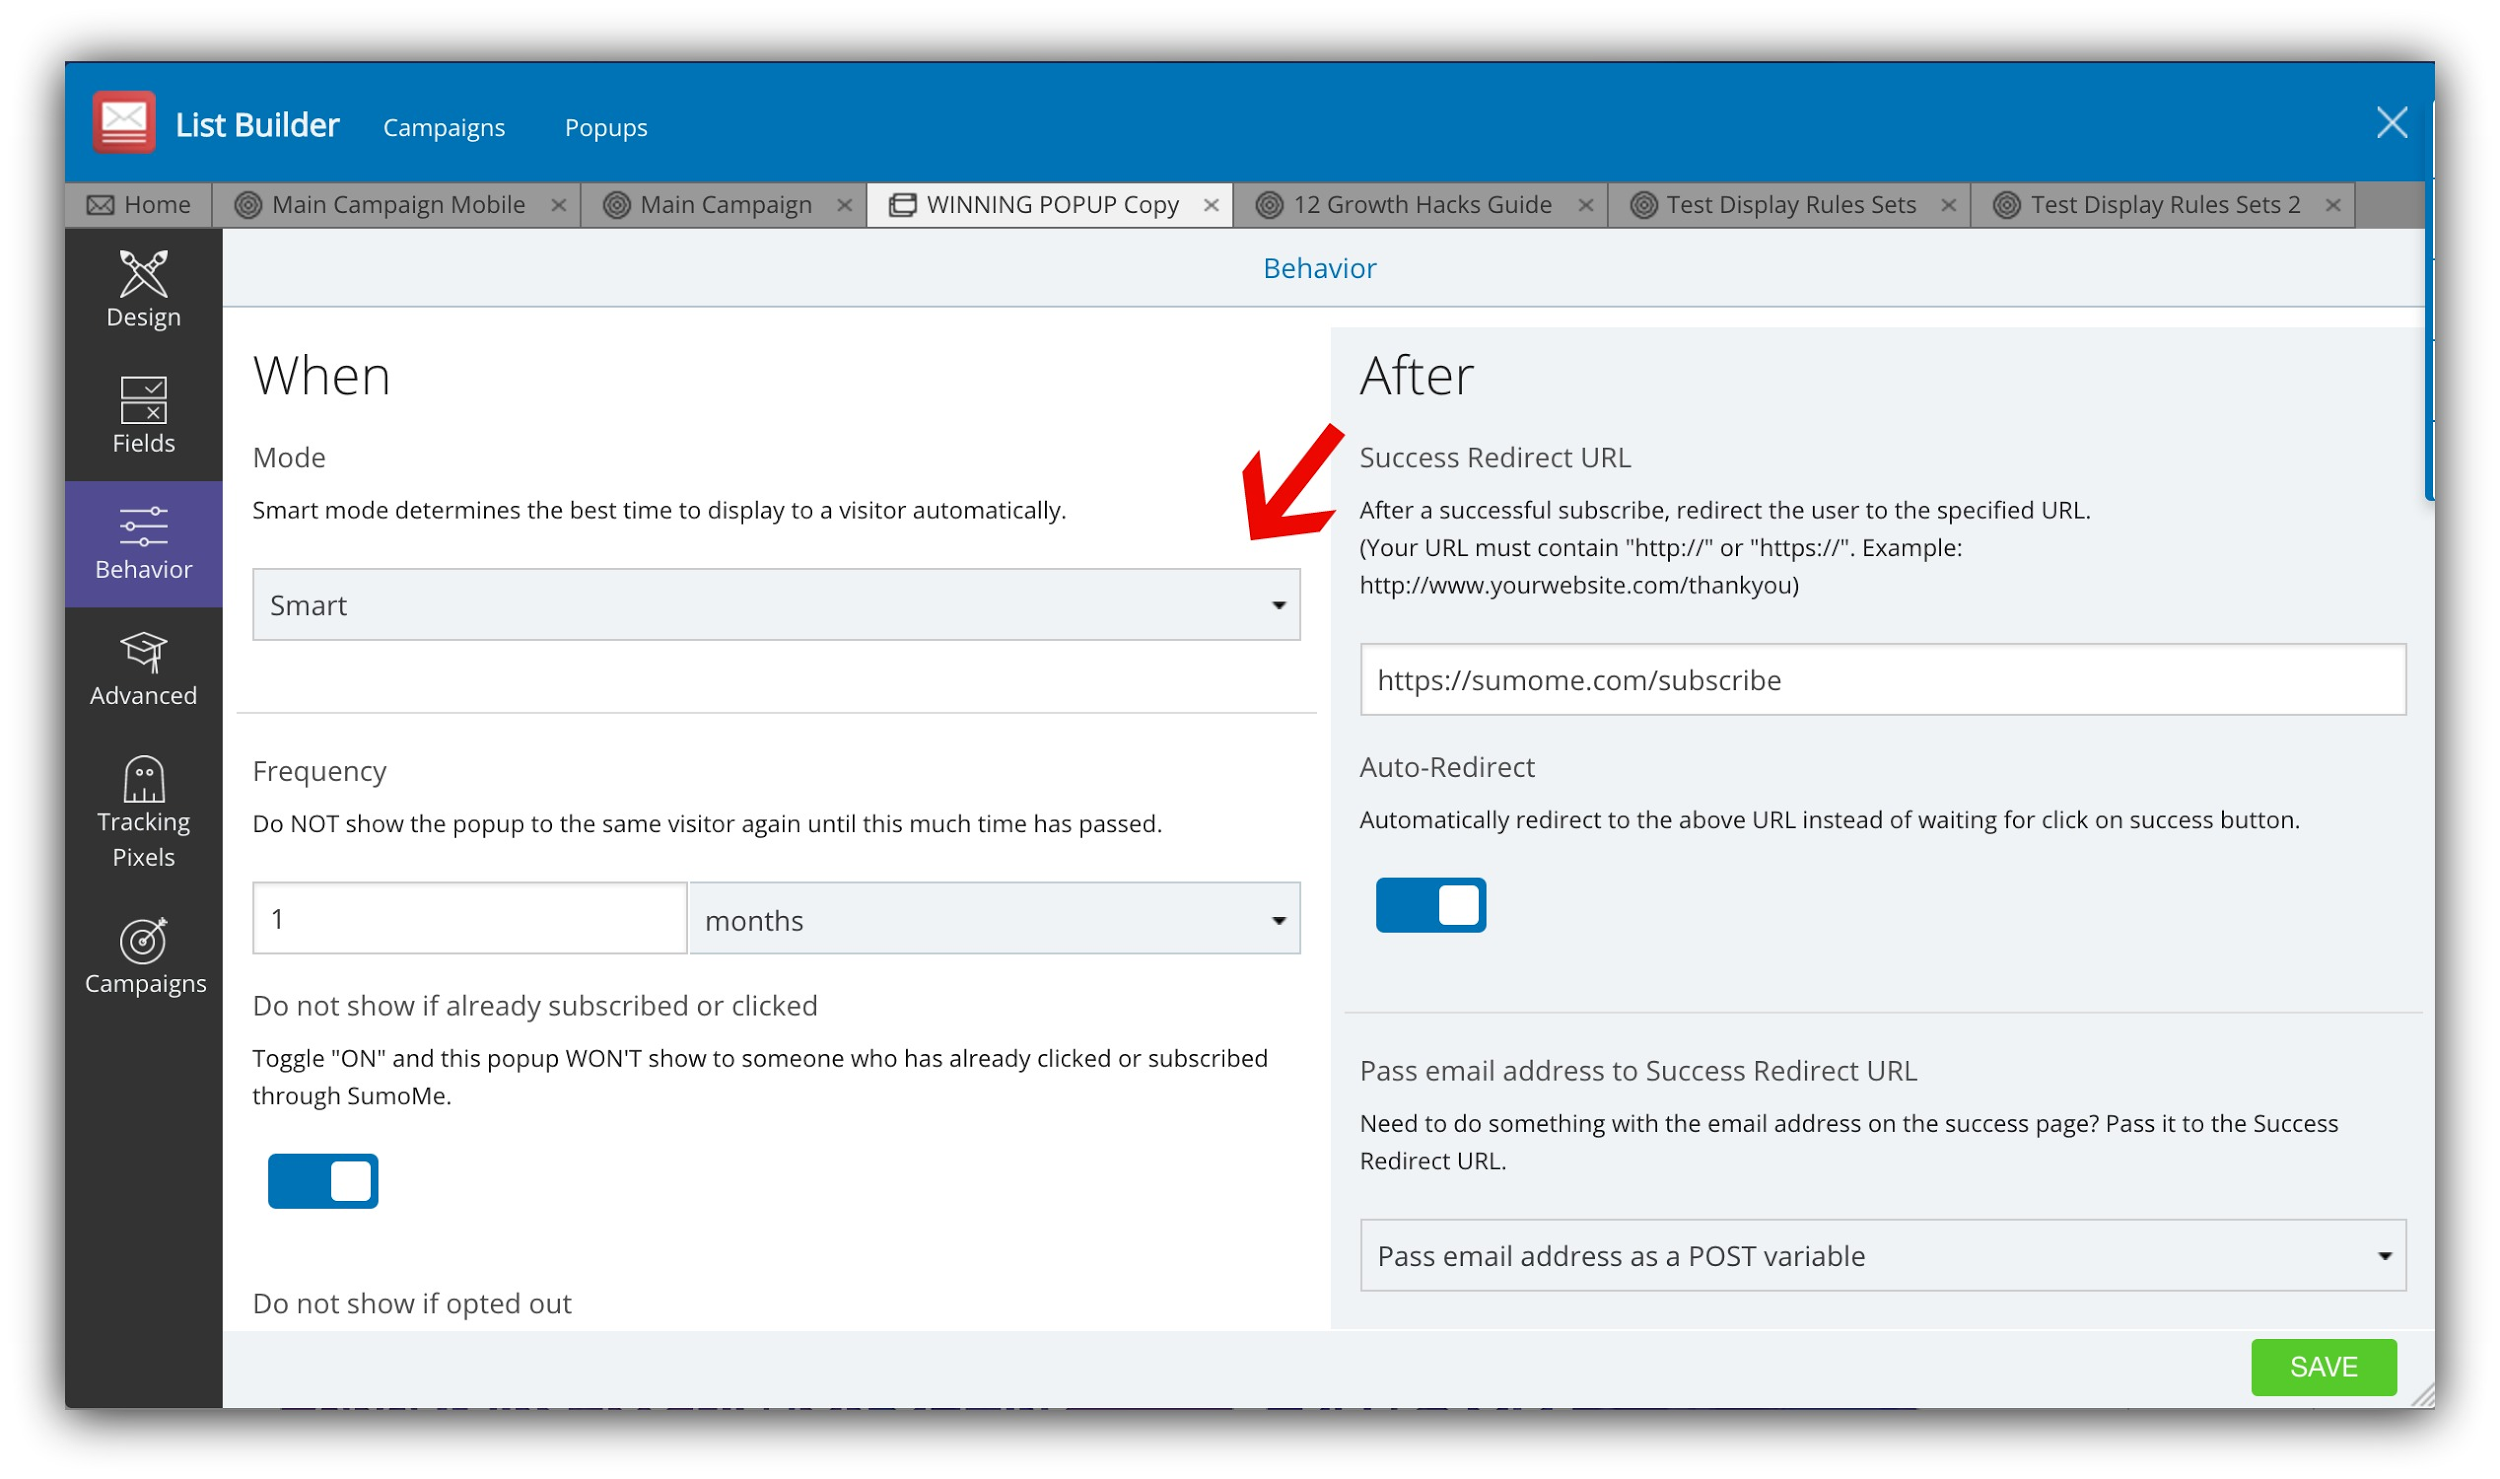
Set the display rules to only show on product pages. Use your email service provider’s embeddable opt-in form if you want a form. You can embed this in the HTML of your site. Because these are less eye catching than a pop-up, make sure your form is above the fold and uses bright, eye catching colors.
Opt-In #4: A Link as a Menu Option
Expected Conversion Rate: 10-20%
Ever look at a heat map?
Probably not. Unless you’re a marketing geek like me, they look rather boring.
But just like babies, they’re far more interesting when they’re your own. And one thing that I’ve found after looking at hundreds of heat maps over hundreds of websites is this:
Menus get a lot of attention.
My personal blog’s menu is lit up like the fourth of July according to my heat map:
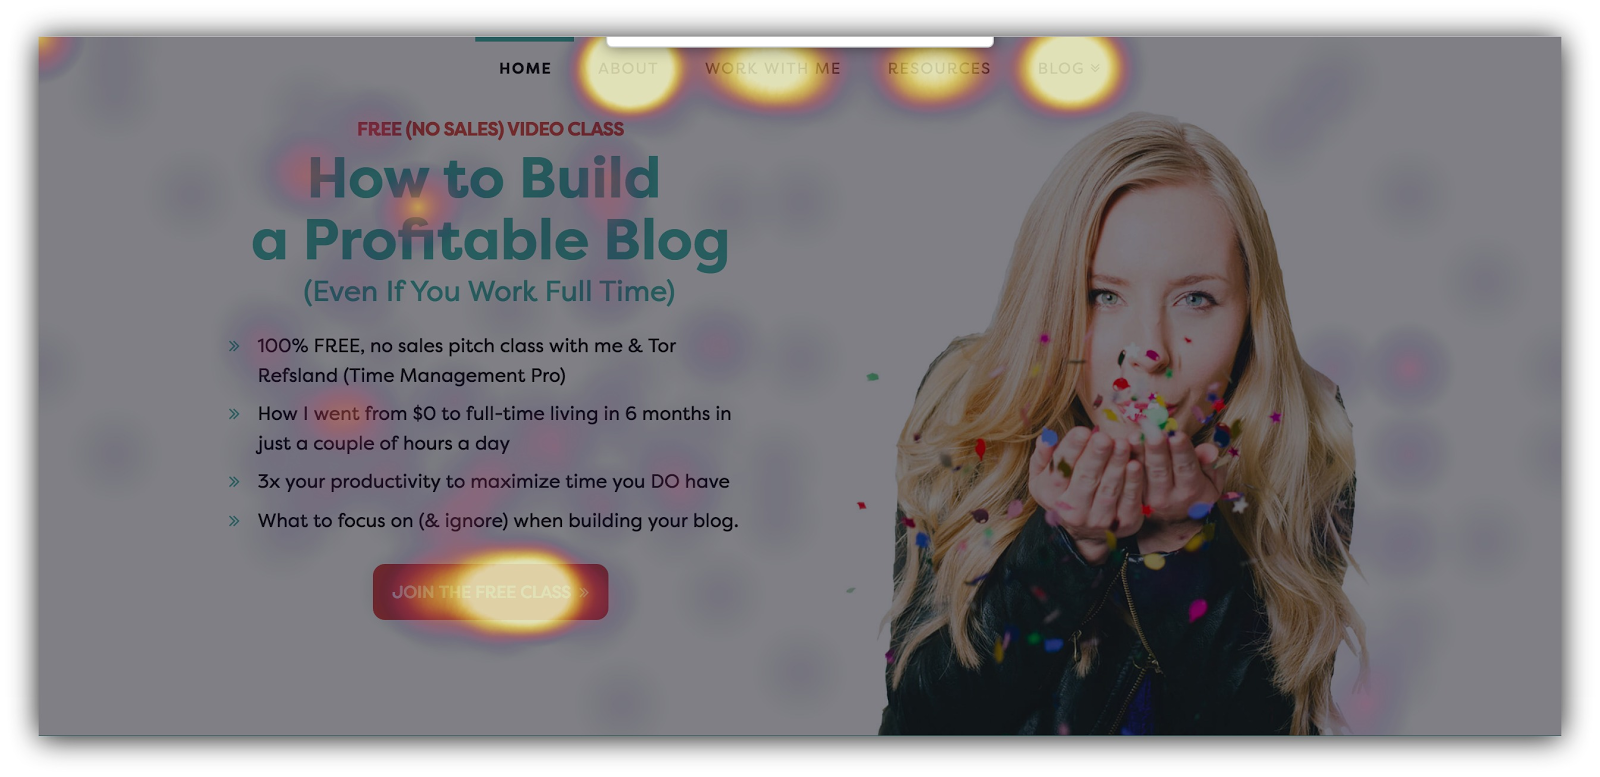
And I bet that if you were to run a heat map on your home page, you’d see something similar.
People are drawn to menus. They are, after all, universally the one thing that helps you navigate a website. So that’s why this opt-in opportunity is effective: you harness the attention that your menu is already getting by placing an opt-in CTA there.
Take a look at how Derek Halpern from Social Triggers does this:
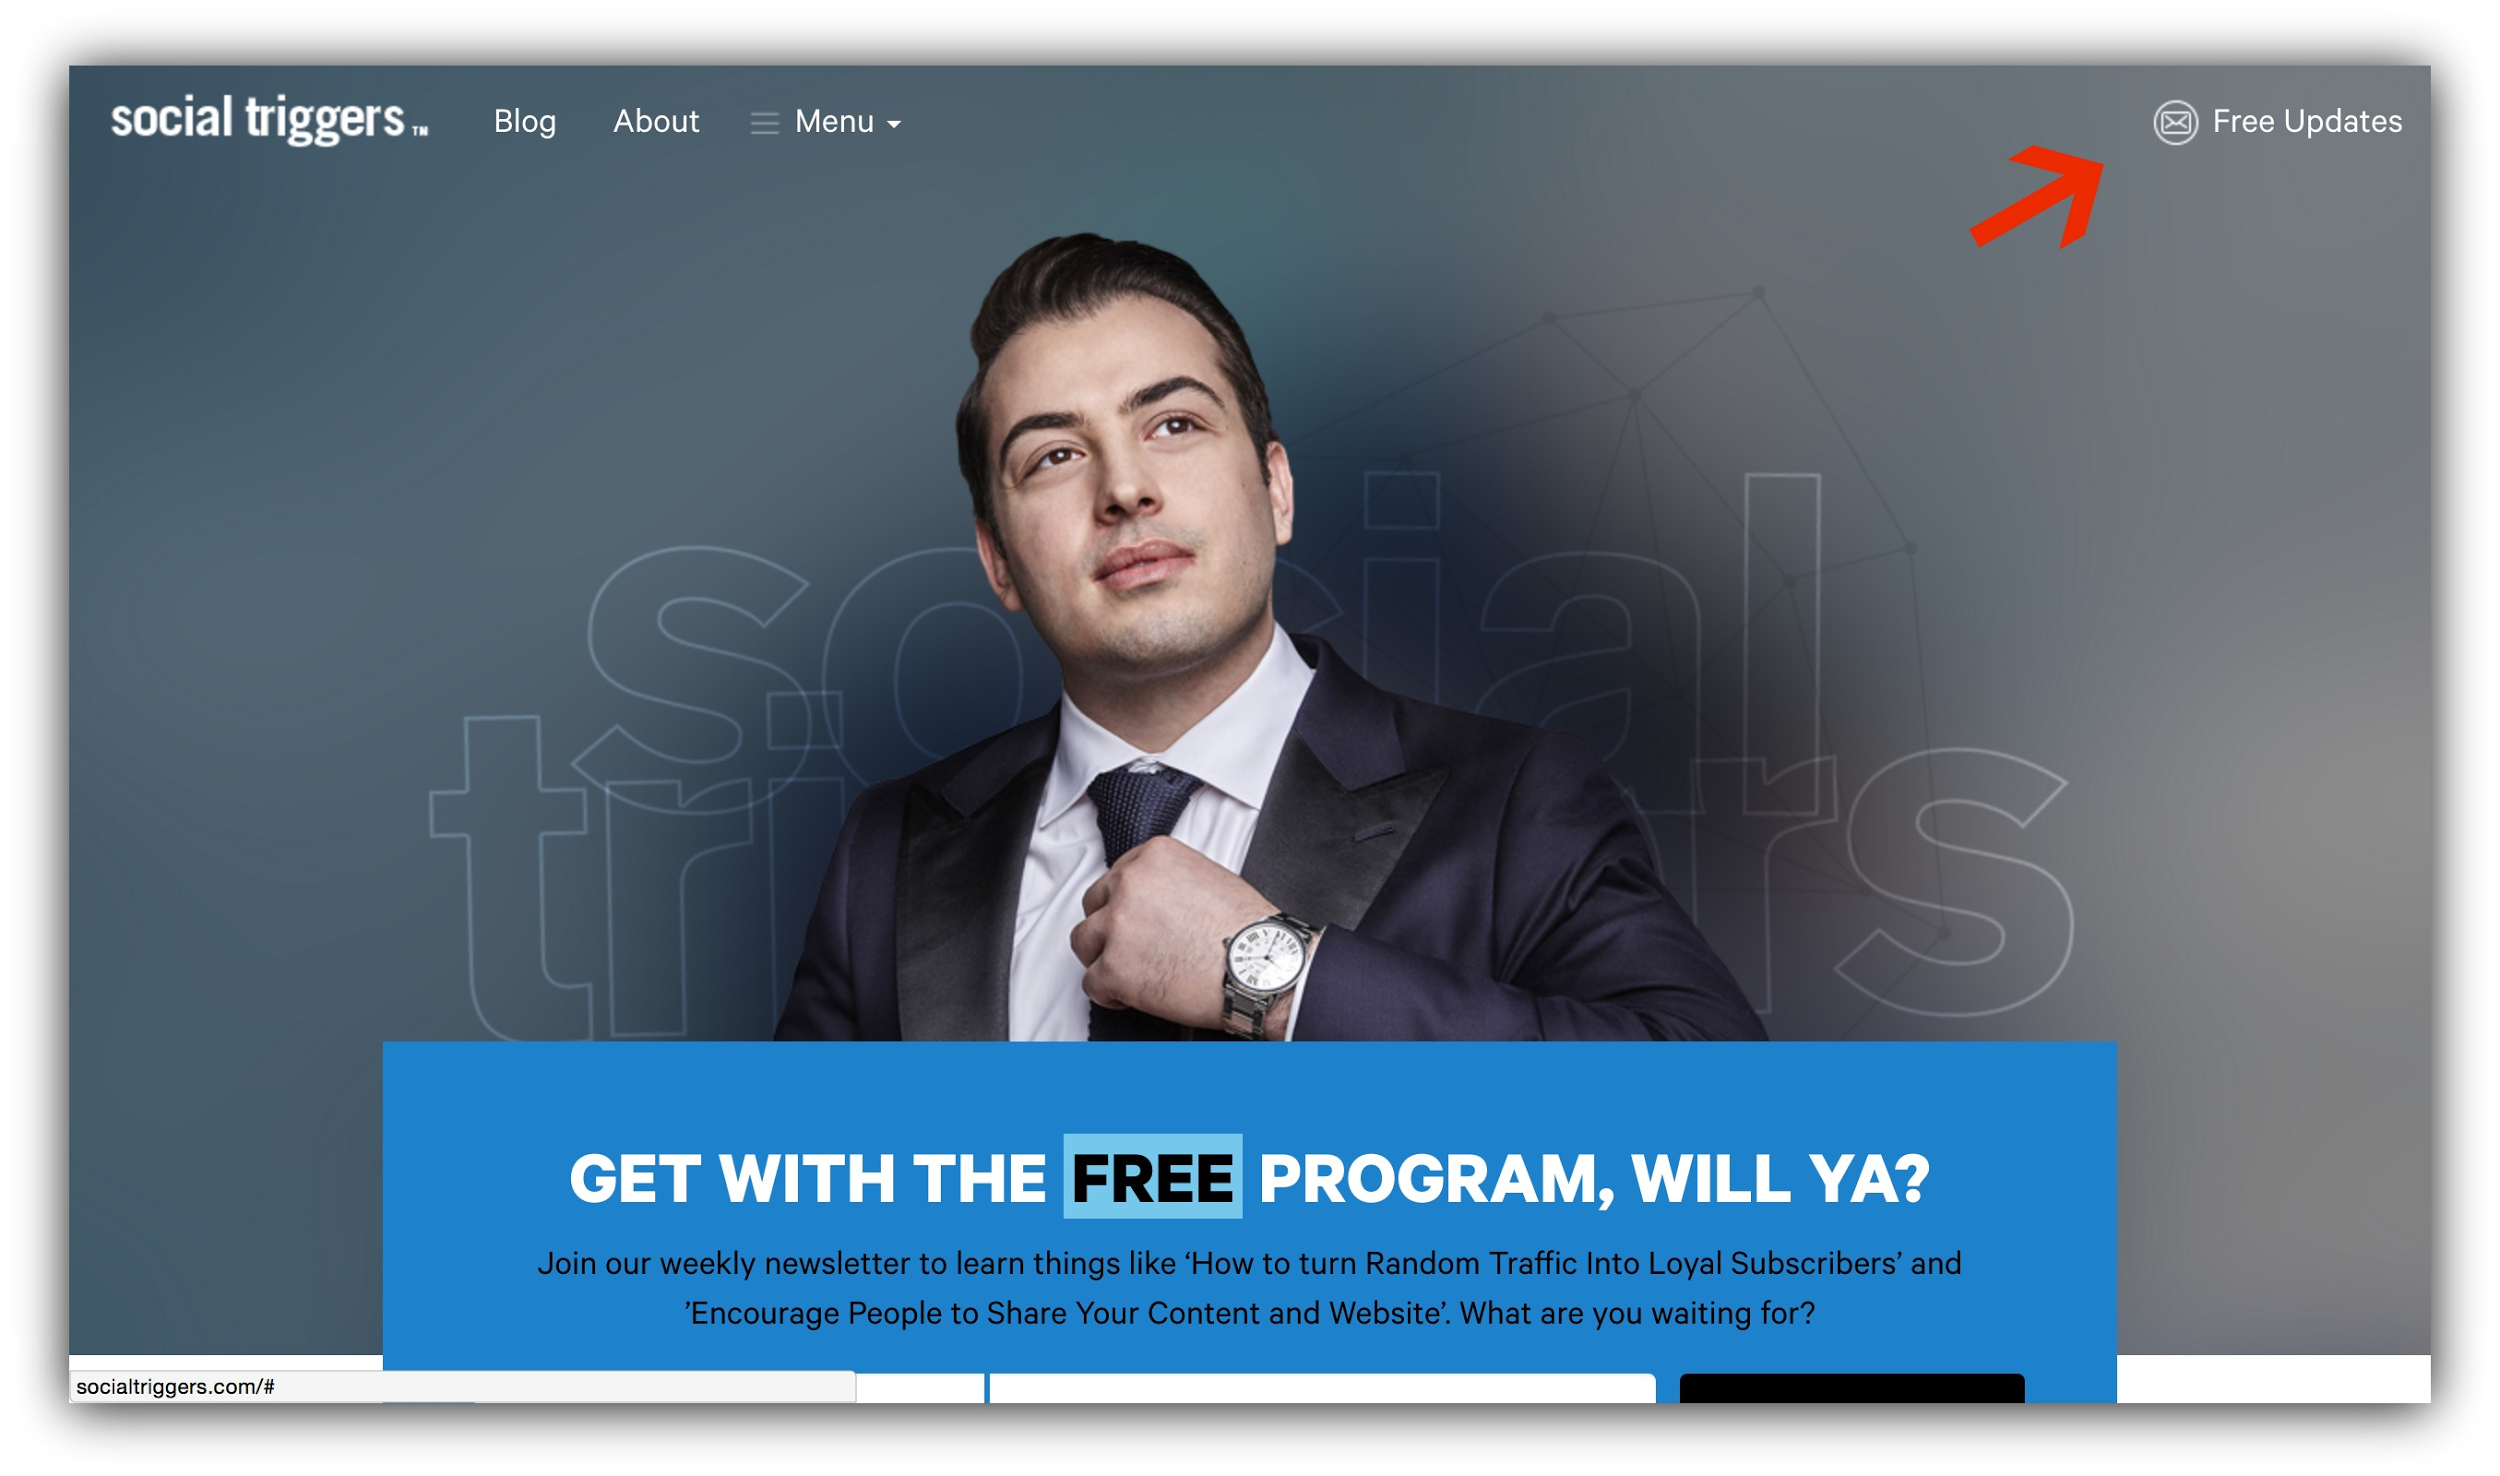
This is a great way to capture people where they’re already clicking the most.
I’ve been able to rake in a nearly 20% conversion rate with my menu opt-in:

Which is set up as a Click Trigger once you click on it:
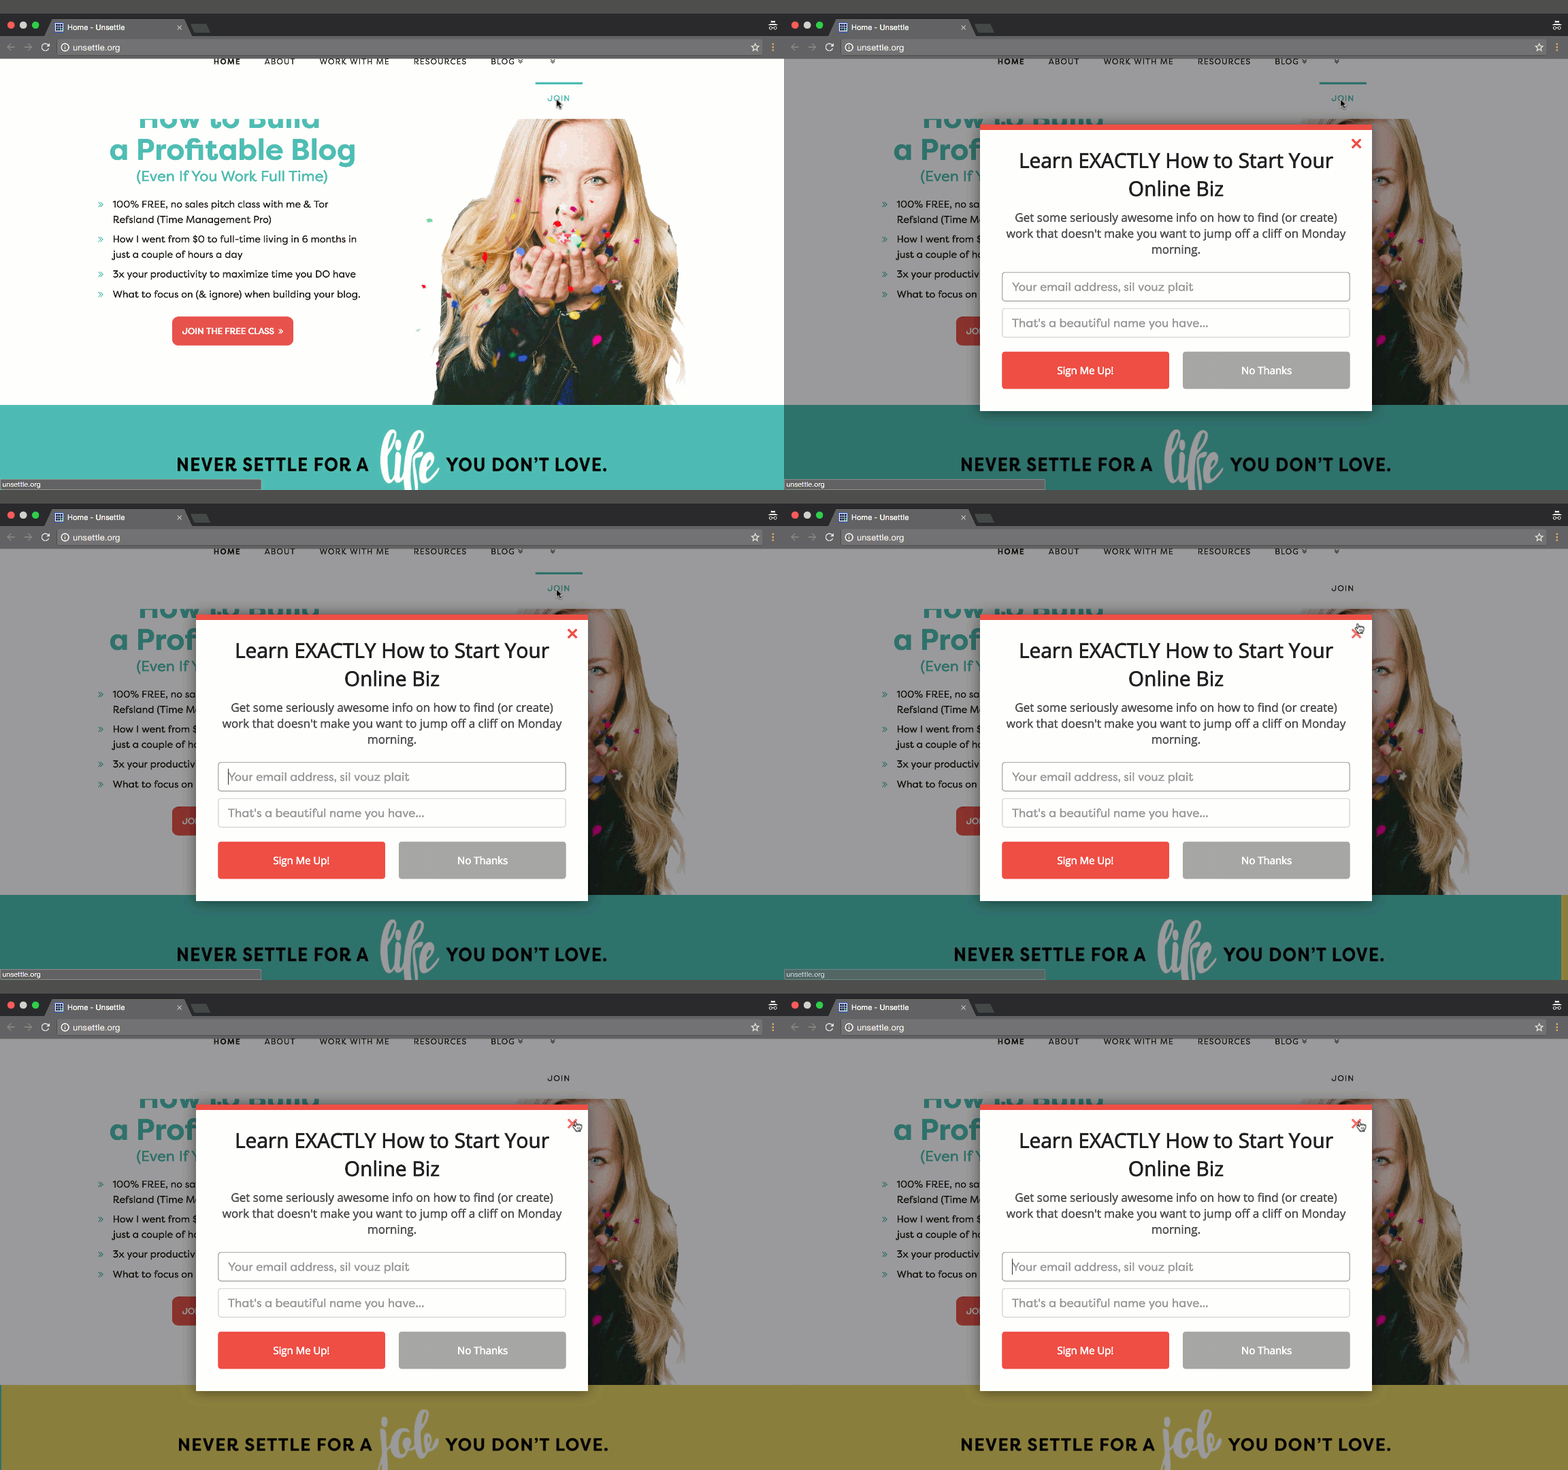
Making this one of the most effective opt-in opportunities out there.
How to Make This Work For You:
-
In WordPress, did you know you can bold menu options? It’s true. Make your menu option to subscribe jump out by adding a spot of HTML code around your Navigation Label under Appearance>Menus:
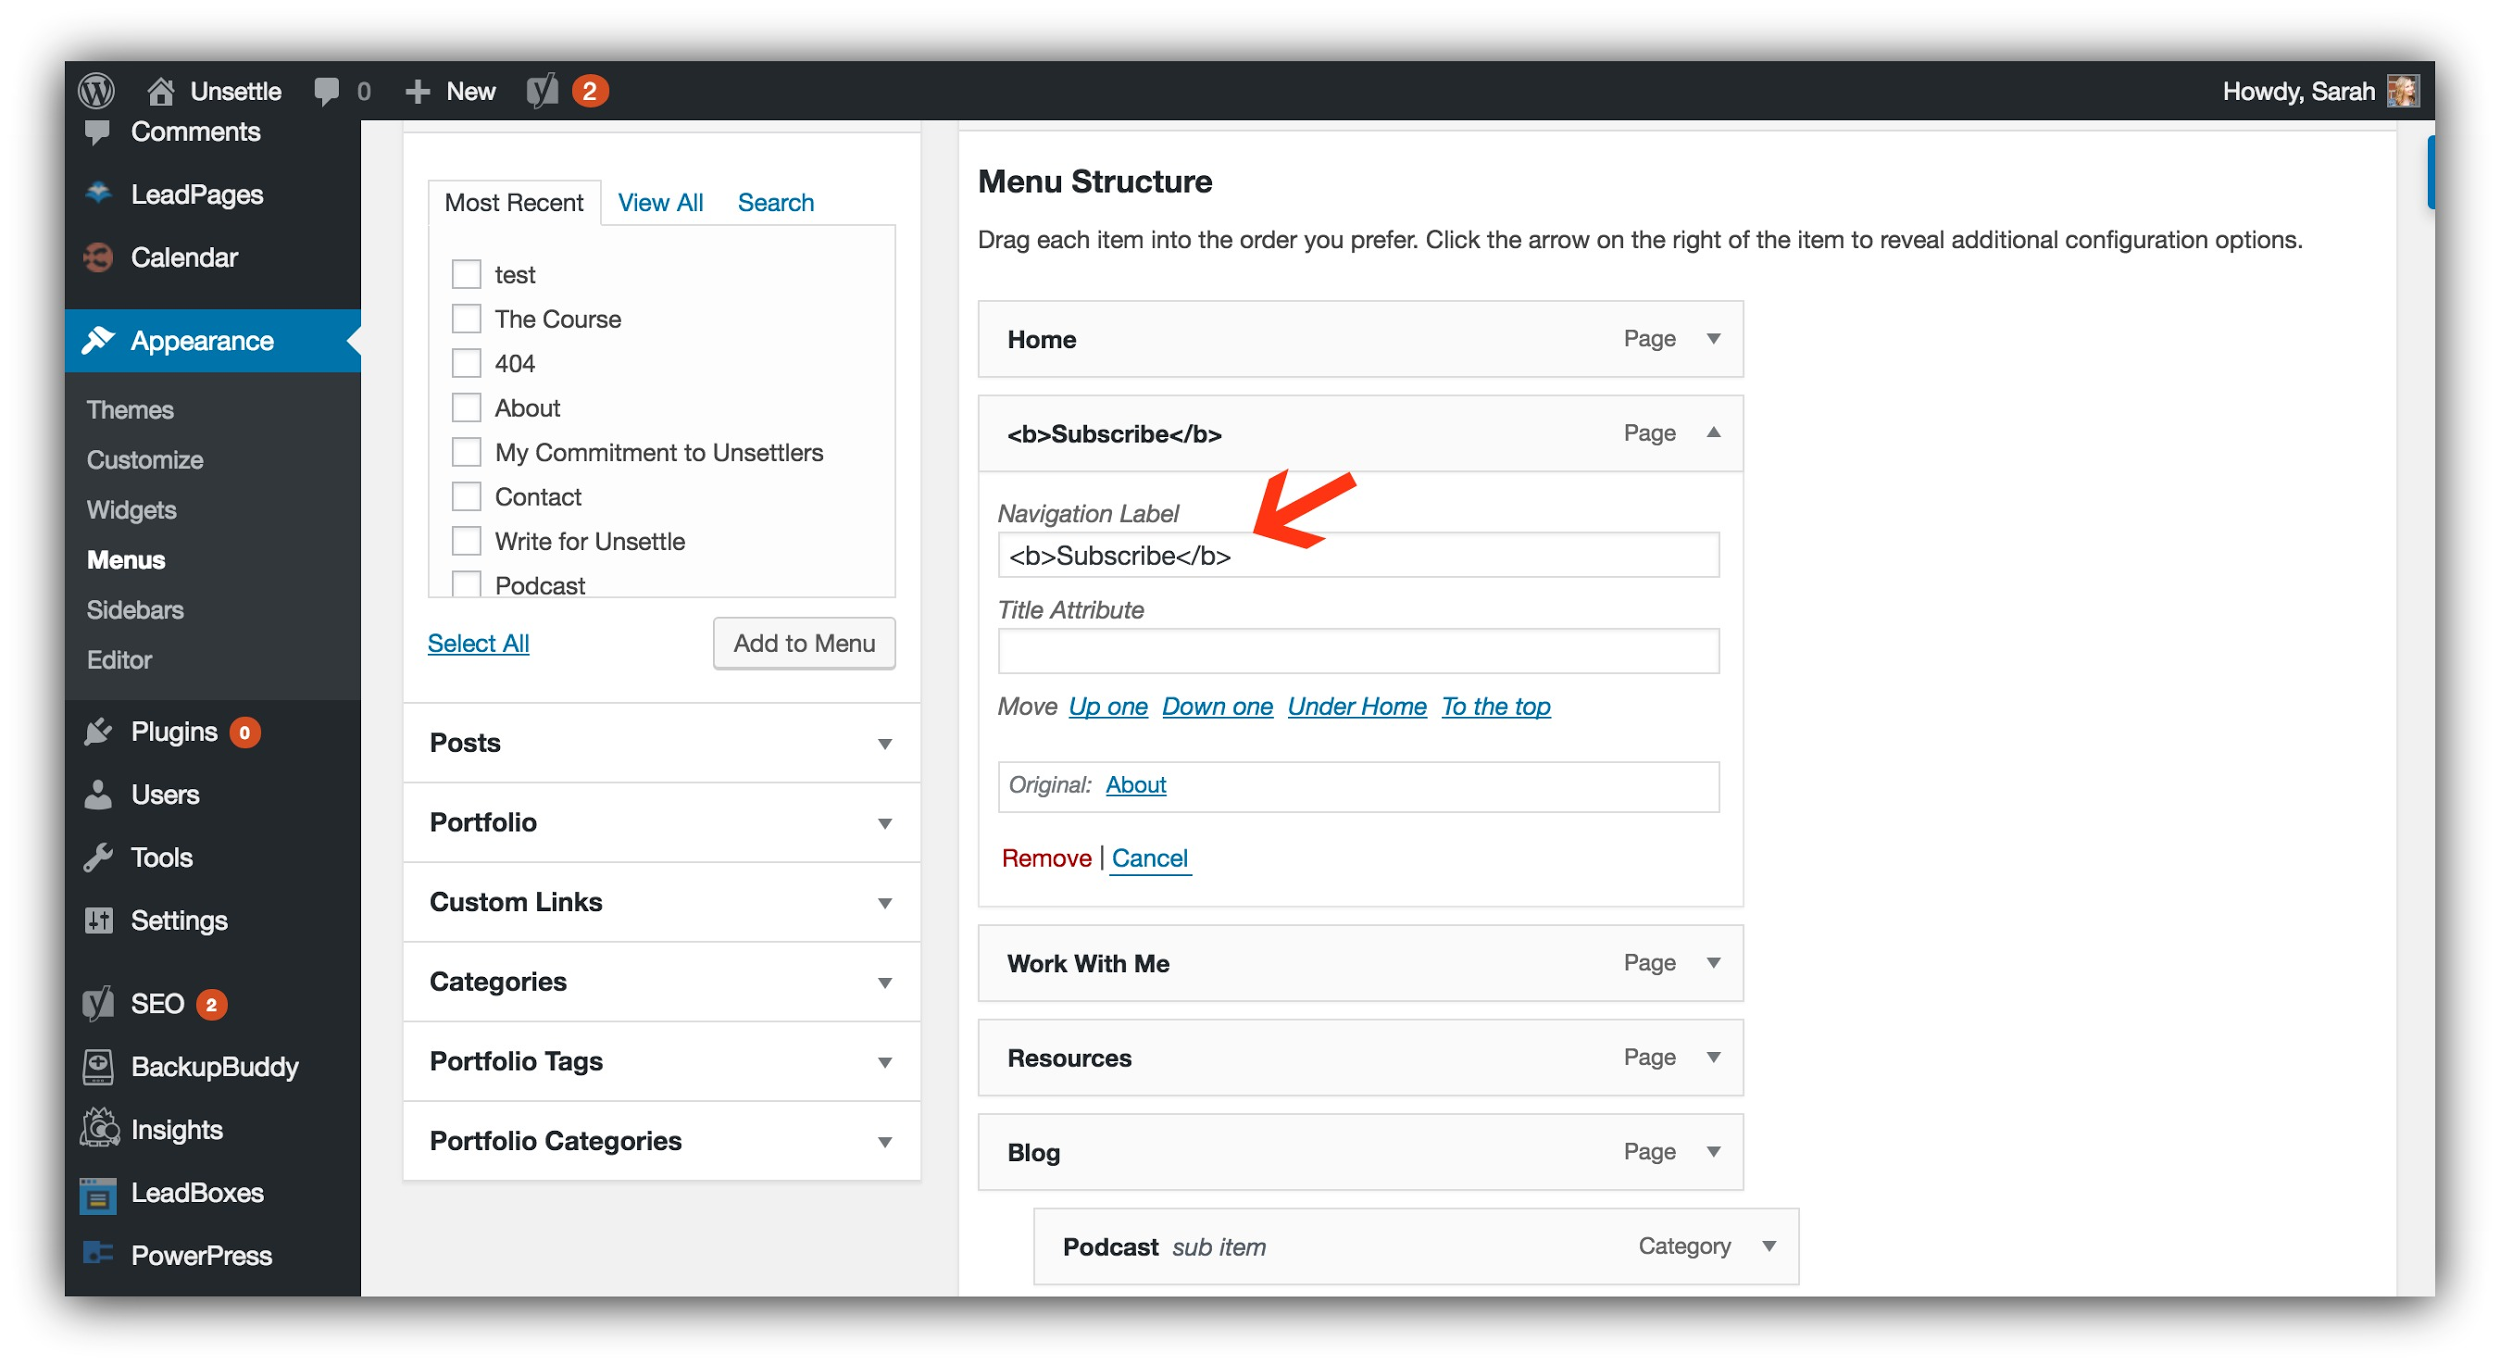
-
Use Heat Maps (it’s free!) to remove any menu options your visitors aren’t clicking on. This will make your menu option to opt-in to your list jump out at them, giving them fewer choices, and therefore increasing your conversions.
-
Use the word "Get" or “Free” to increase conversions on your menu option.
-
-
Tools: Instead of making the subscribe process more convoluted for your visitors by sending the menu option to a landing page (and risk losing them to the voids of the internet), set up an ultra-effective two step opt-in to collect vastly more emails. Use Click Triggers (a function within List Builder) to do so.
Opt-In #5: Before the "Read More" Tag on Your Homepage
Expected Conversion Rate: 5-15%
I live in Vancouver, BC Canada.
And one thing we love to do here is hike. Seriously, you’d think hiking was an olympic sport or something.
So on the heels of getting lost in the woods last season, I took to REI to buy some emergency supplies. You know, just in case it happened again.
As I assessed my flashlight options, I saw one that hit all the criteria – high lumens, light, different settings. But I wasn’t quite sold yet, so I was about to continue browsing…
And then I saw it.
The blurb on the package that indicated it came with a battery pack.
That bonus pushed me from "looking at other options" right to the checkout with the flashlight in hand.
I, like every other human on the face of this planet, like bonuses and freebies. And if the freebie hadn’t been advertised up front, I would have continued looking for a flashlight.
Think about this in terms of your content upgrades and opt-in offers. If your visitor has to click onto your content and read half of it before discovering your content upgrade, many of them won’t even bother reading the content in the first place.
That’s why the excerpt opt-in opportunity is so effective. Not only does it garner attention to the content, but it also converts many more people to email subscribers, since they have advance notice of your bonus.
To take advantage of this, you have to post your call to action before the "read more" tag in your content,so it shows on your homepage and in your archives like Noah Kagan does on Ok Dork:
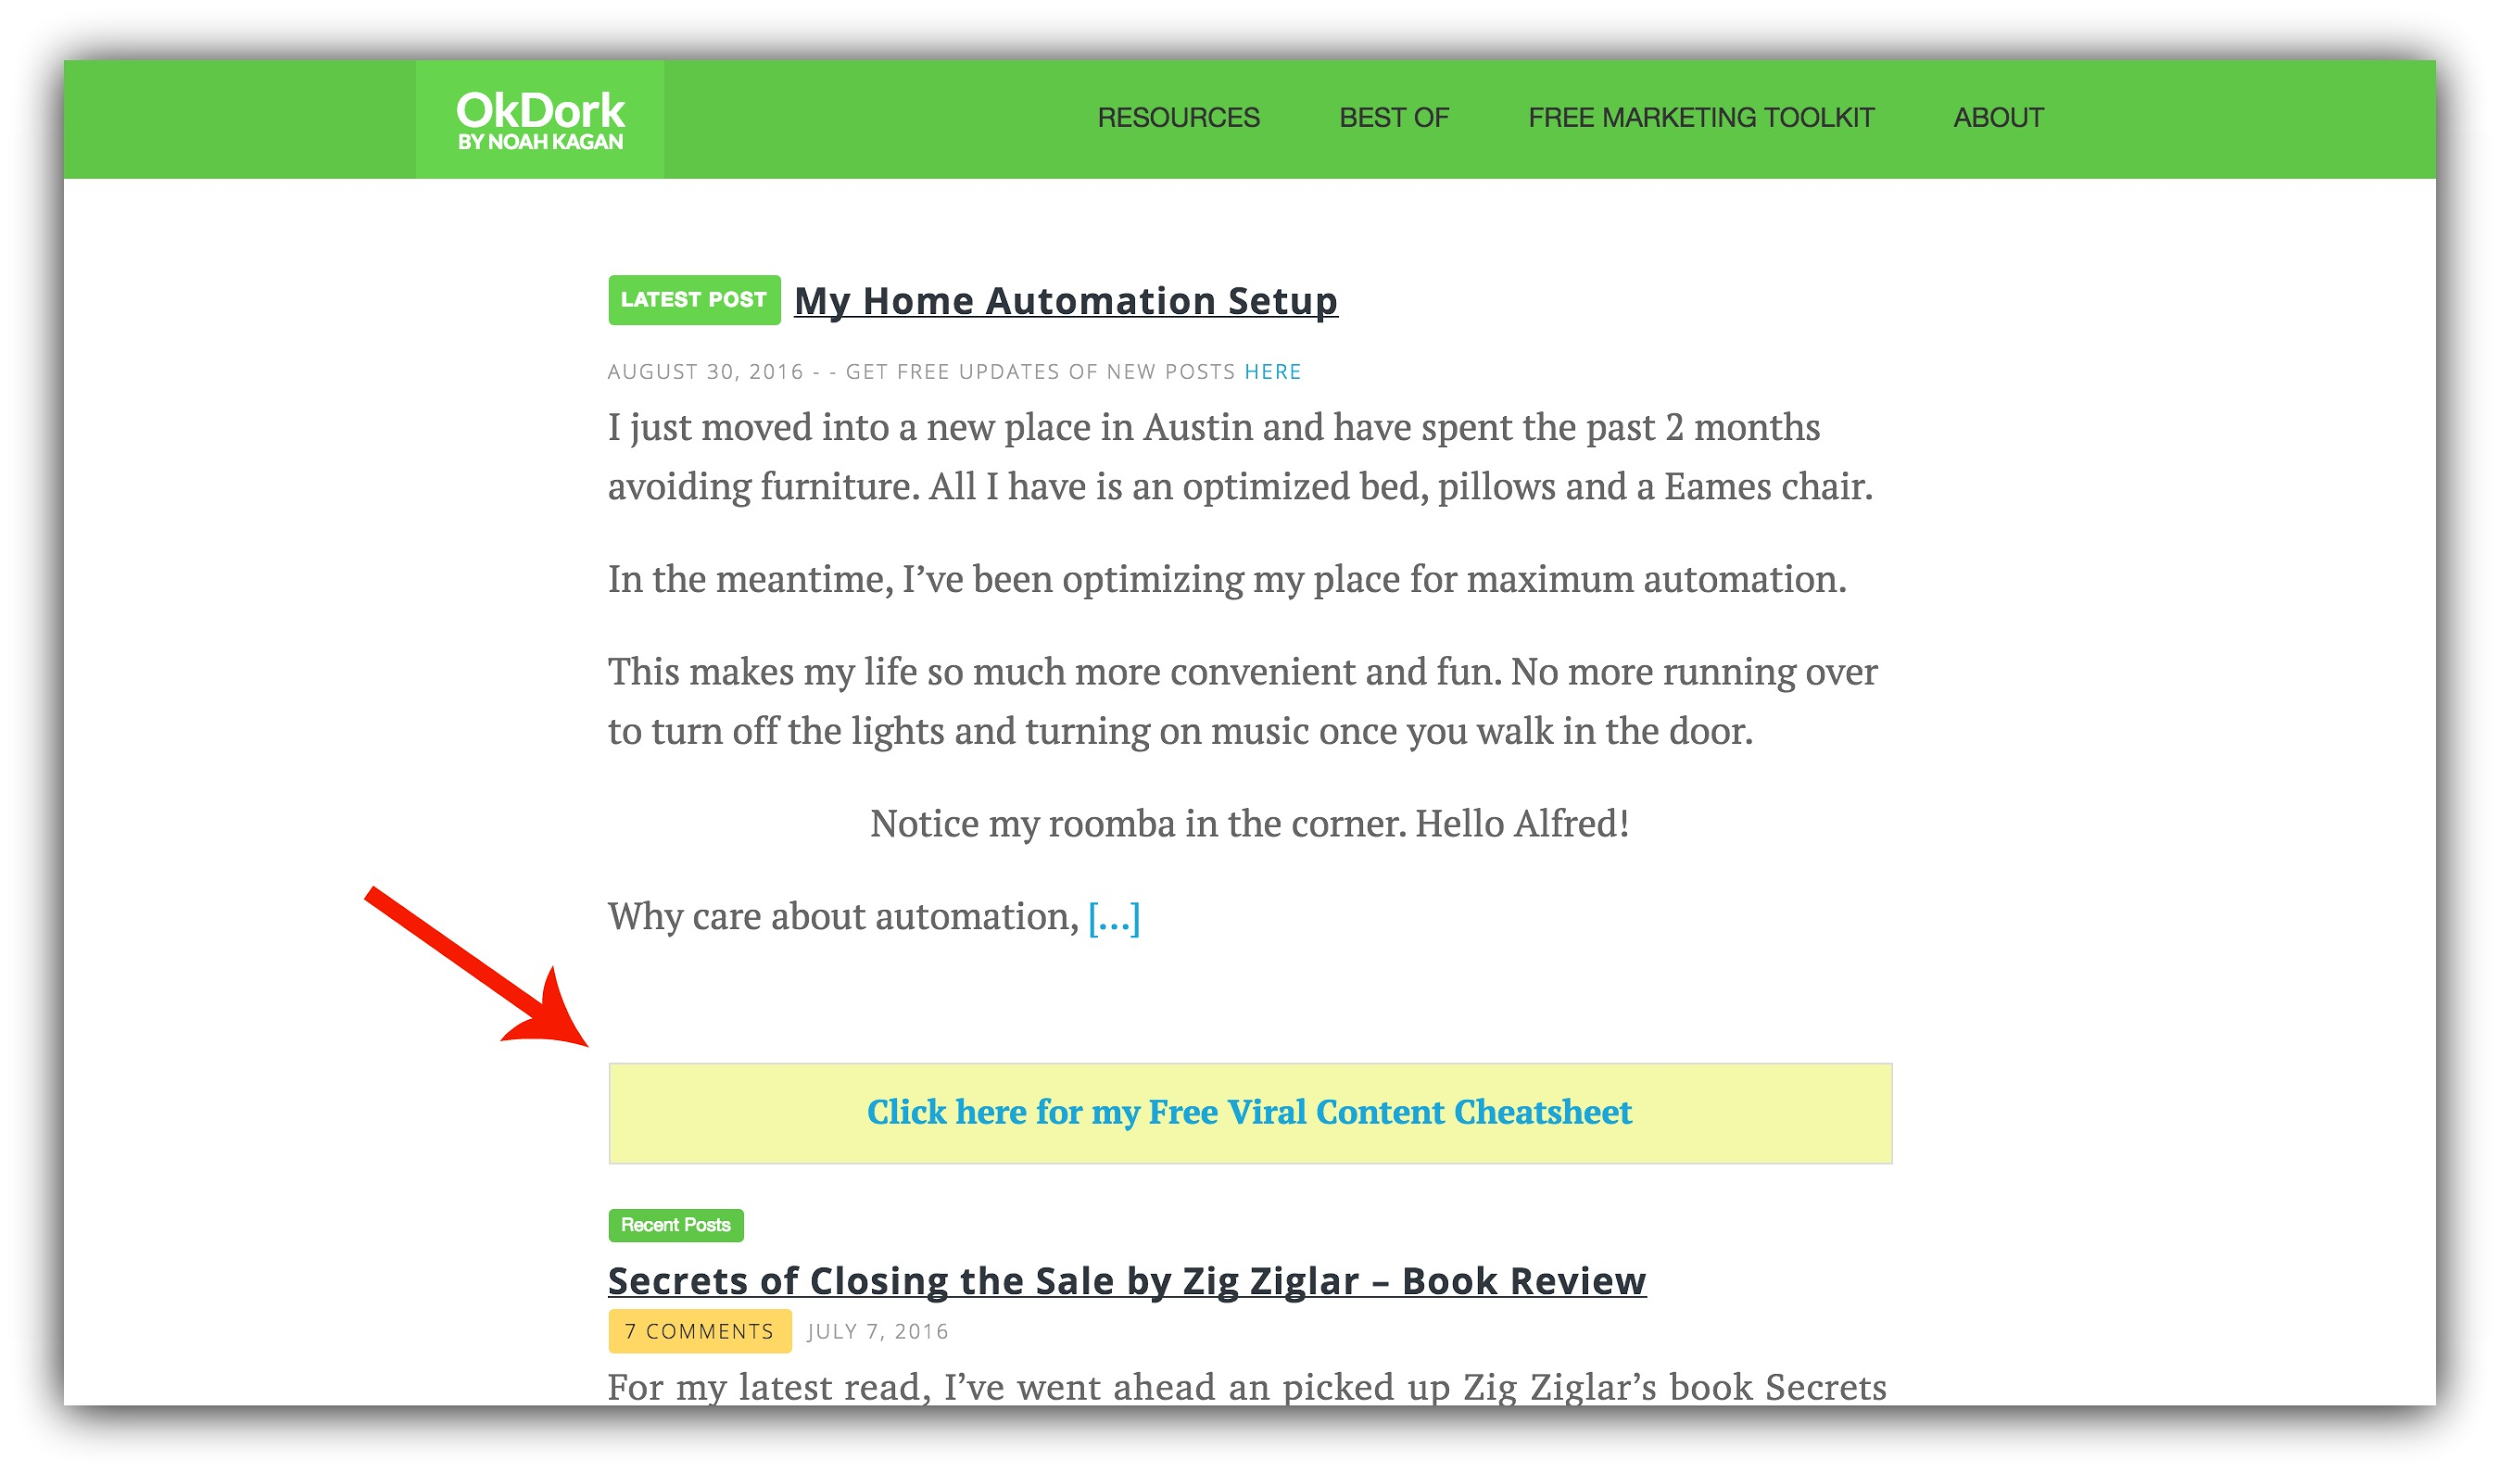
This will ensure that even the people who aren’t directly clicking onto your content will know of the upgrade.
How to Make This Work For You:
-
Because this type of text can easily blend into the rest of the excerpt, it’s best to put the call to action in a box or use a colorful background or font. This will ensure it jumps off the page to your visitor.
-
Pair this with the power of content upgrades relevant to the content you’ve published to truly increase your conversion rates.
-
-
Tools: You can either hire somebody to do this change for you, or simply use WordPress to increase the length of your excerpts, ensuring the call to action always appears in the tidbit on the homepage.
To create a colorful background like the example above, use an alert in the Text portion of your article, and either build out a link using Click Triggers for a two step opt-in, or link to a landing page.
Opt-In #6: The Hospitable Welcome Mat
Expected Conversion Rate: 5-10%
I’ve just spent the last few points stressing the effectiveness of different types of landing pages.
Quick refresher: Landing and squeeze pages work because they isolate the call to action.
But a dedicated landing page is not the only way to isolate the call to action for strong conversion rates. Enter the Welcome Mat.
The Welcome Mat appears much like a landing page does when you land on the website they’re on, but unlike with a squeeze page, with a Welcome Mat you can simply scroll down out of the Mat.
This means that it’s less intrusive than a squeeze page, in that it doesn’t interrupt the flow of the user’s experience as much.
Regardless of which page your visitor navigated to on your website, you can set up a Welcome Mat to appear – meaning the Mat doesn’t have to be directed to it’s own URL to be effective.
Check out how Jeff Bullas has used a Welcome Mat on his homepage to collect emails:
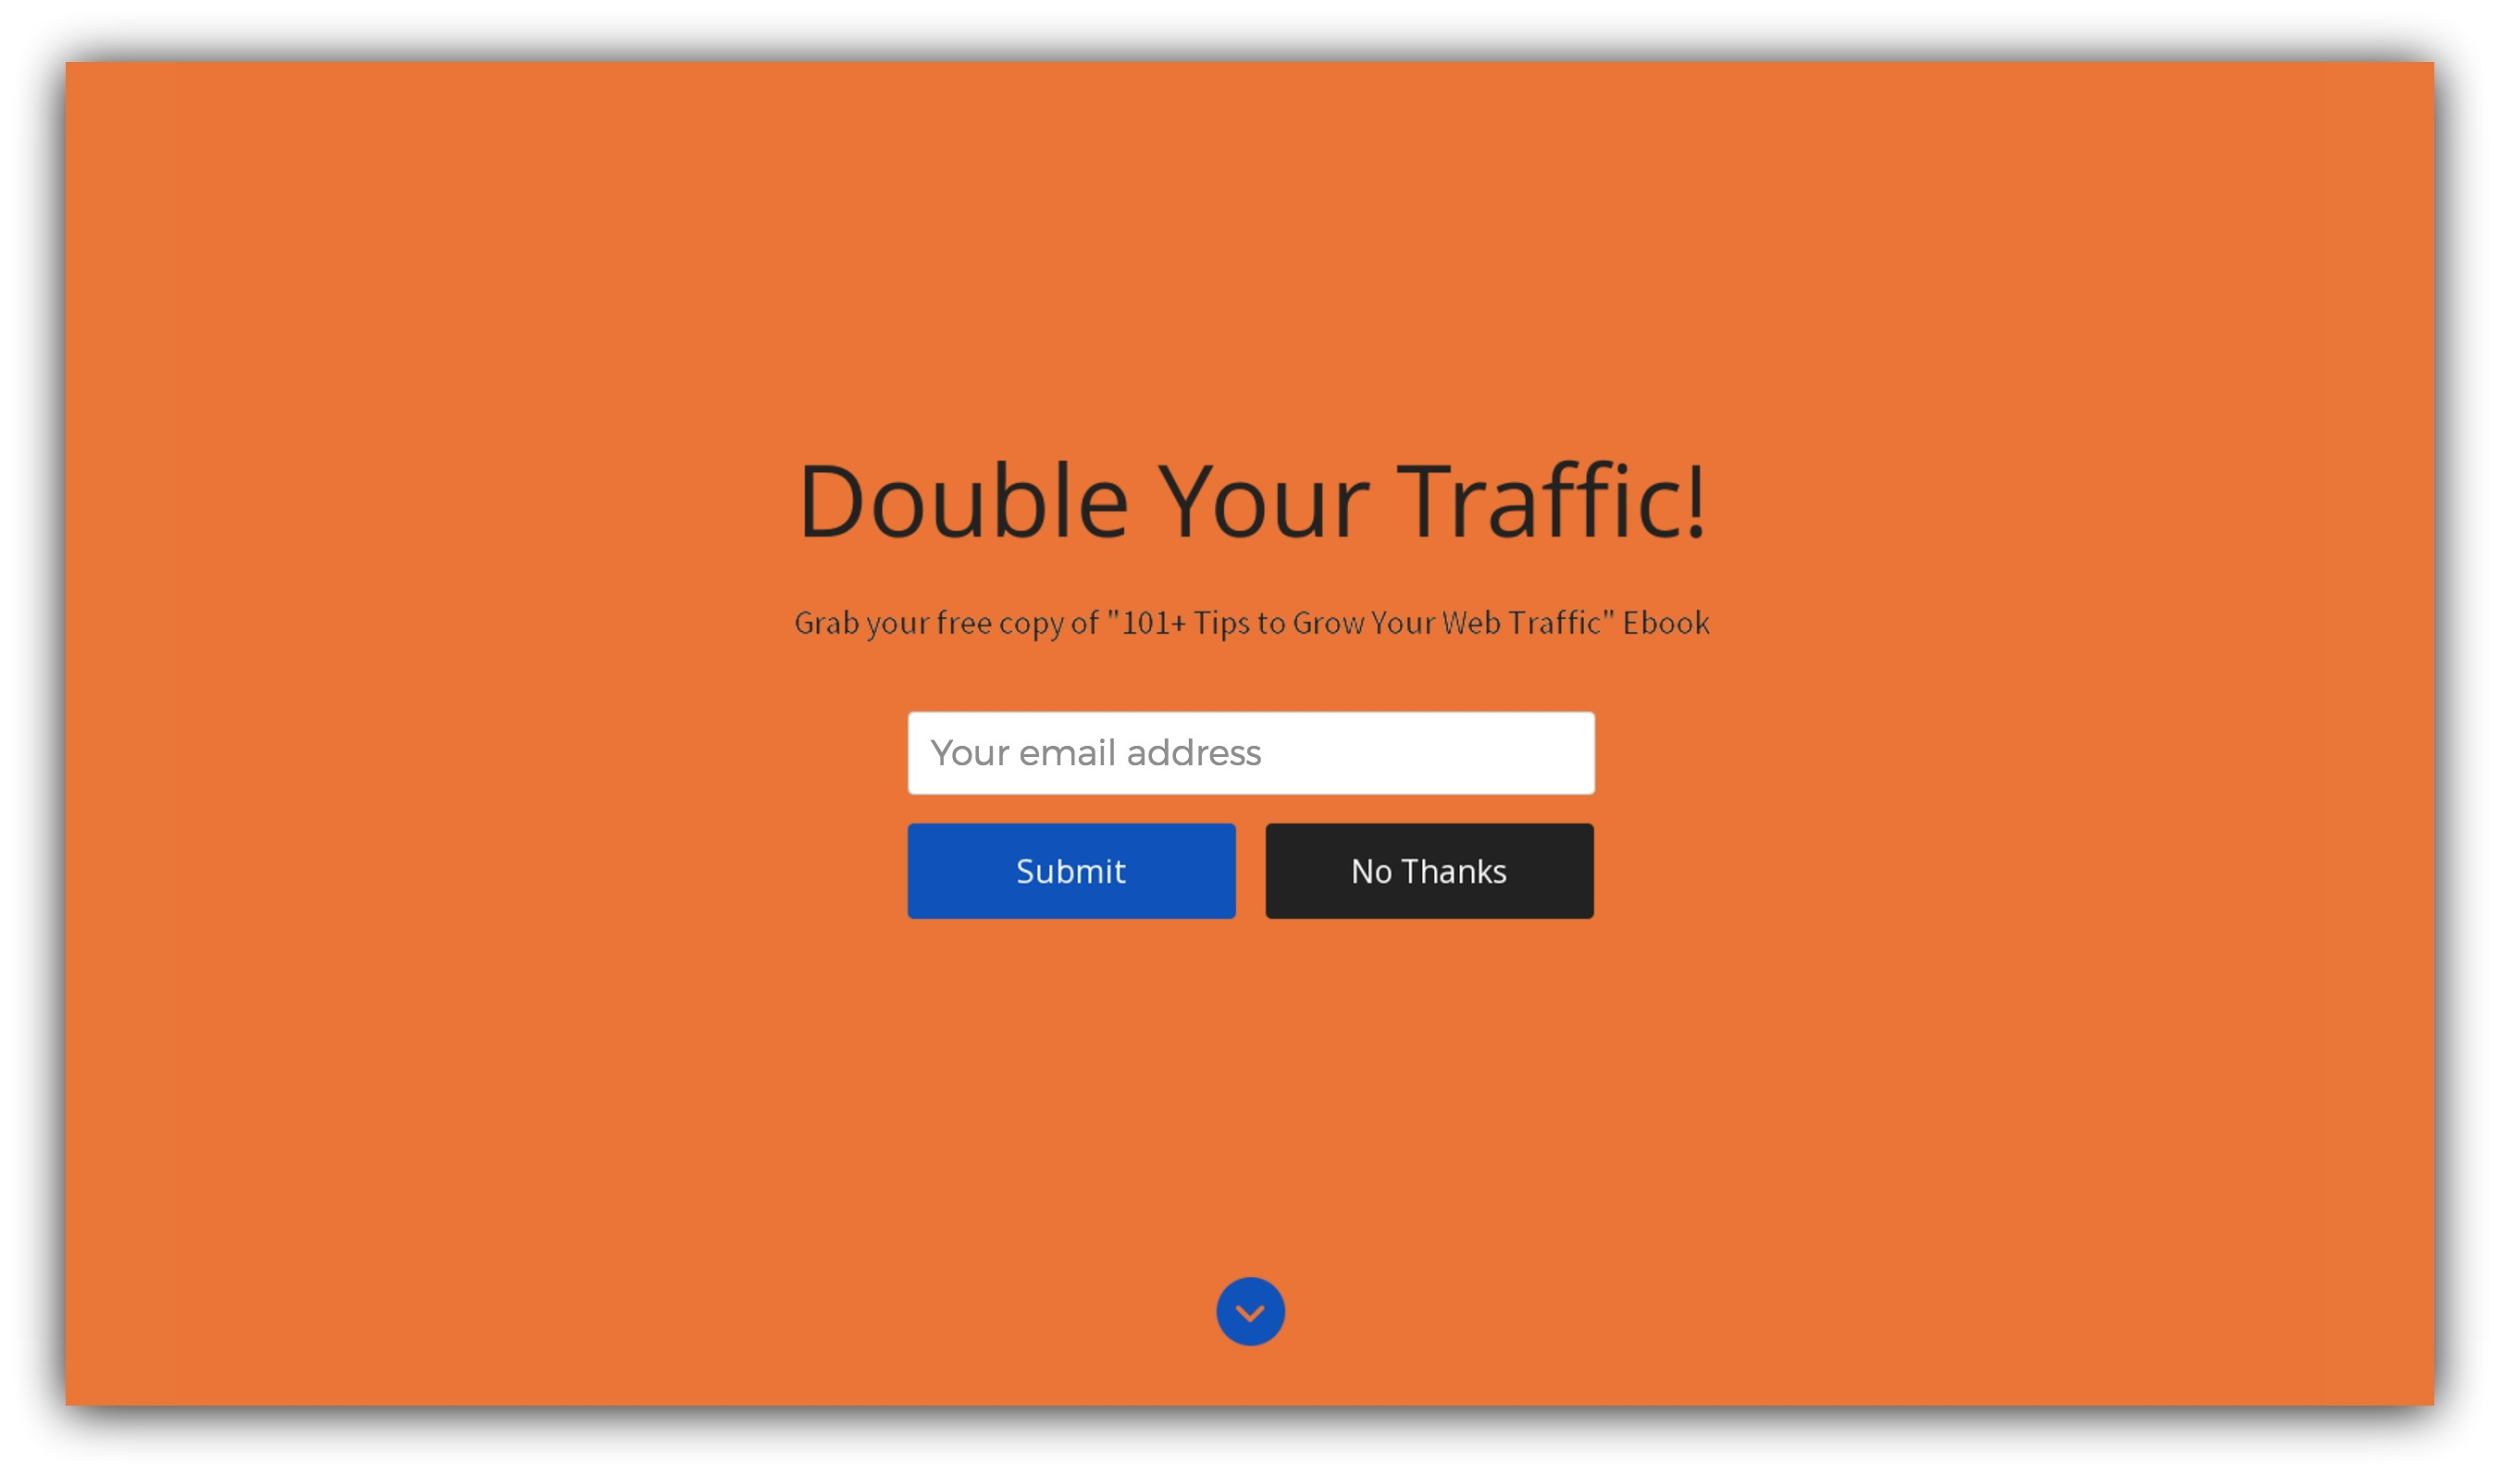
Welcome Mat is Sumo’s top converting app, with the top 10% of users enjoying a 7% conversion rate.
How to Make This Work For You:
-
Ever land on a website and then automatically start to scroll down to find what you went there for? Well, your audience does this too – even if they’d be interested in your offer on your Welcome Mat. Instead of just letting them lose the Mat by accidently scrolling out, enable Instant Landing Page to double conversions:
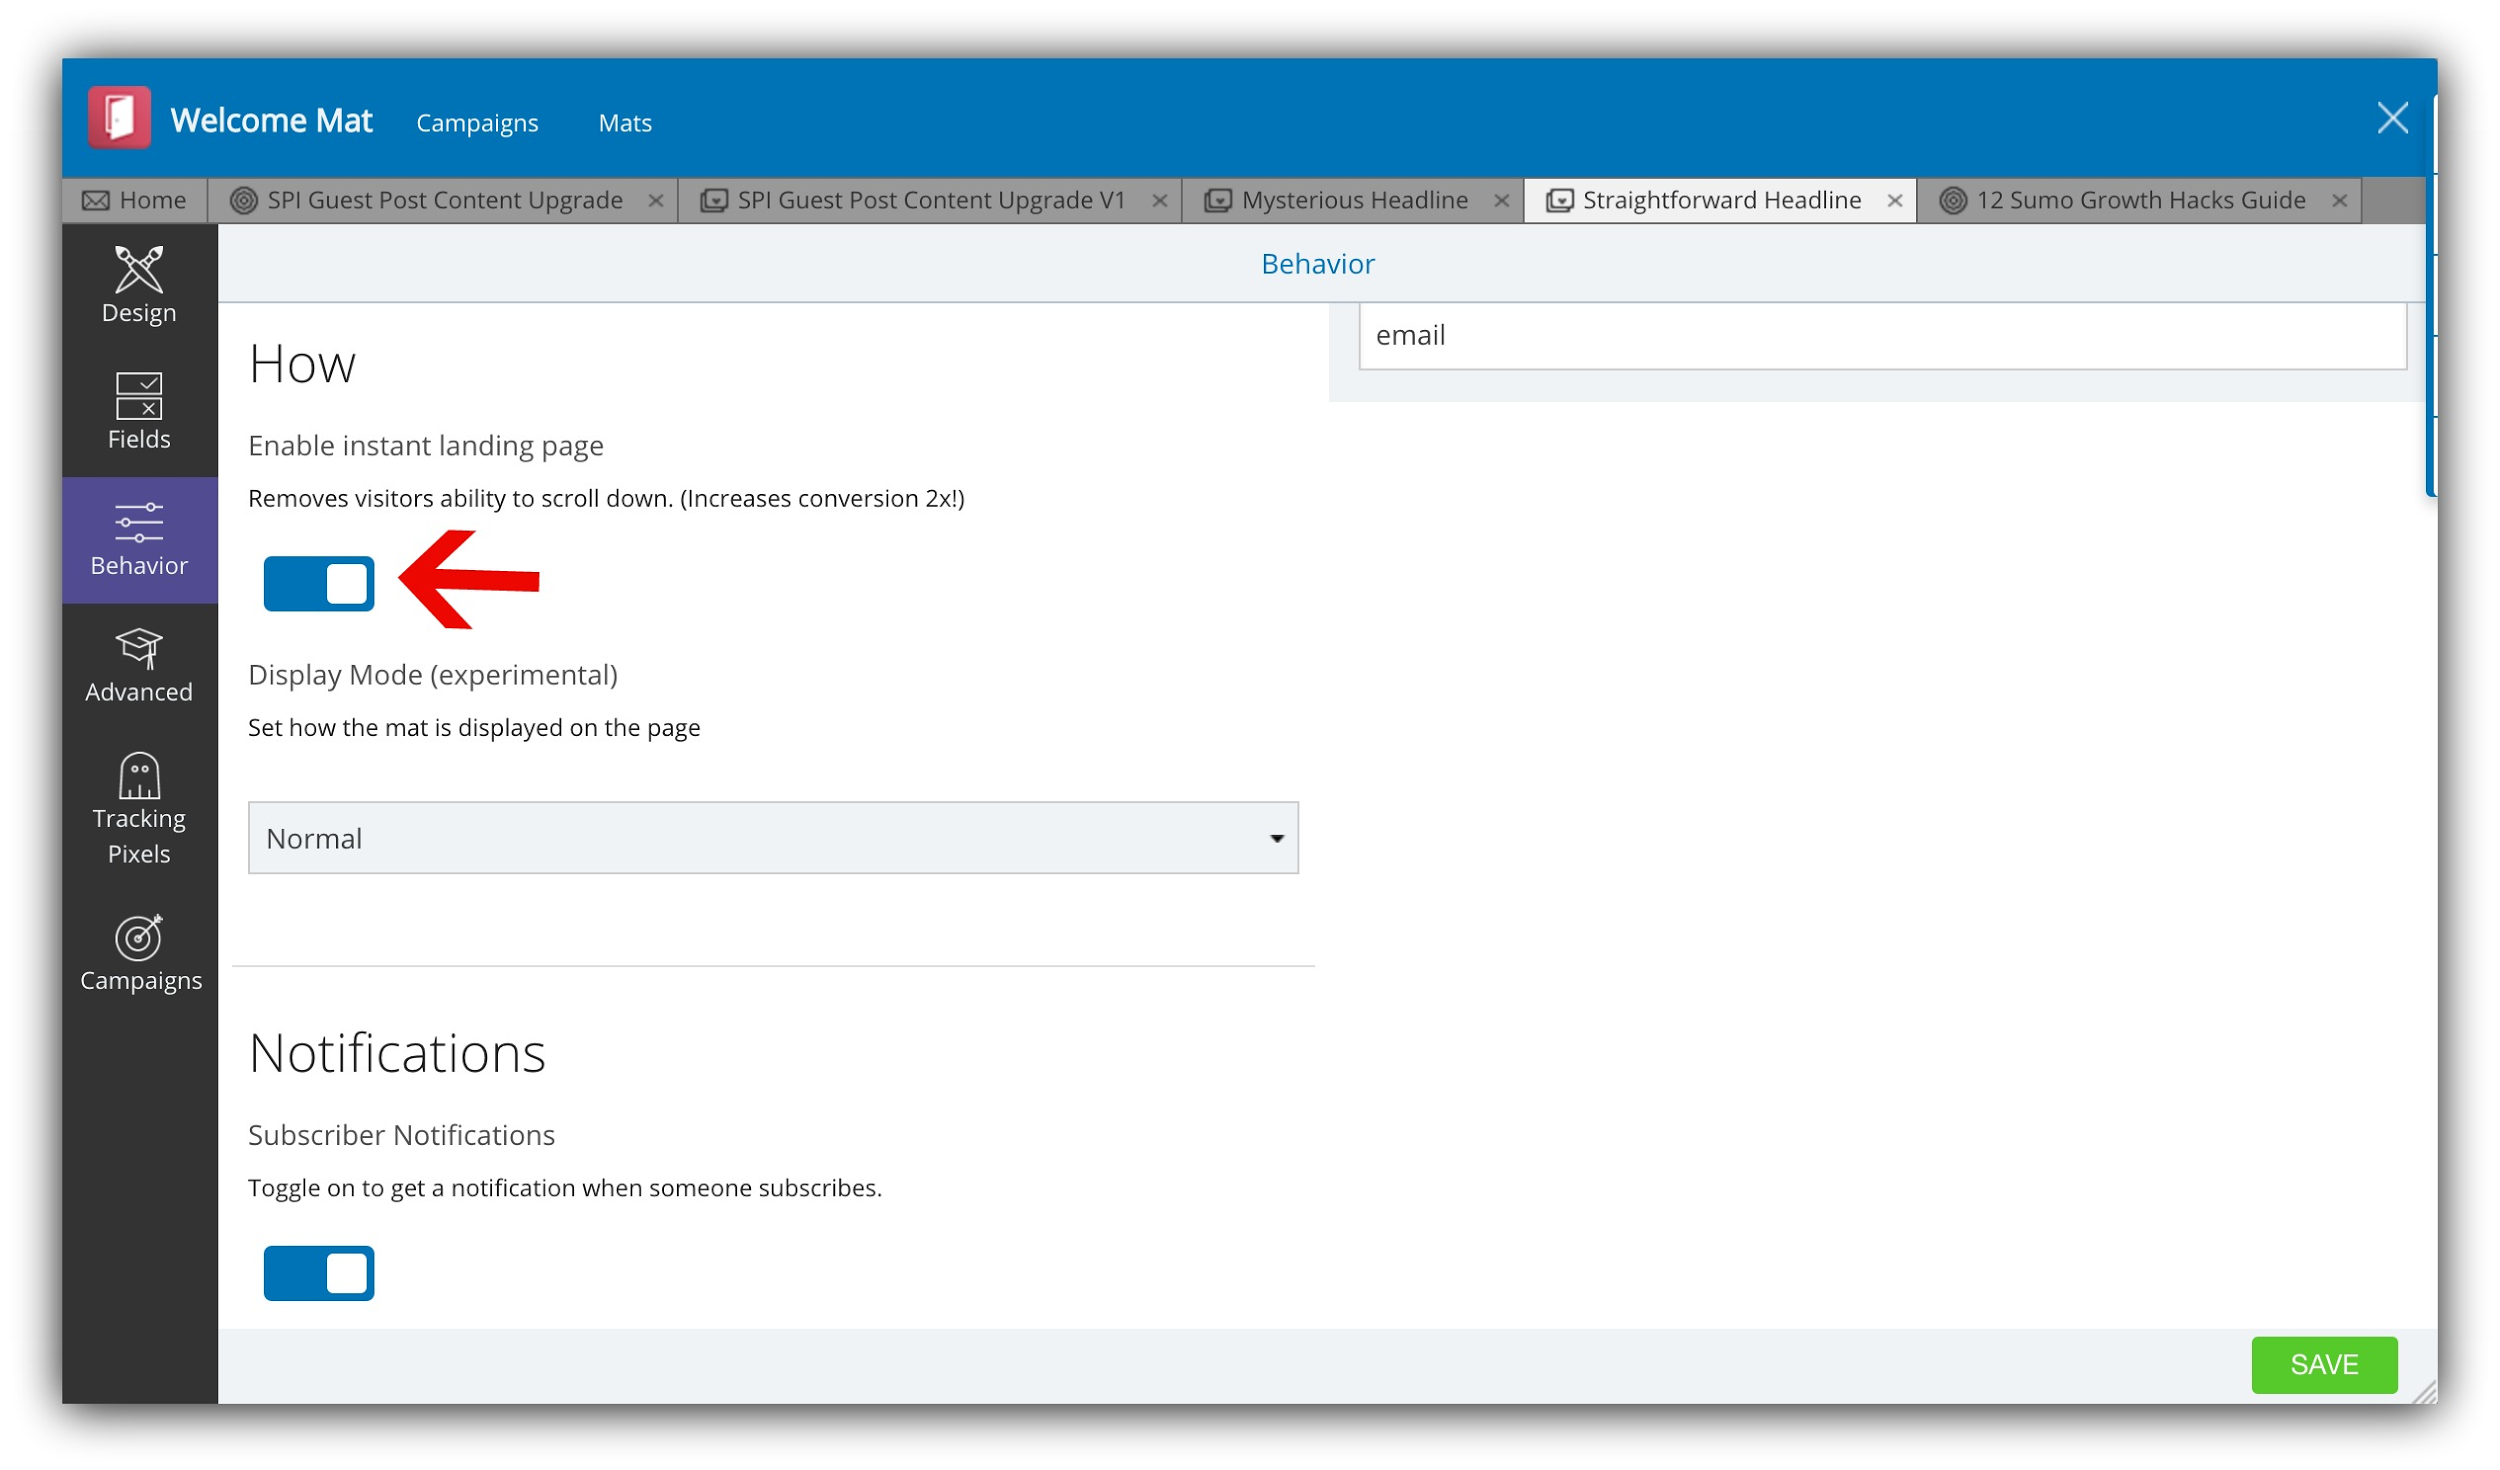
This makes it so the visitor can’t just scroll right out of your Mat.
-
Follow the Sumo-Sized Guide to the PERFECT Landing Page. We’ve used these principles to achieve 18-22% opt-in rates:

-
-
Tools: Welcome Mat is a Sumo app that works on WordPress, Shopify, Weebly, and more that you can install for free here.
Opt-In #7: The Classic Pop-Up
Expected Conversion Rate: 3-10%
Raise your hand if you’ve ever been to a website that threw up a pop-up in front of you!
Maybe it was a pop-up giving you a discount or offering free shipping:
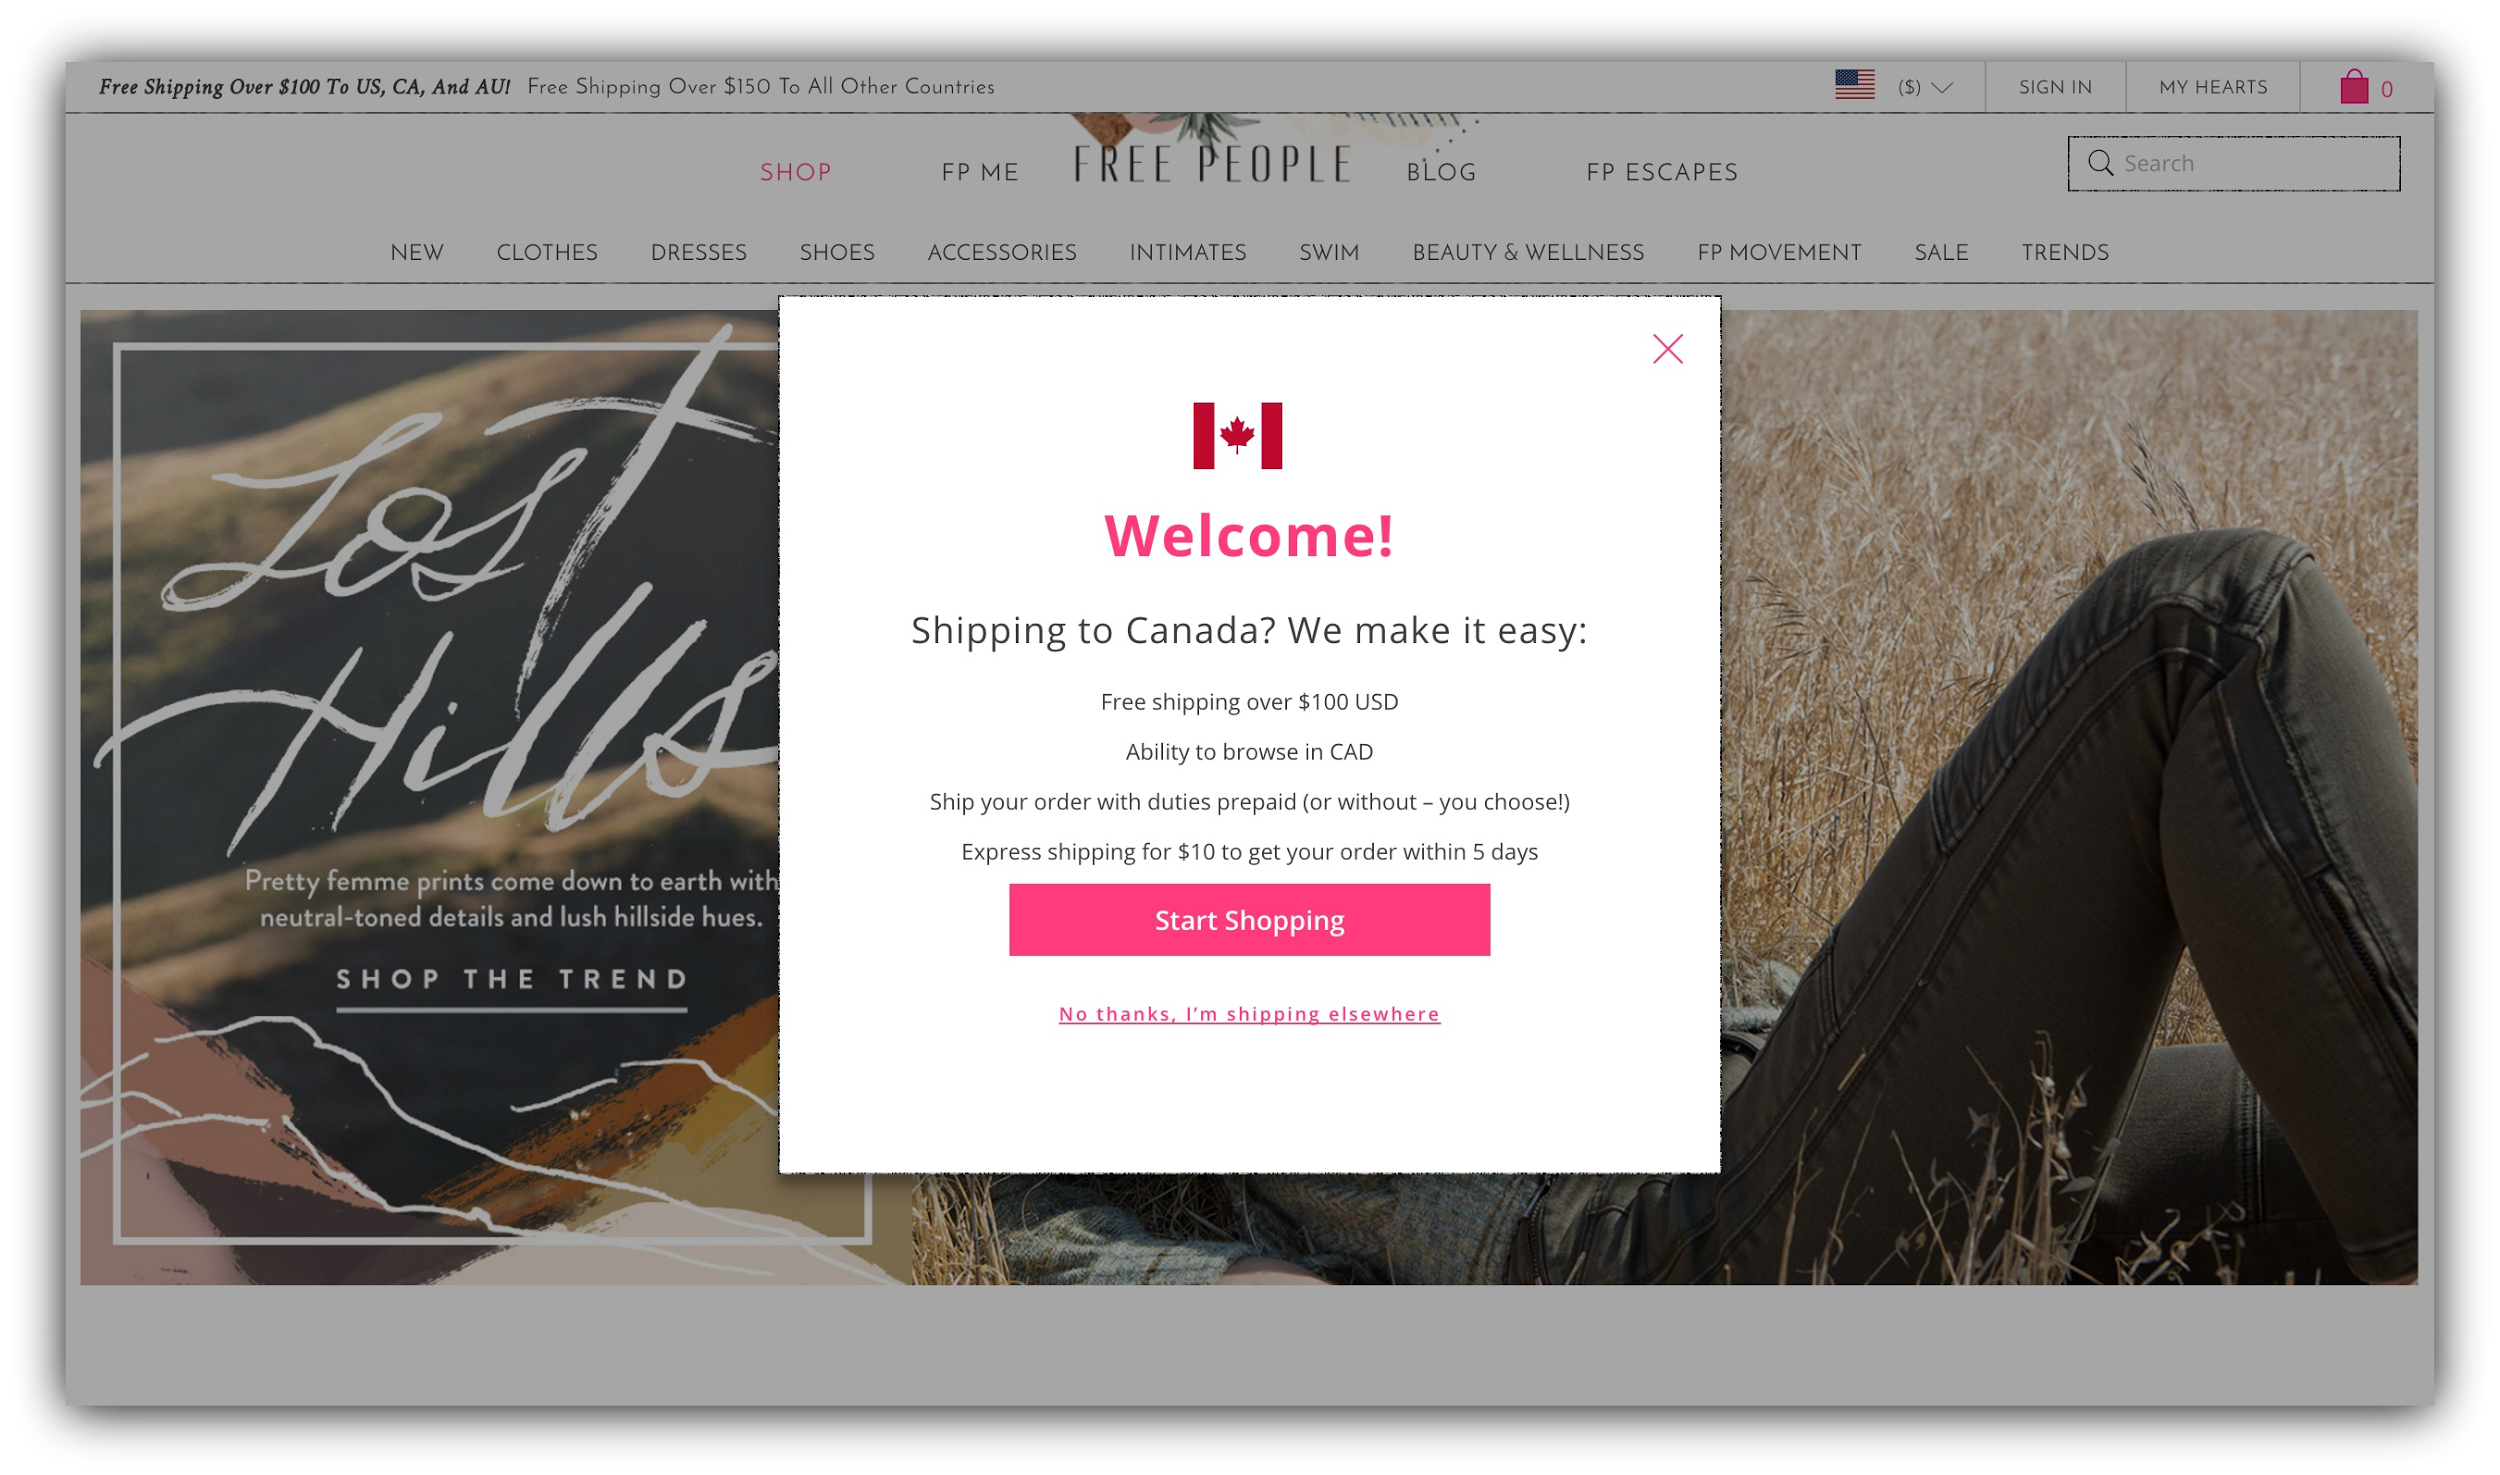
Or maybe it was asking you for your email address:
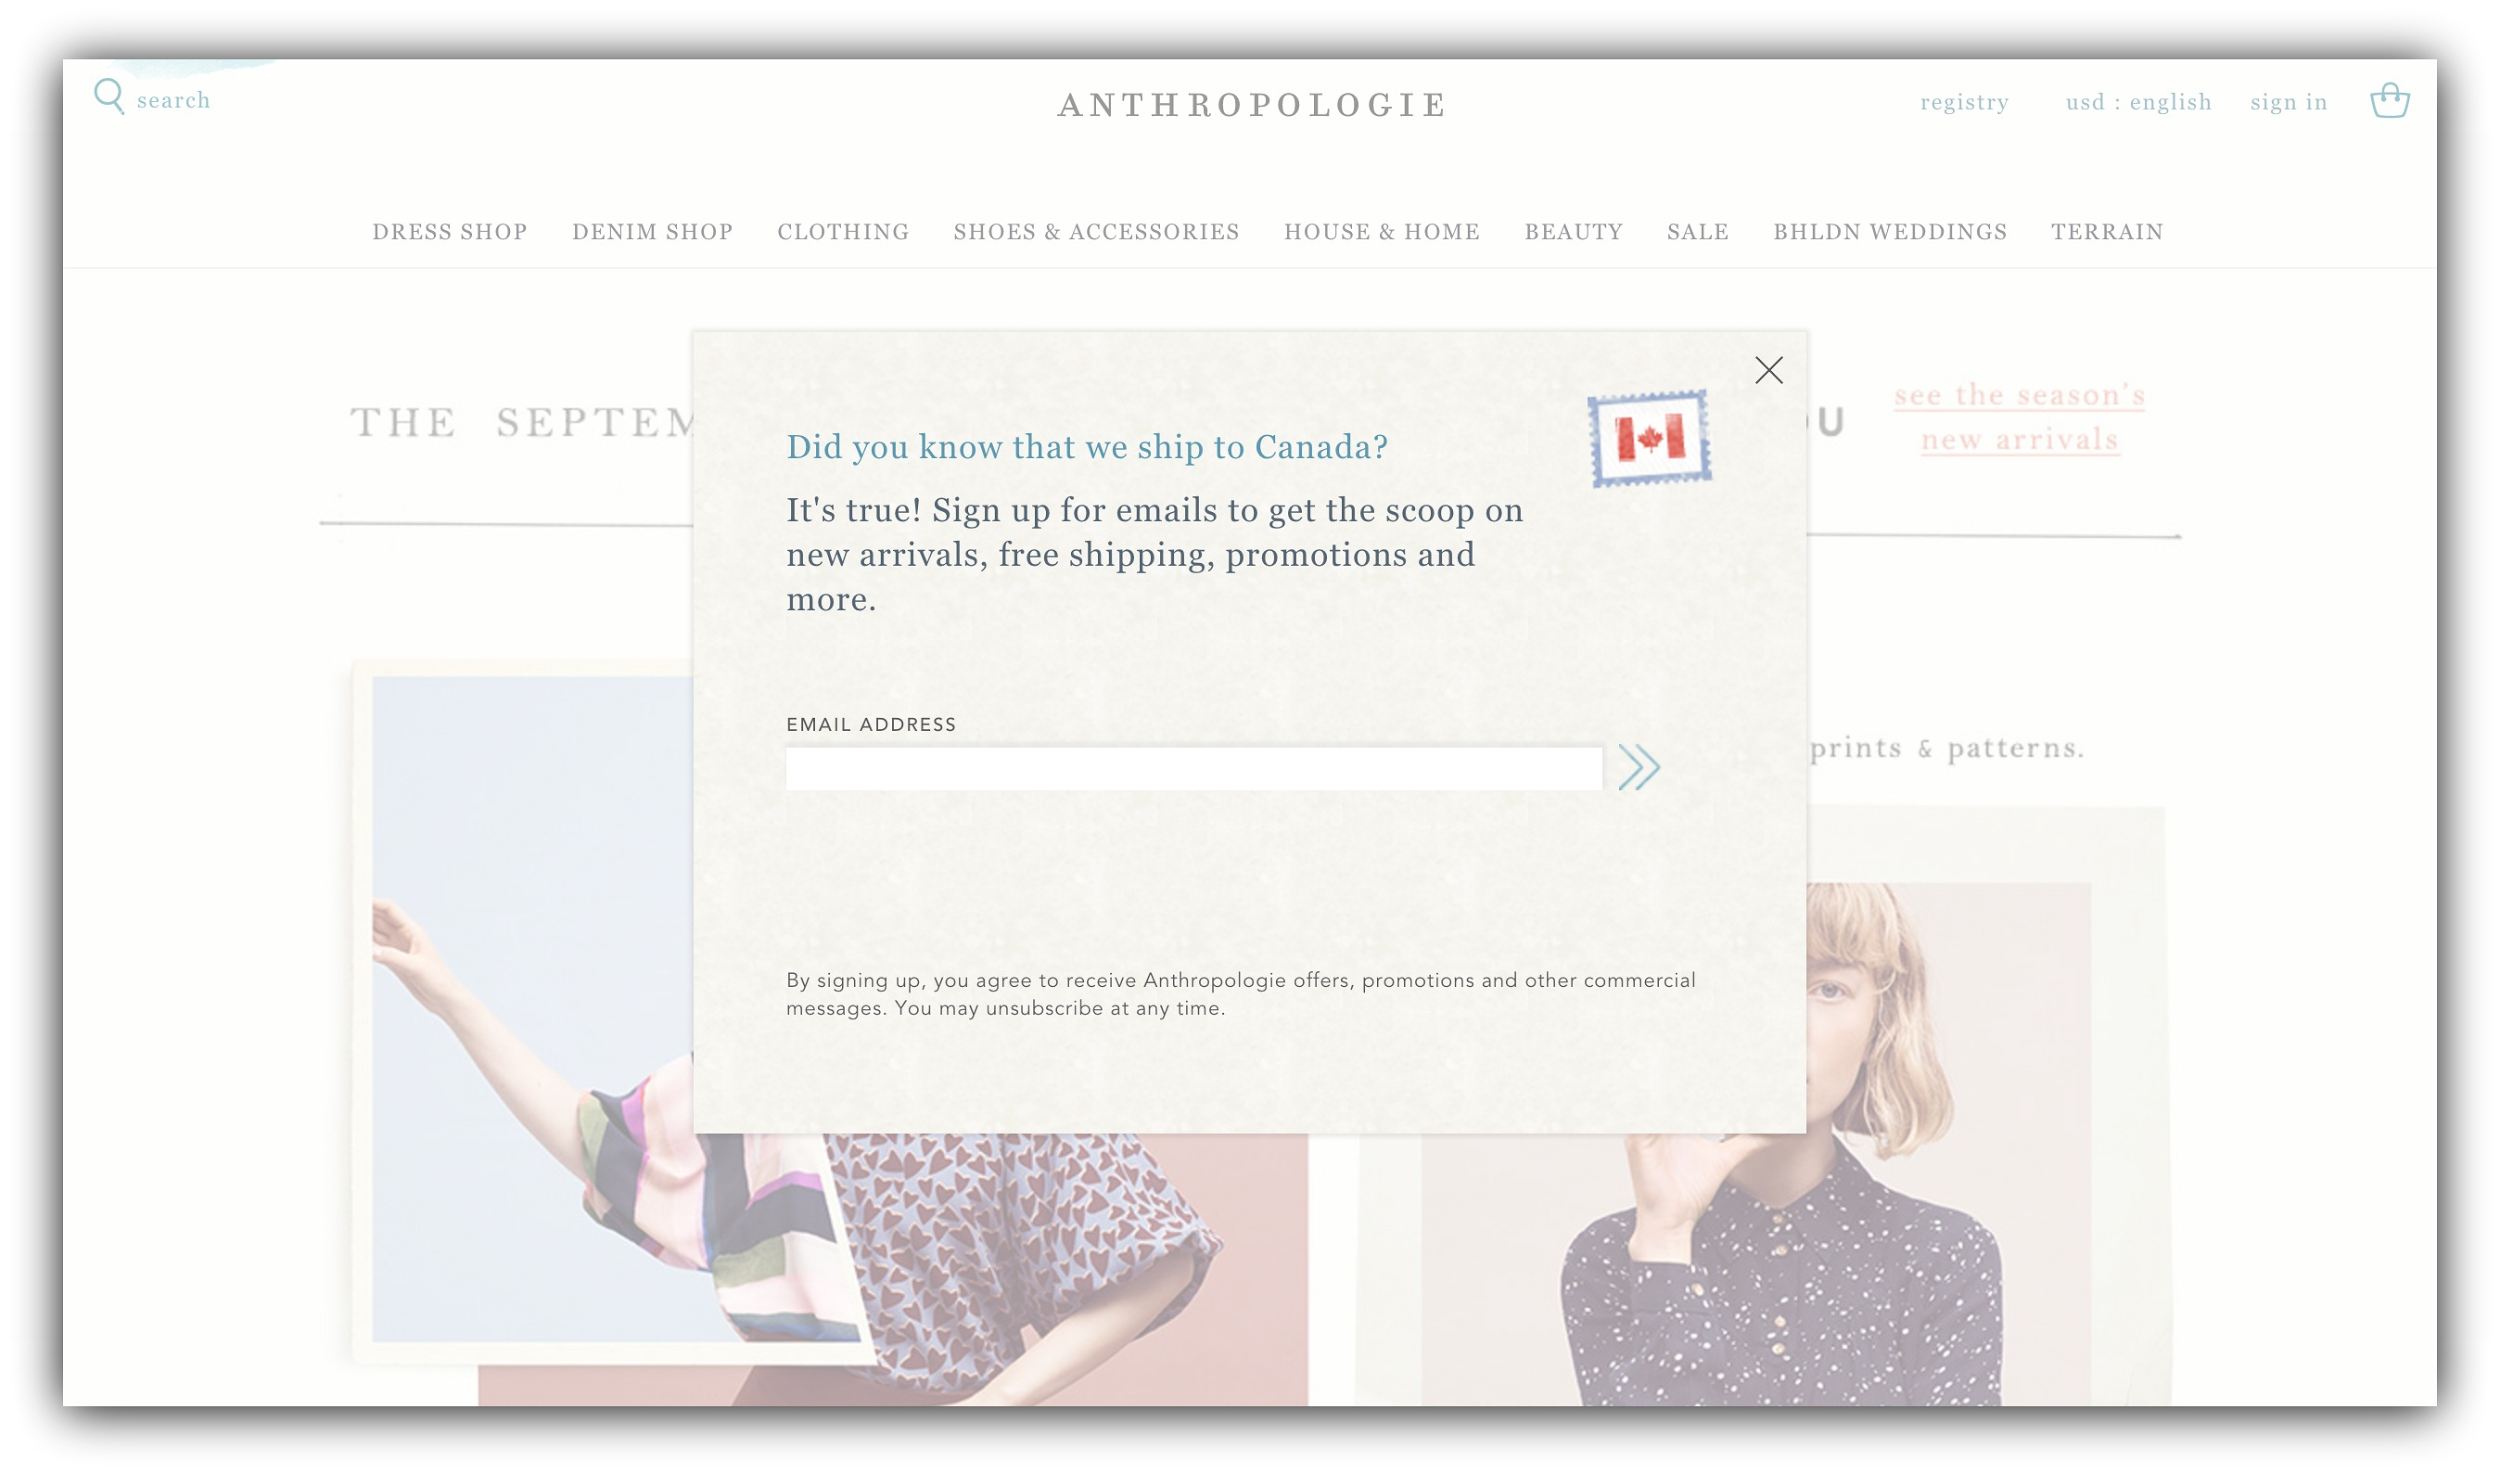
Almost all of us have encountered pop-ups, and as annoying as some people say they are, pop-ups still work as one of the highest converting opt-ins.
Because pop-ups demand attention and action (either you enter your email address or press the X to exit out of the pop-up), they convert like crazy.
There are a few different options for pop-ups, however. You don’t just have to trigger the pop-up exactly when the visitor lands on your site.
You could have a…
-
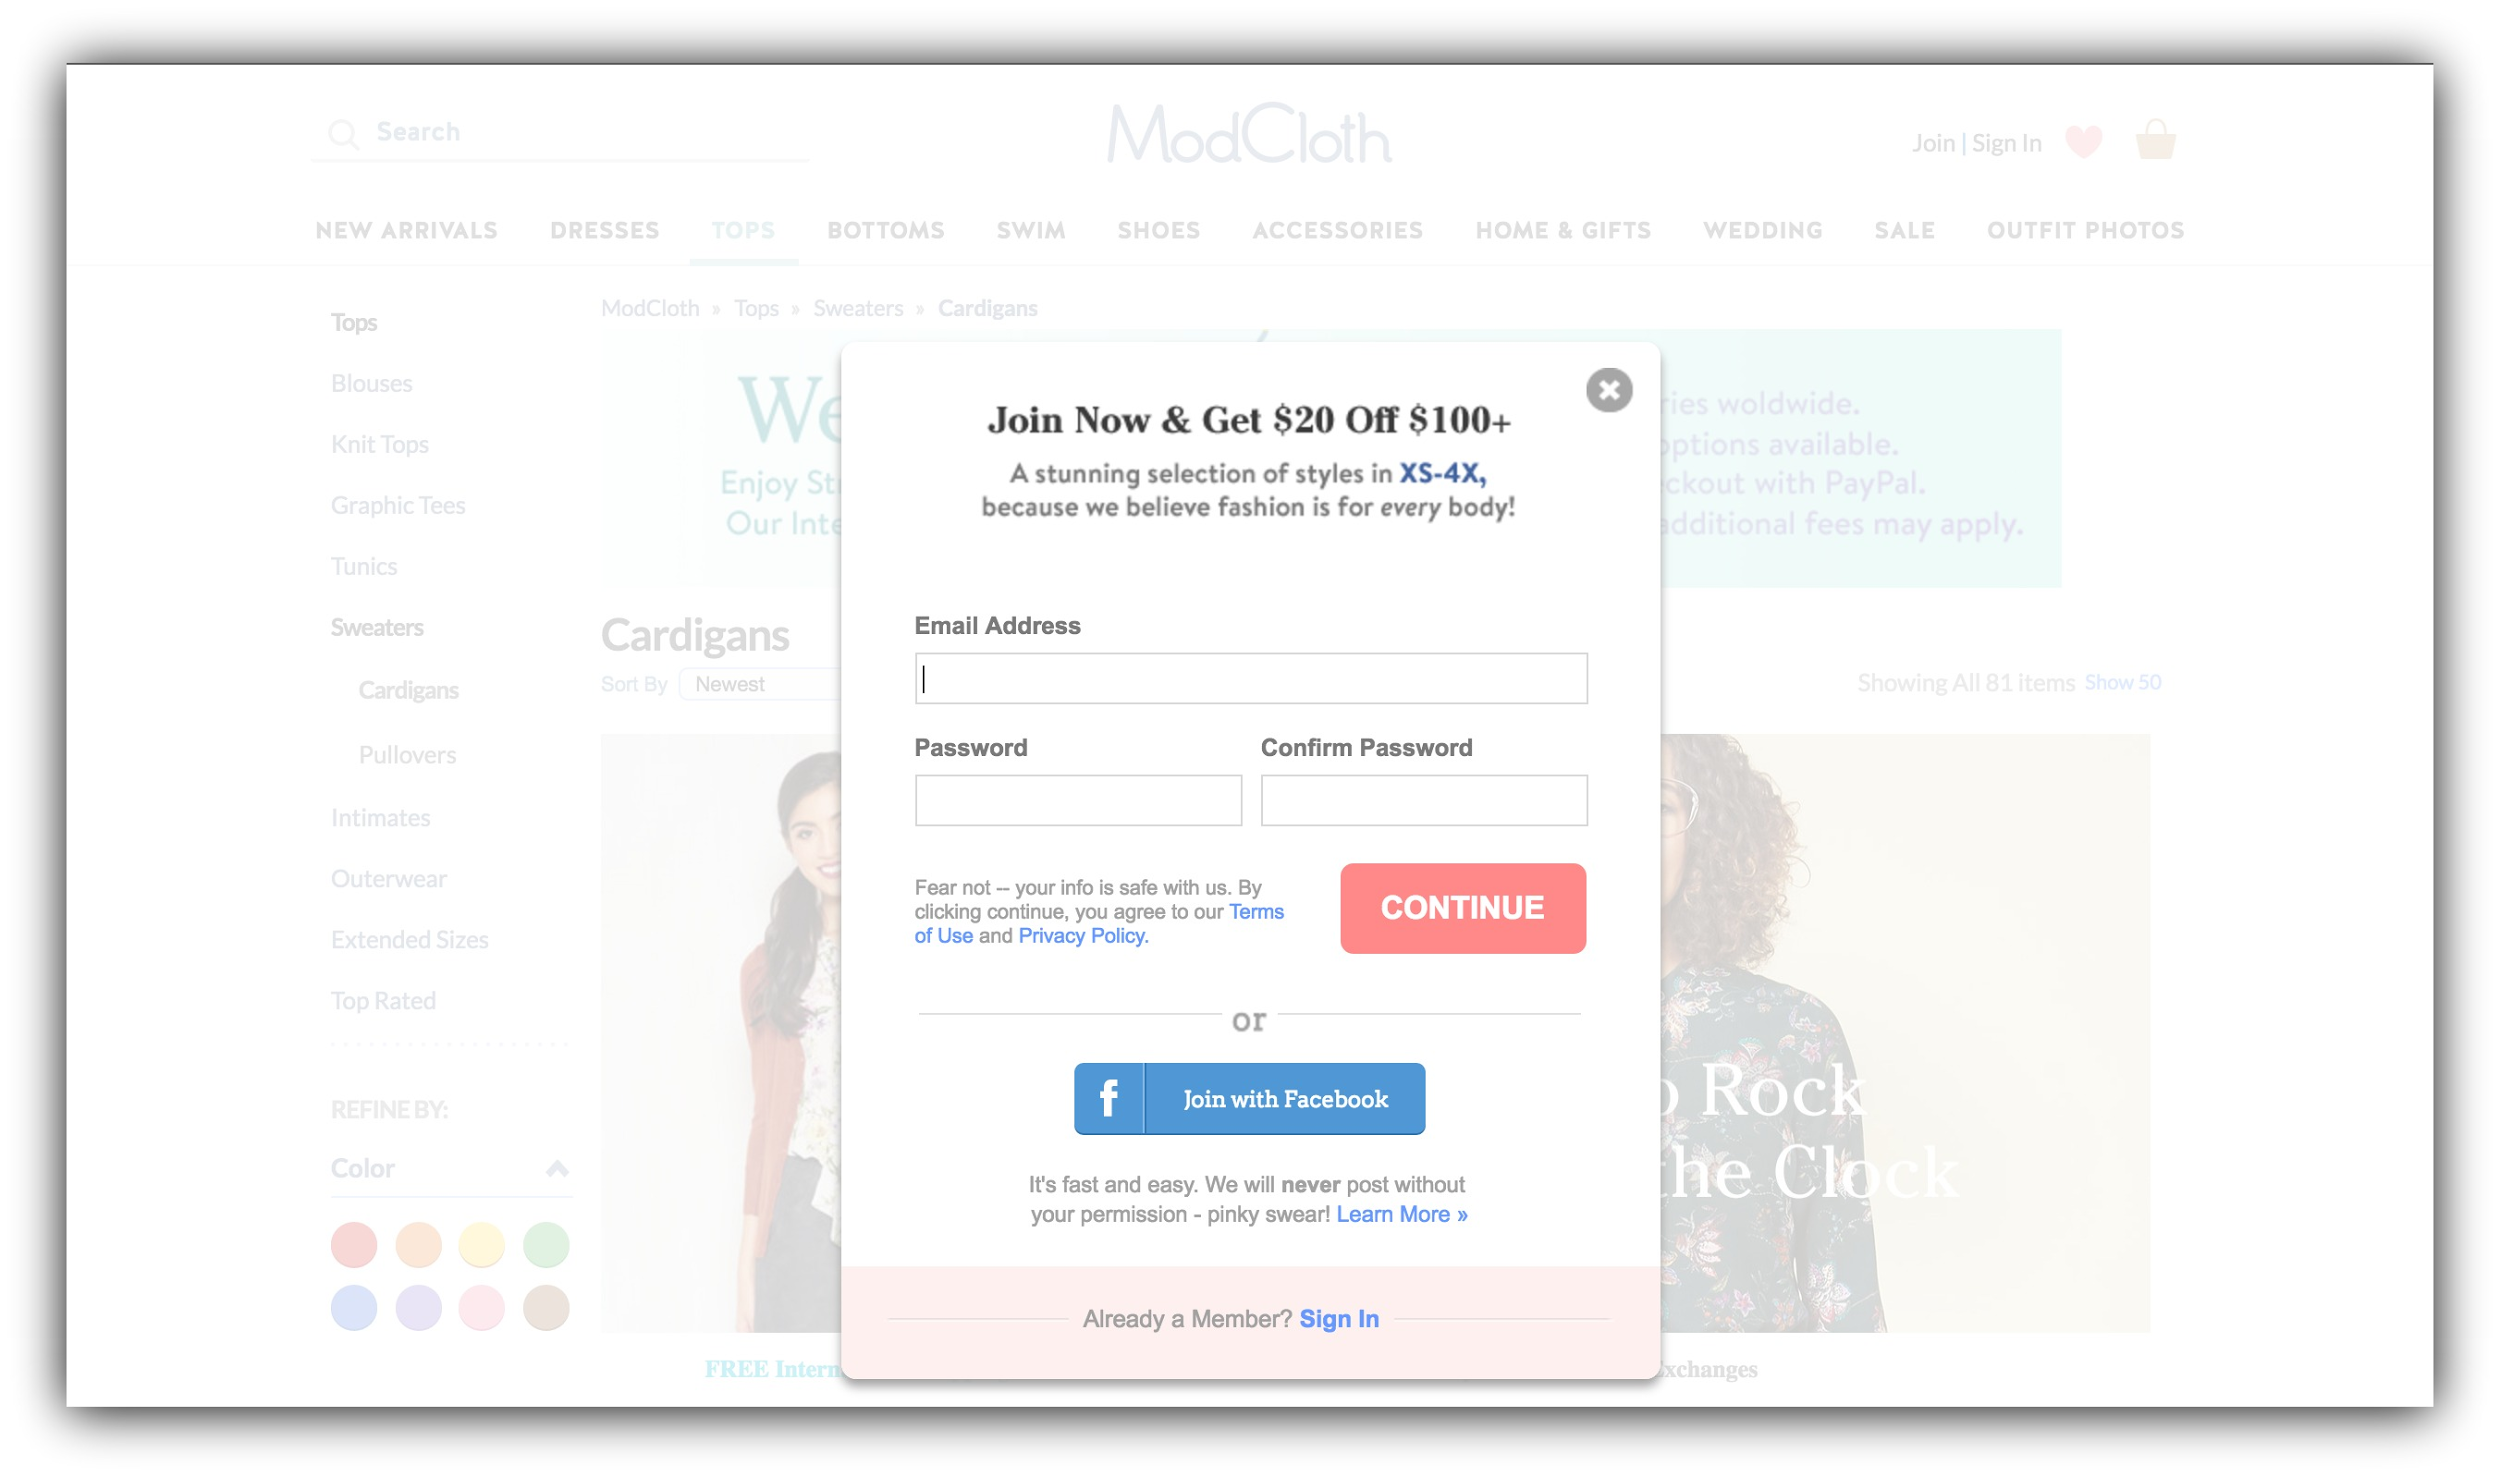
Site wide pop-up. These are the pop-ups you’re most used to seeing around the internet. It usually appears within a few seconds of your visitor being on your page, on a timer rather than an event. This ModCloth pop-up is a site wide pop-up:
-
Exit intent pop-up. An exit intent pop-up appears right when your visitor goes to press the "back" button or quit out of your website. This doesn’t interrupt their browsing experience at all, as it only shows up when they’re about to leave. This is what “Smart Mode” in List Builder does.
Our exit intent pop-up converts at over 6.5%:

-
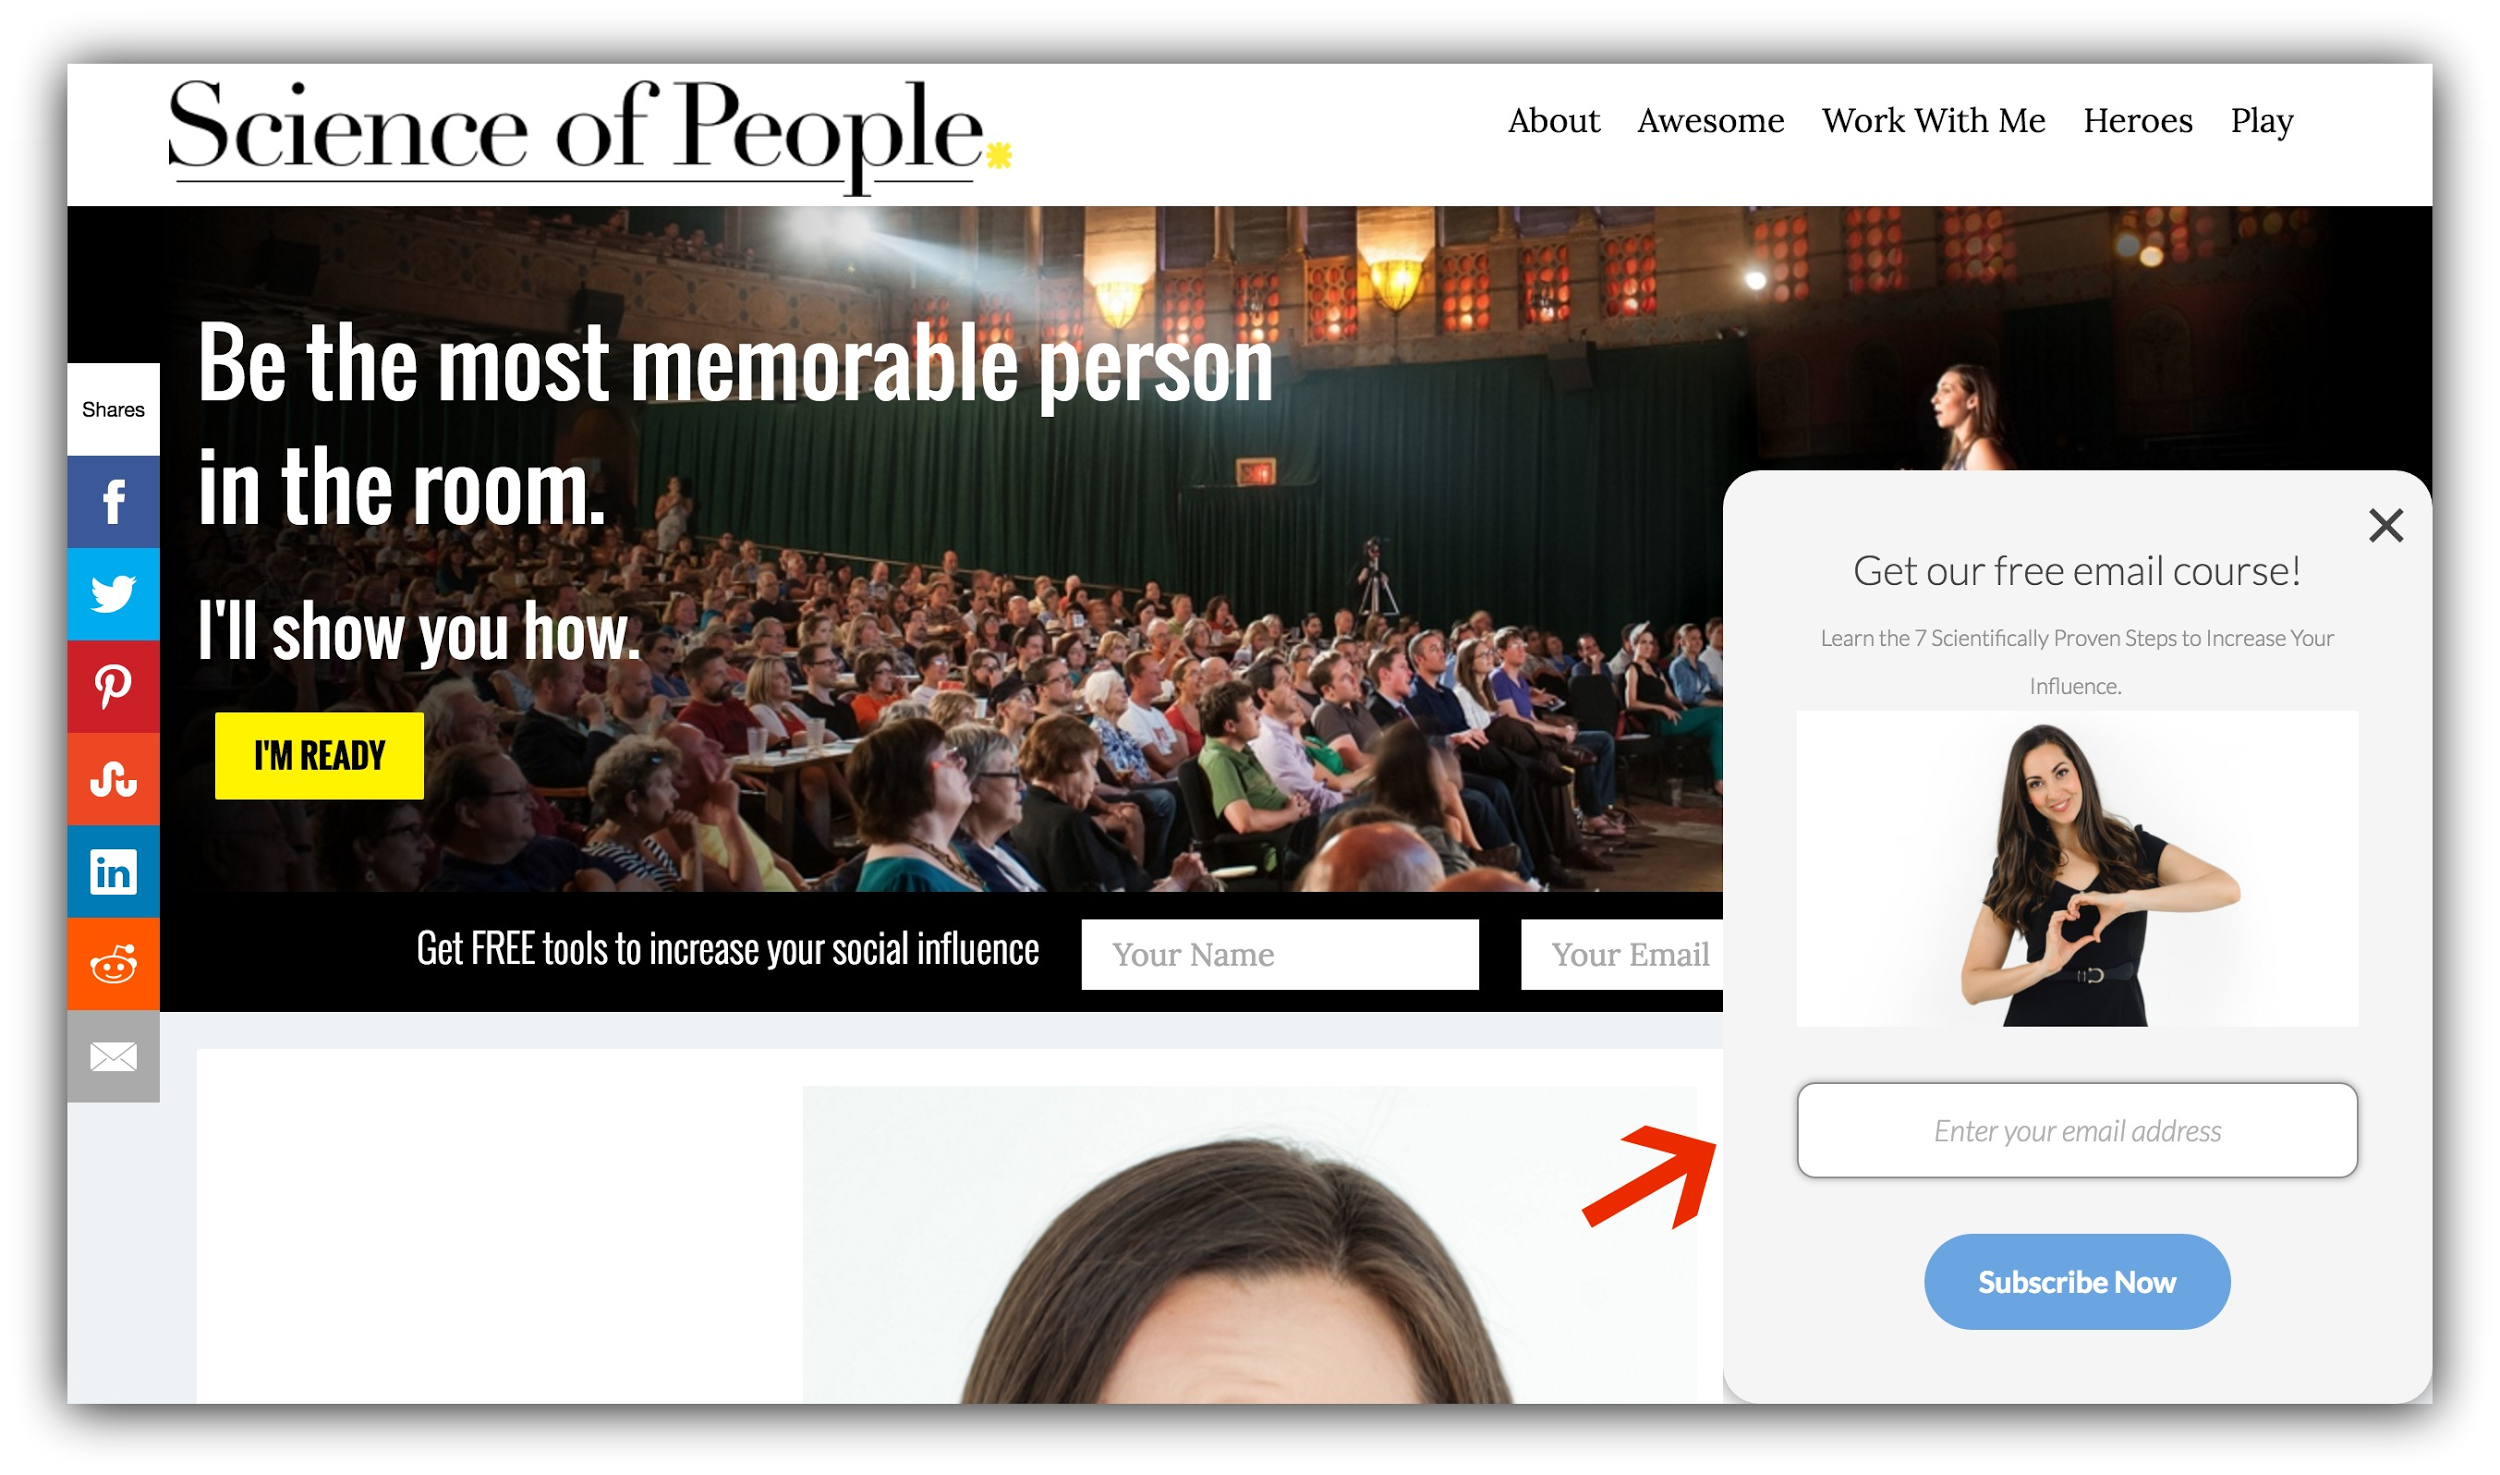
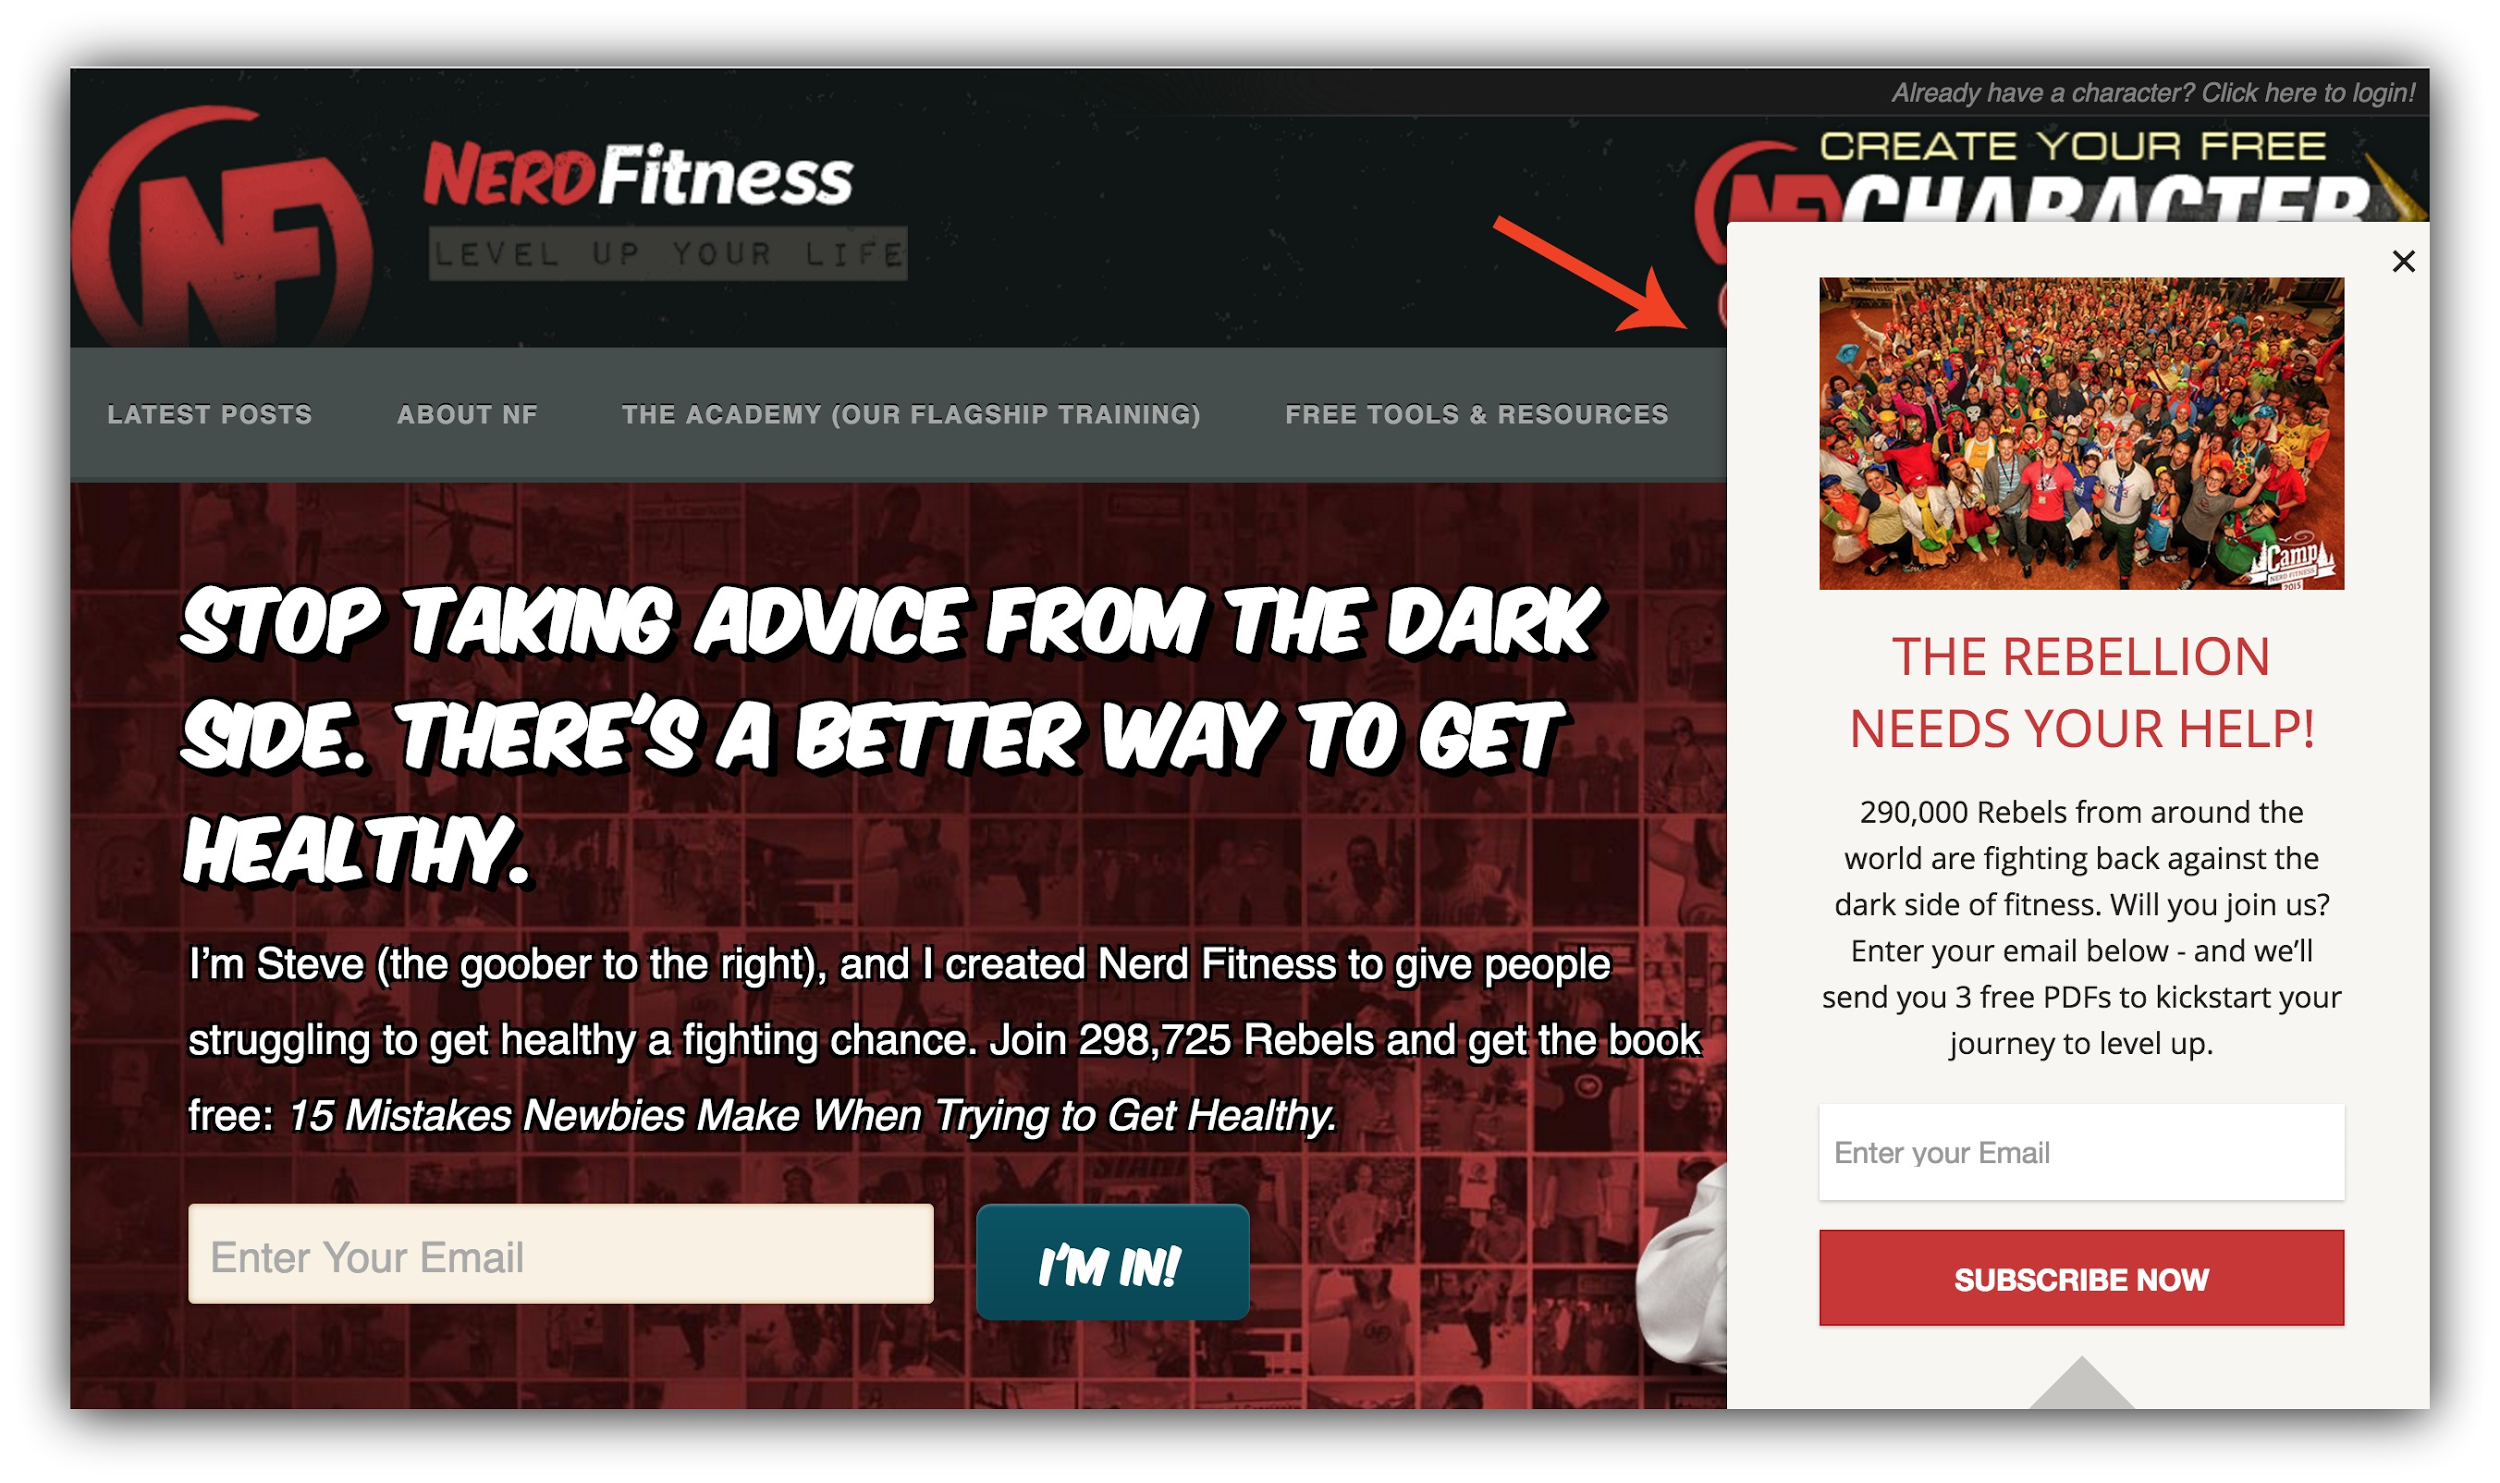
Slide in pop-up. A slide in pop-up appears when triggered by the percentage of the page the visitor is on. For example, you might trigger a content upgrade pop-up to slide in when the visitor is finished 50% of the content. See how Science of People uses a slide in pop-up (a Sumo Scroll Box to trigger a slide in for their free email course?:
And Nerd Fitness does the same:
-
-
The more aggressive the pop-up (for example, a site wide pop-up), the higher your conversion rate will be – and the more emails you’ll collect.
Regardless of which type of pop-up you choose, adding a pop-up to your list building arsenal is a good bet.
How to Make This Work For You:
-
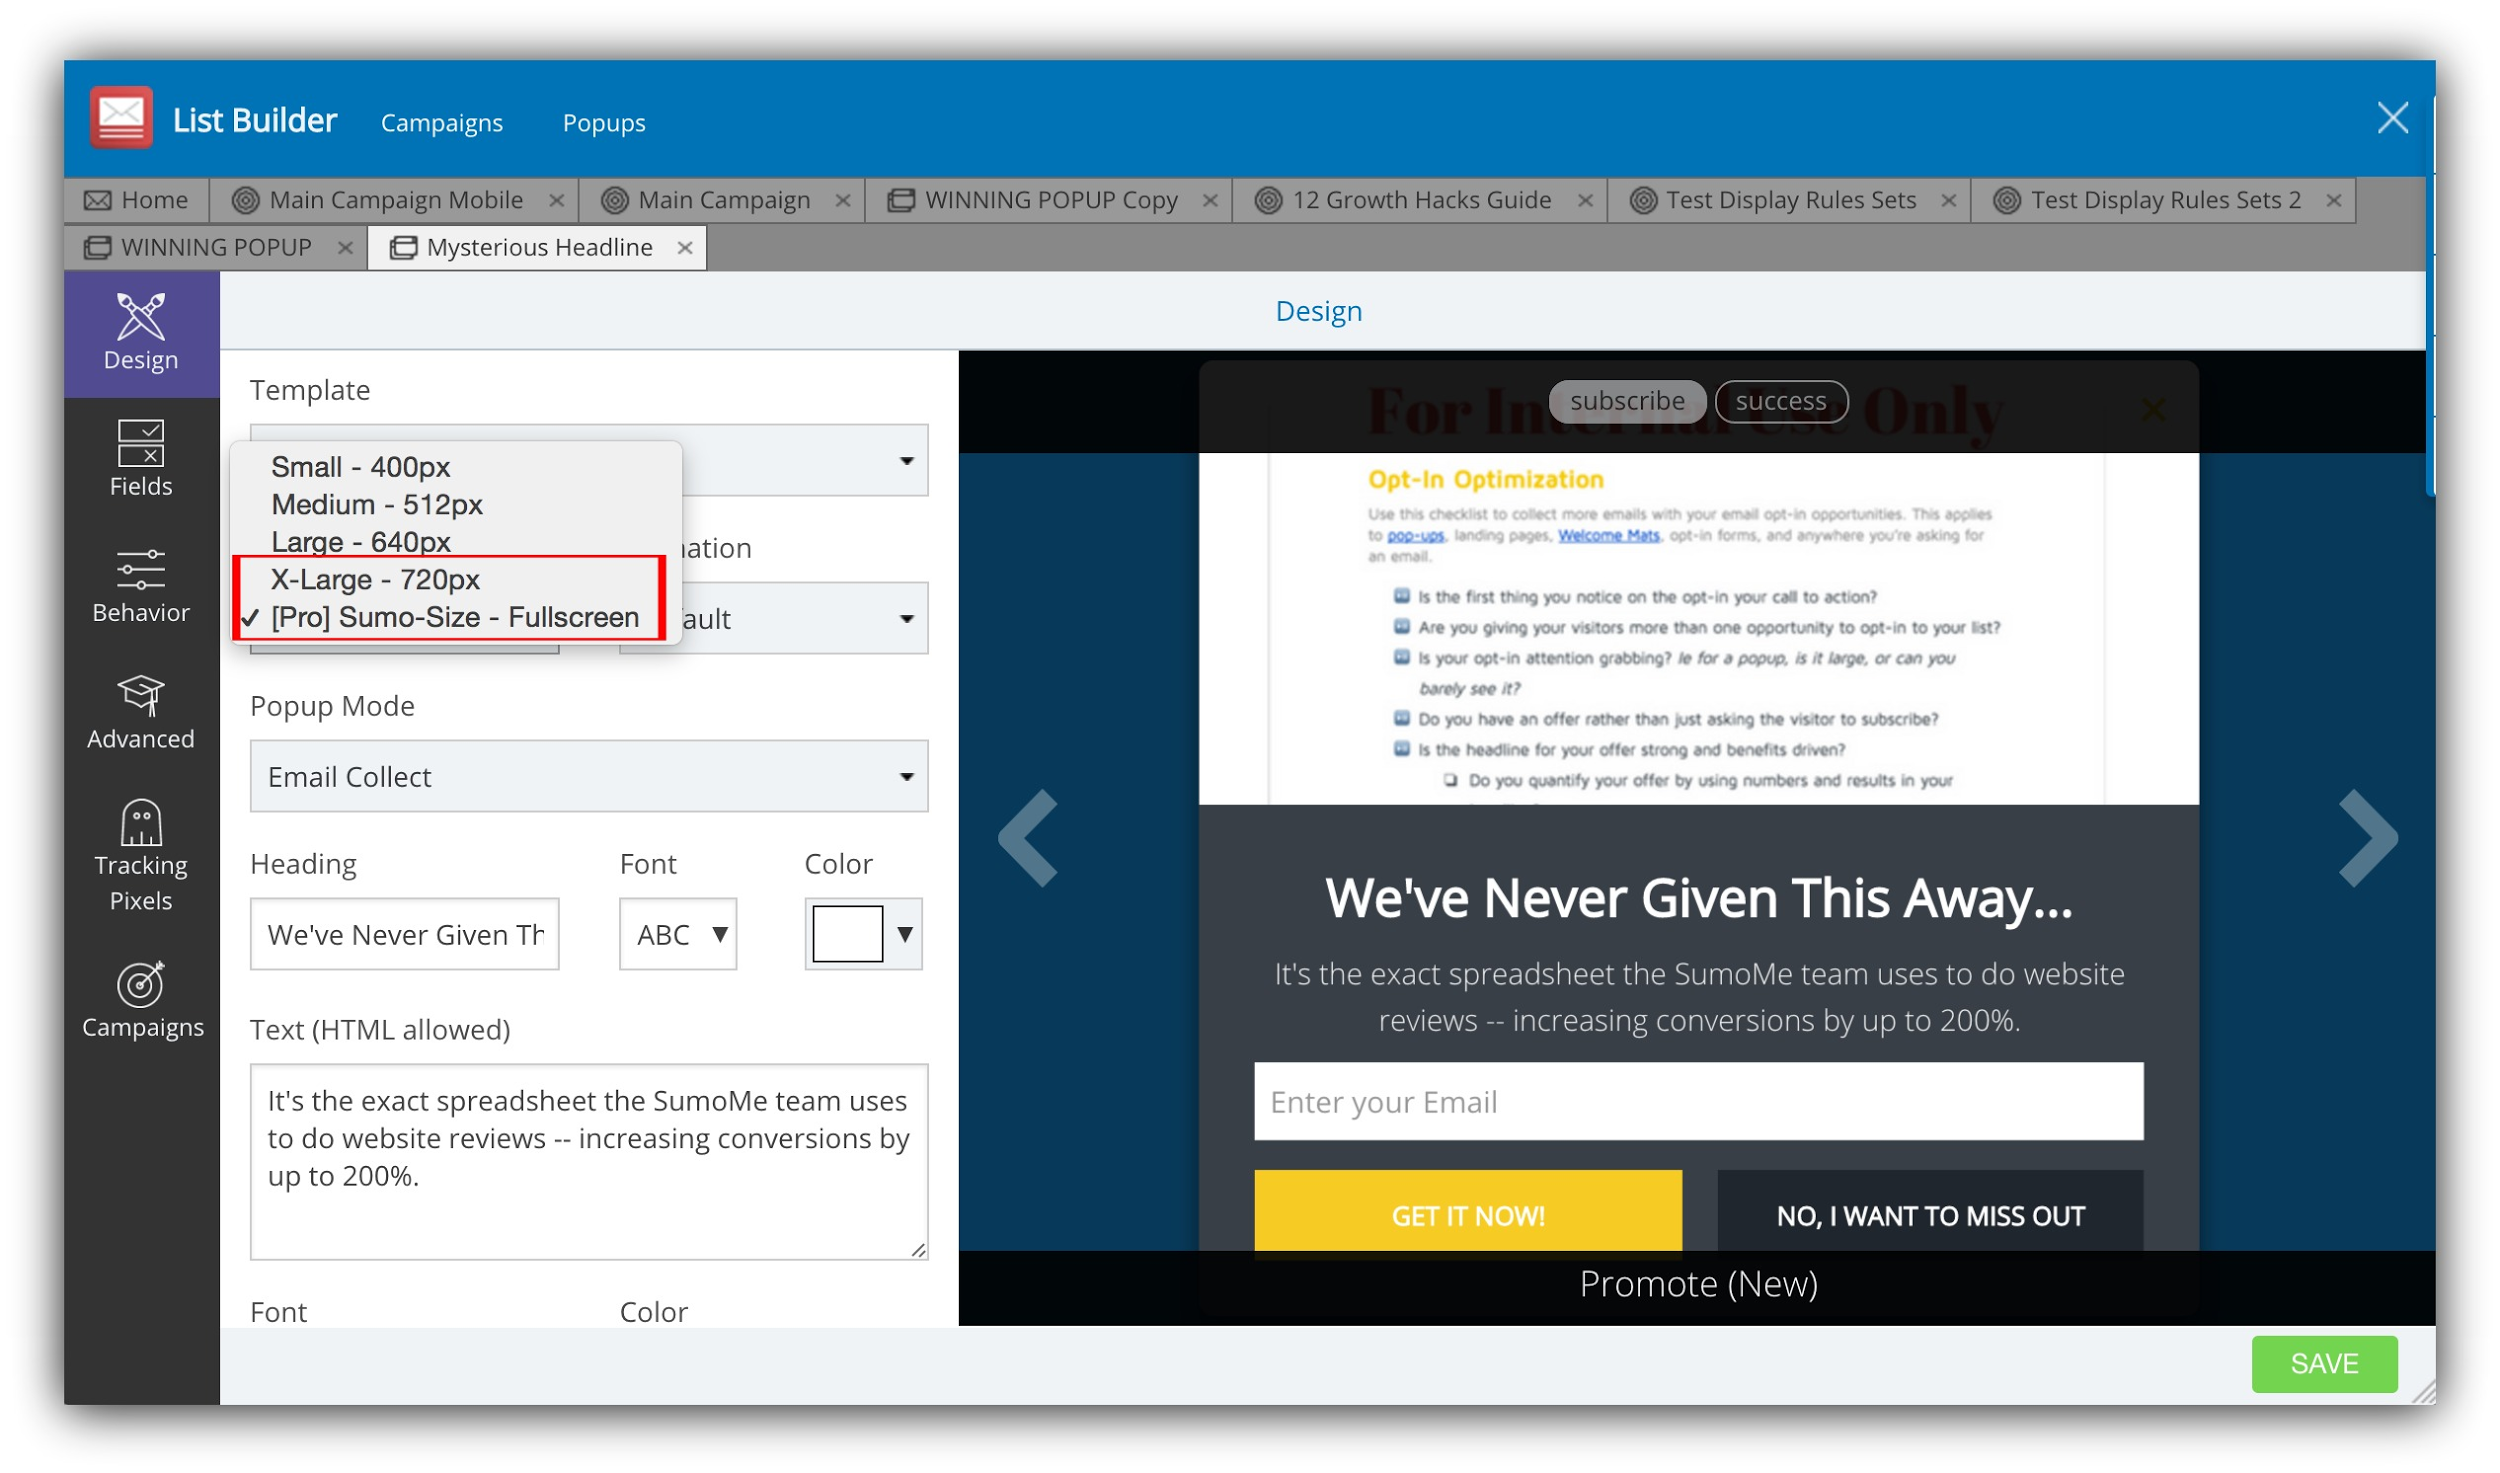
Most people don’t want to be too intrusive, so they build meek pop-ups. What do I mean by "meek?" Well, they make their pop-ups as small and inconsequential as possible. The problem with this, is that small pop-ups don’t isolate the call to action. The visitor can easily become distracted by everything going on behind it.
That’s why best practice is to make your pop-up as large as possible. This will block out all the distractions on your website and command more attention. When you’re setting up your pop-up in List Builder, select Sumo-Size or X Large:
-
Because pop-ups do distract from what the visitor originally navigated to your website for, don’t keep them on the pop-up for too long. Only ask for 1-2 pieces of information – their email and their name at the very most. If you have too many form fields, your call to action will fail.
-
Motion is eye catching and has proven to increase conversions. Add an animation to your pop-up to capture more attention.
%(010)
-
While the huge websites can get away with a simple email ask, if you have less than 100,000 pageviews per month, make sure you’re giving away something in exchange for the email address. And while we’re on that topic, how you describe your offer is crucial to increasing your conversion rates! Master that headline formula.
-
-
Tools: Sumo’s List Builder app is two step opt-in, site wide pop-up, and exit intent pop-up all rolled into one super customizable pop-up plugin. Scroll Box will allow you to create a polite slide in pop-up that’s triggered by how far down the page your visitor gets. Use the Headline Generator to come up with the perfect headline for your pop-up.
Opt-In #8: The Attention-Grabbing Feature Box
Expected Conversion Rate: 5-10%
Pop quiz!
What opt-in opportunity has a high conversion rate, capture attention and is usually above the fold?
It’s the feature box. Obviously. What point do you think you’re reading, anyway?
The feature box has gotten a lot of attention over the past few years, and one reason for that is because feature boxes have become one of the highest converting on-page opt-in opportunities.
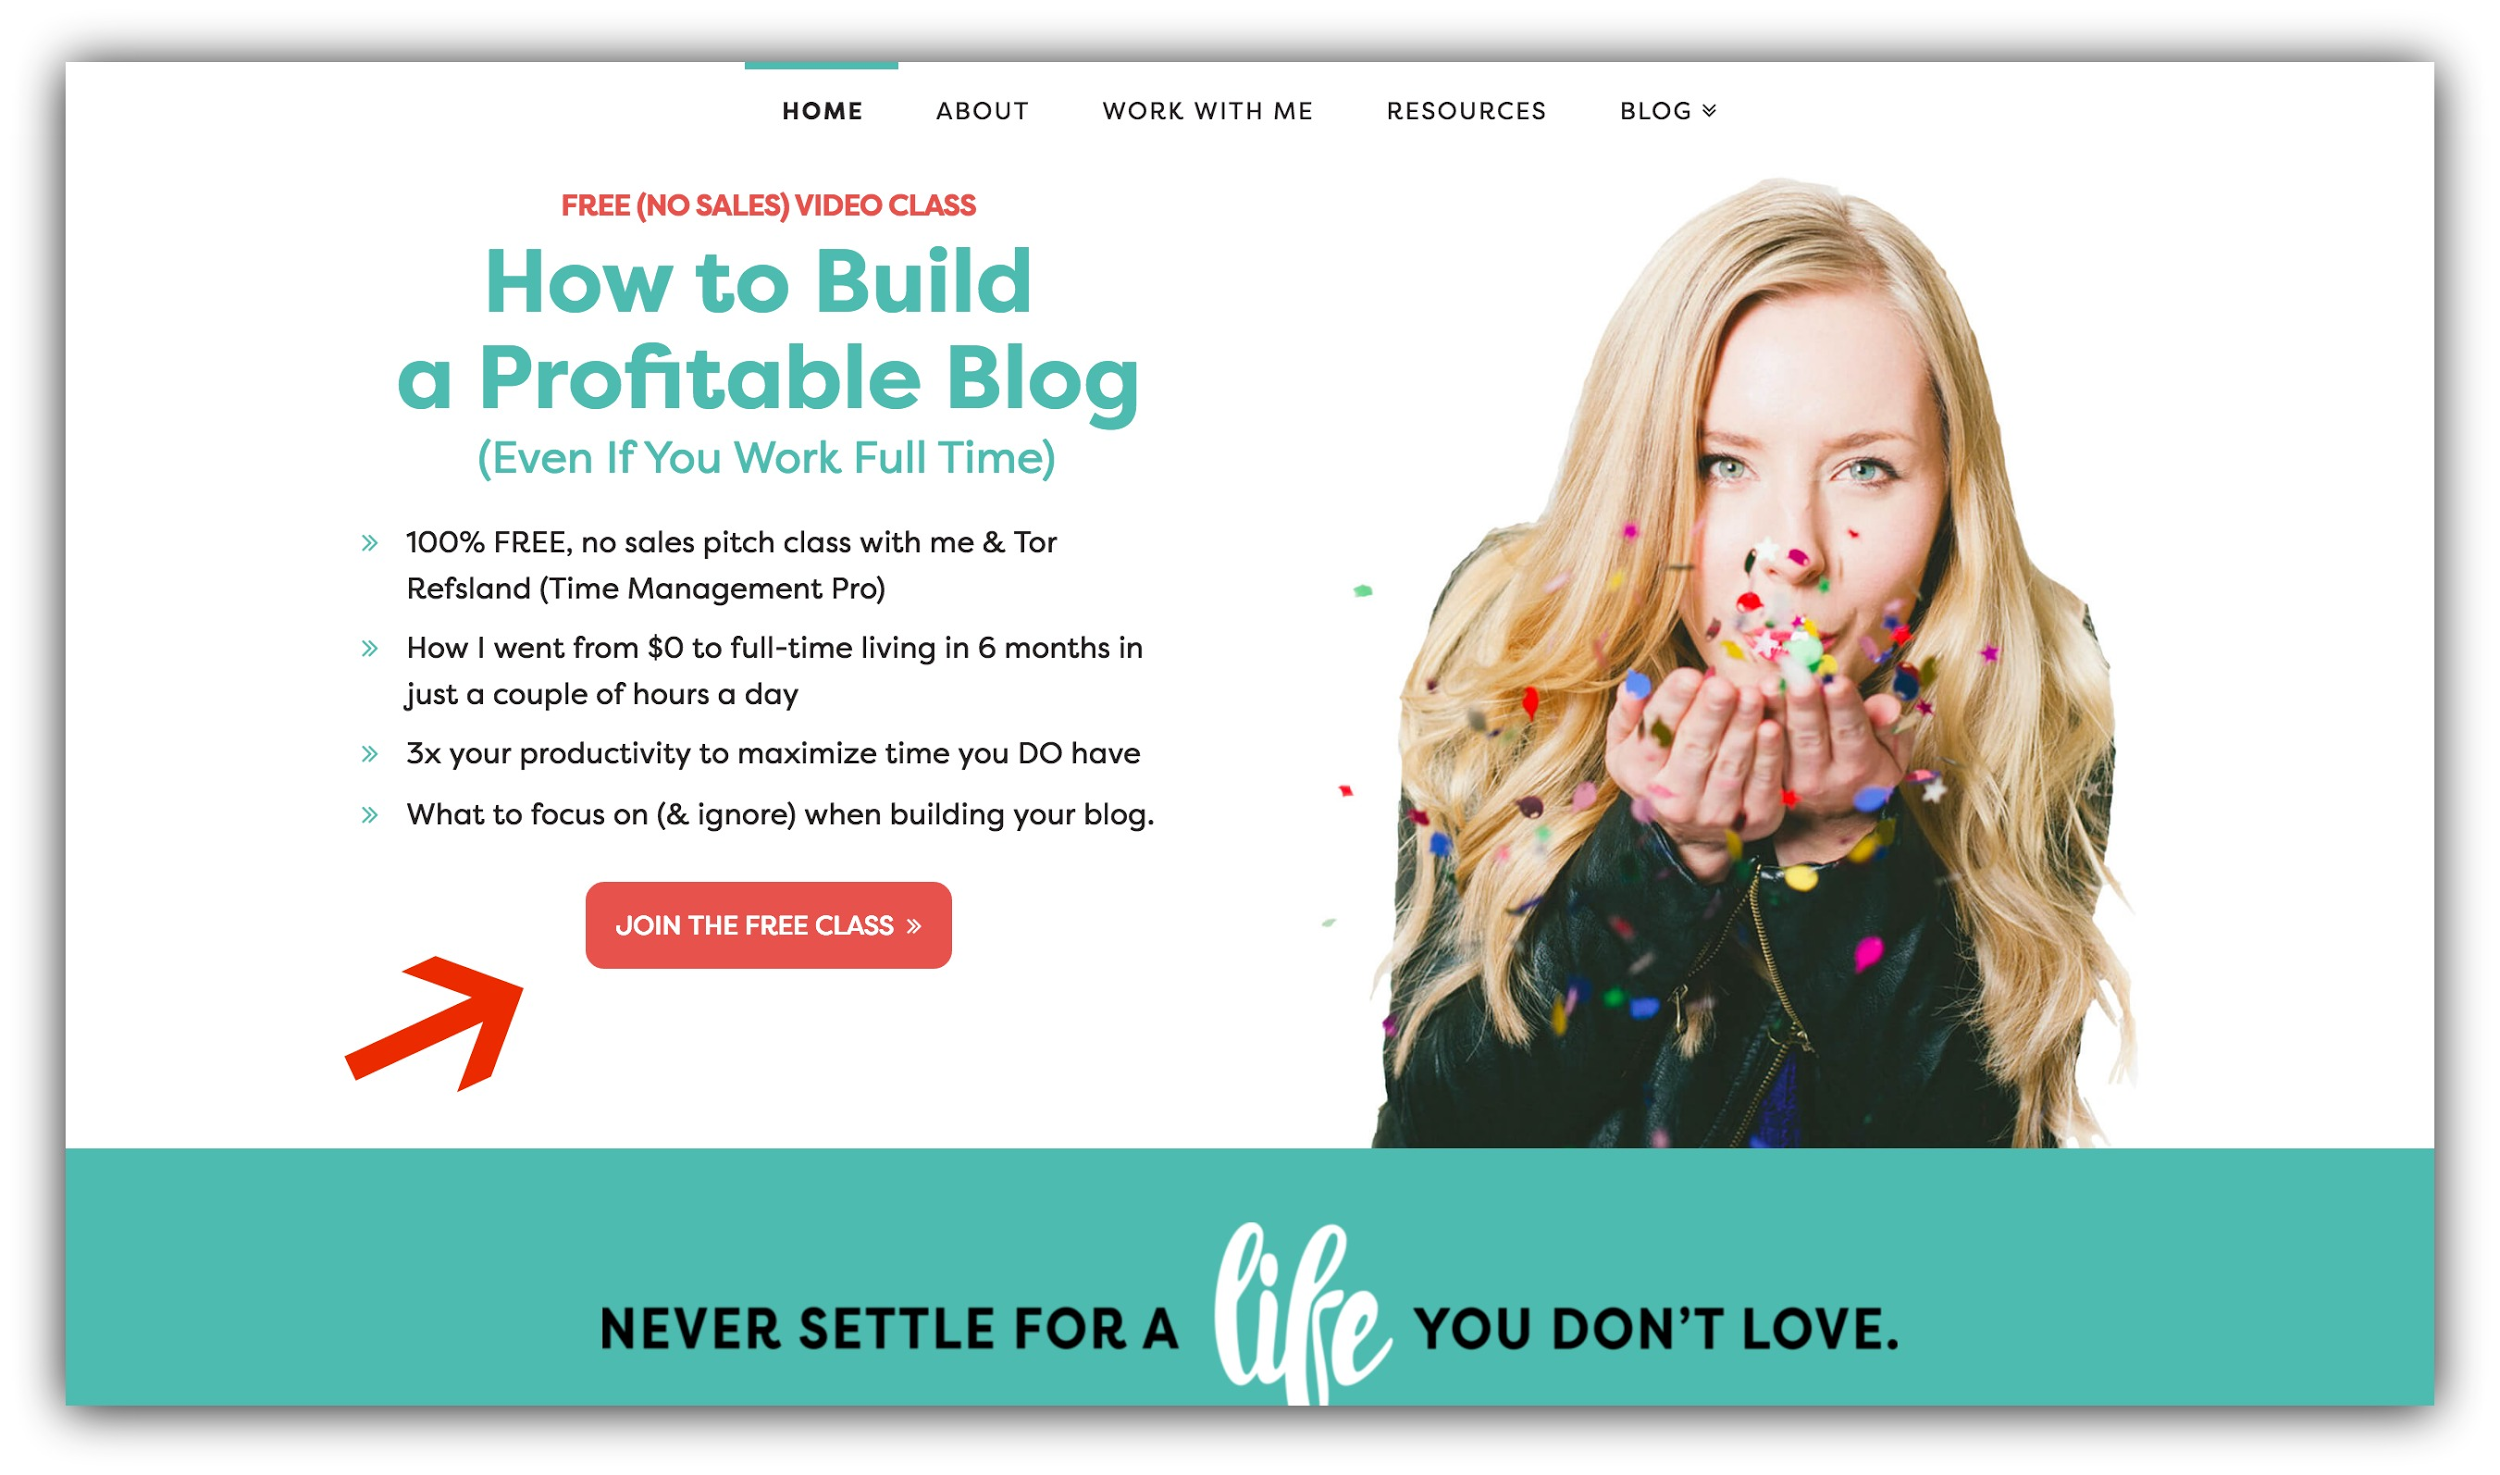
Part of that is because it’s unexpected. As web browsers begin to block out sidebars, feature boxes start to command attention. A feature box is just as it sounds: an opt-in opportunity that is a feature of your website.
The most common version is the one you see above the fold on many websites, like the one I use on my website:
But there are more places to put a feature box that you might have seen around the web. For example, Foundr has a feature box above the footer:
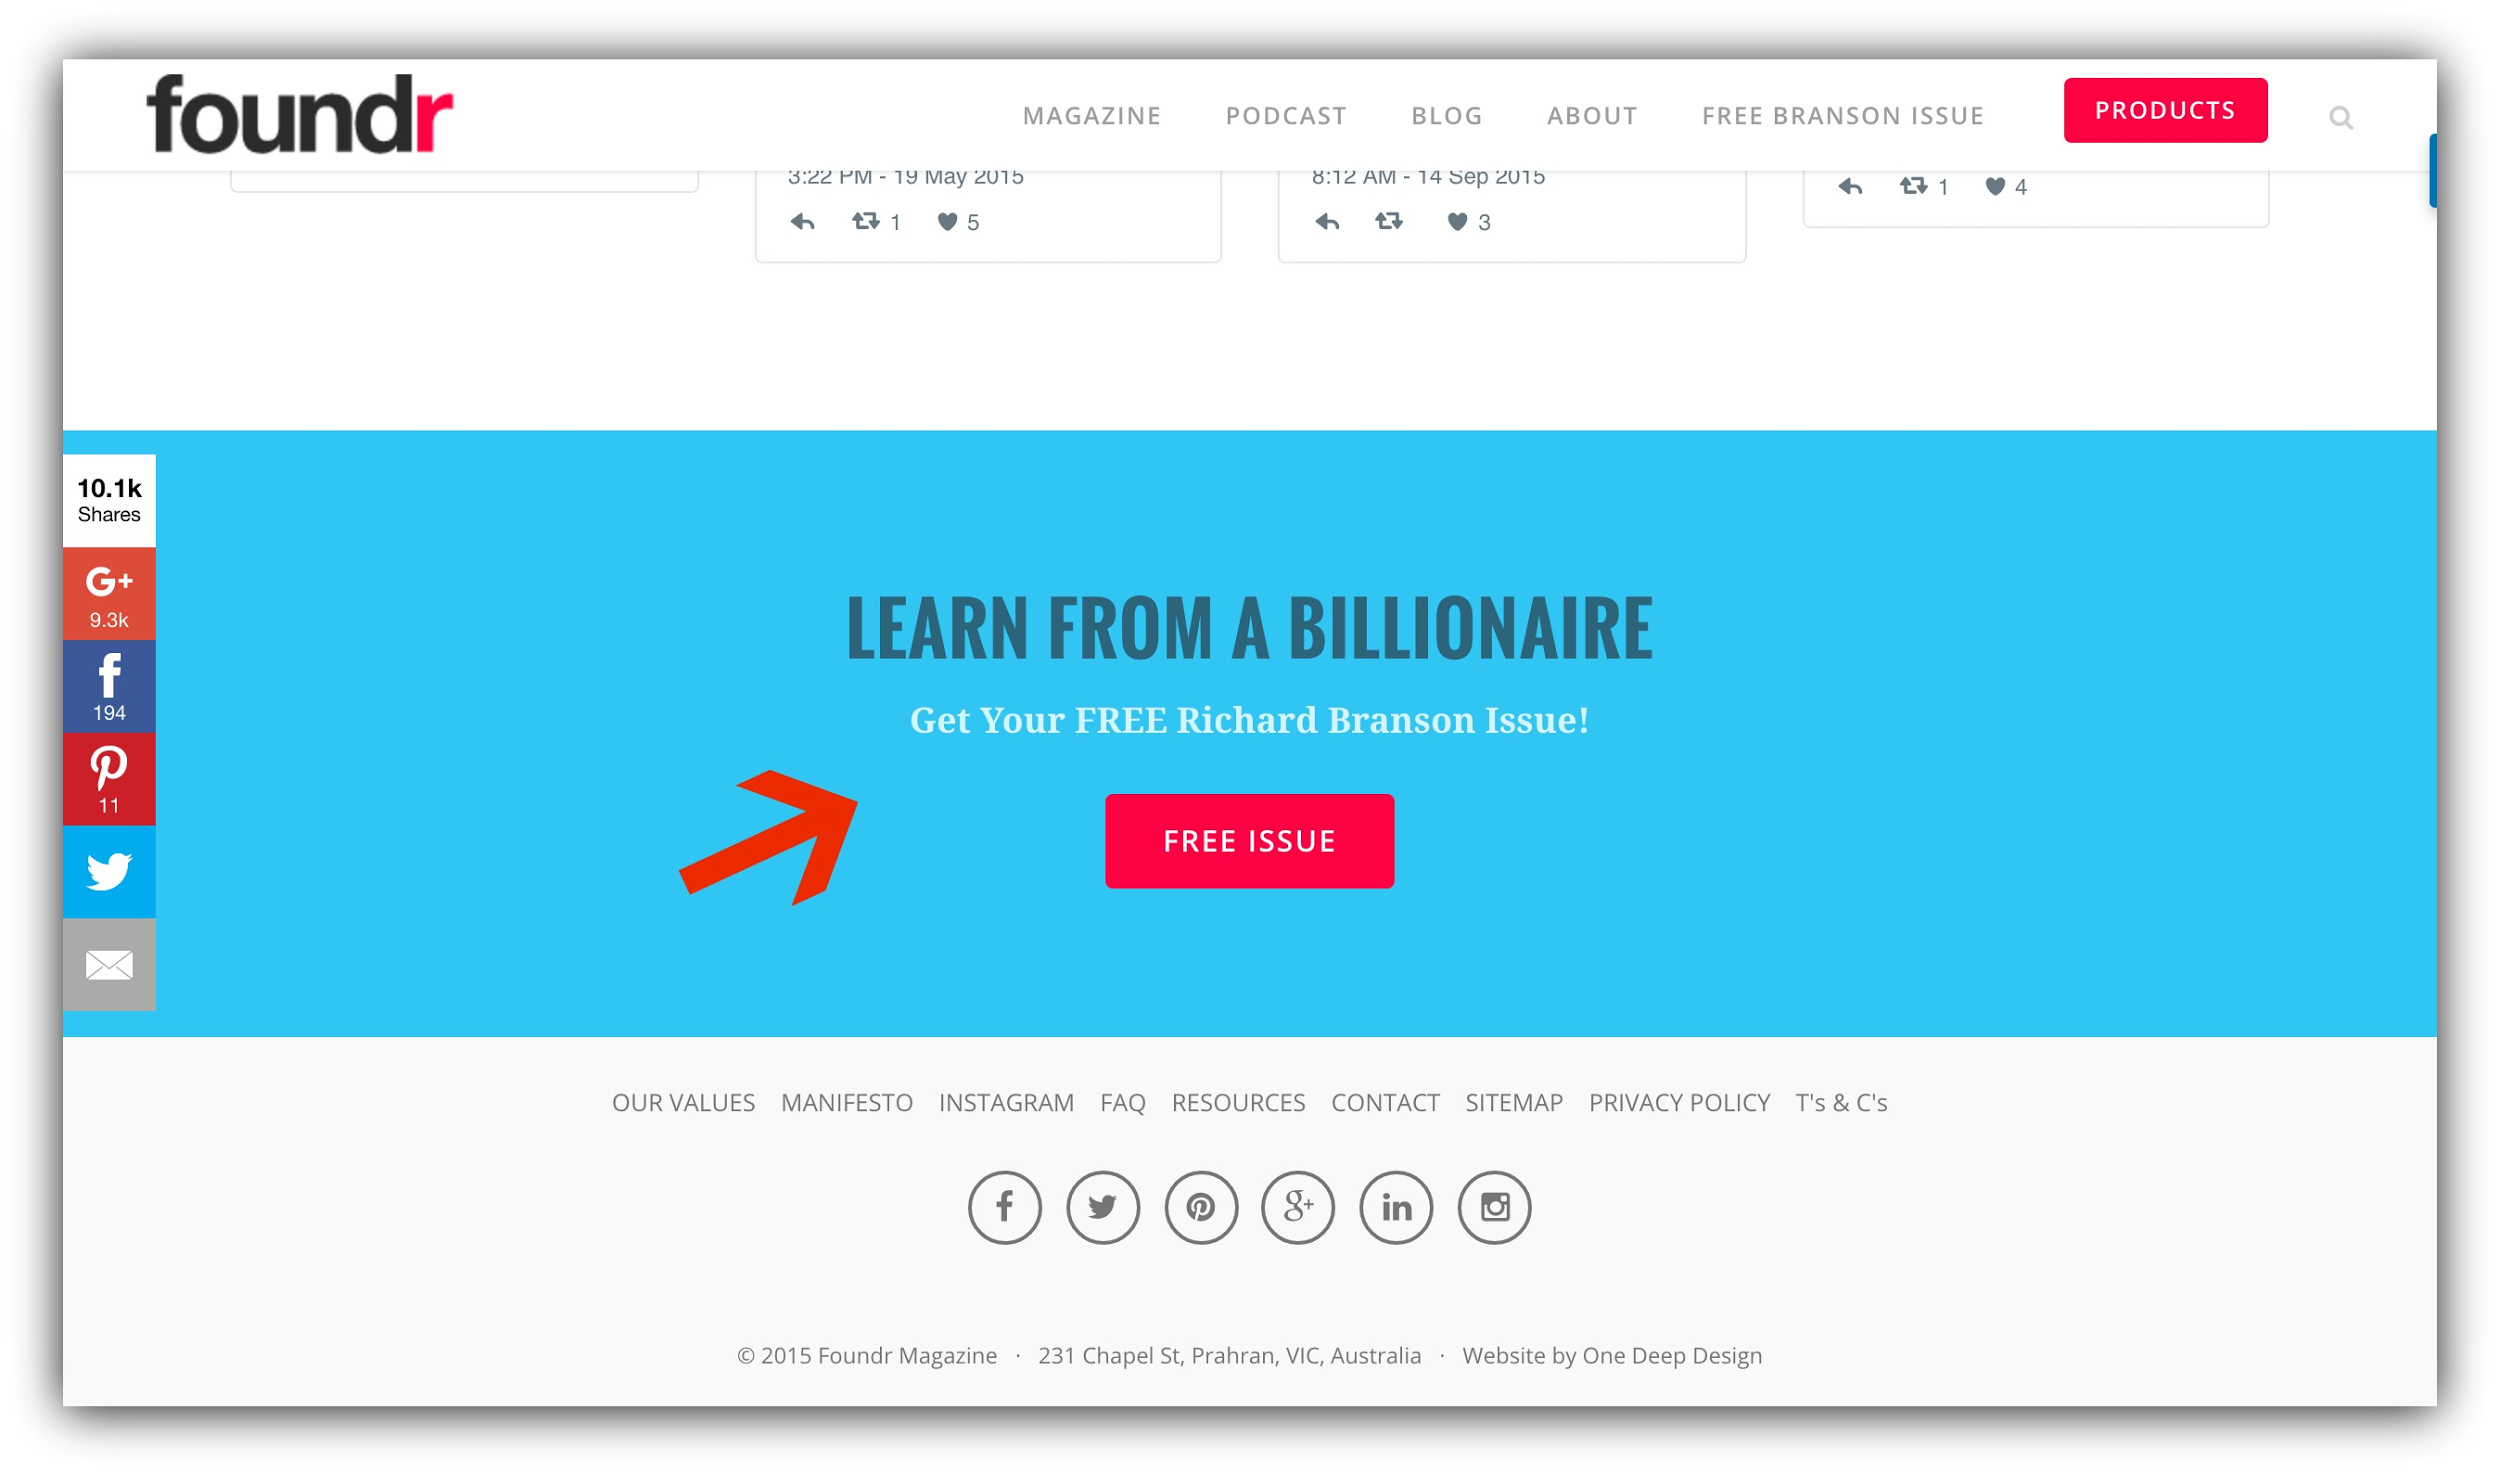
This is a higher converting alternative to the footer opt-in.
This doesn’t actually sit in your footer, but hangs out above it, and is far more eye-catching than the typical Aweber or MailChimp opt-in form templates for the footer.
How to Make This Work For You:
-
Your feature box is just like any other opt-in – you’ll convert much better if you have an offer rather than just ask your visitors for their email address with nothing in return.
-
Keep the text surrounding your offer to a minimum of 3 strong points. If you give your visitors too much information to consume they’ll likely just scroll past your feature box.
-
You can either have a button on your feature box for a two step opt-in, or a raw form – either will work. Use a two step opt-in to increase your conversions.
-
-
Tools: If you don’t have a feature box function in your theme, you’ll need to install a plugin to help with the placing. Plugmatter is a good option, as it comes with both free and premium templates.
Opt-In #9: Below Your Menu on Pages
Expected Conversion Rate: 5-10%
Let’s say you want an eye-catching above-the-fold call to action…
But you don’t want to use a feature box, or you want it on pages other than your homepage.
There’s an opt-in opportunity for that!
Where your feature box is usually just on your homepage, this option will help you capture emails even from visitors who navigate directly to the pages on your website. For this to work, you install an opt-in on pages that aren’t your homepage, like Evan Marc Katz does:
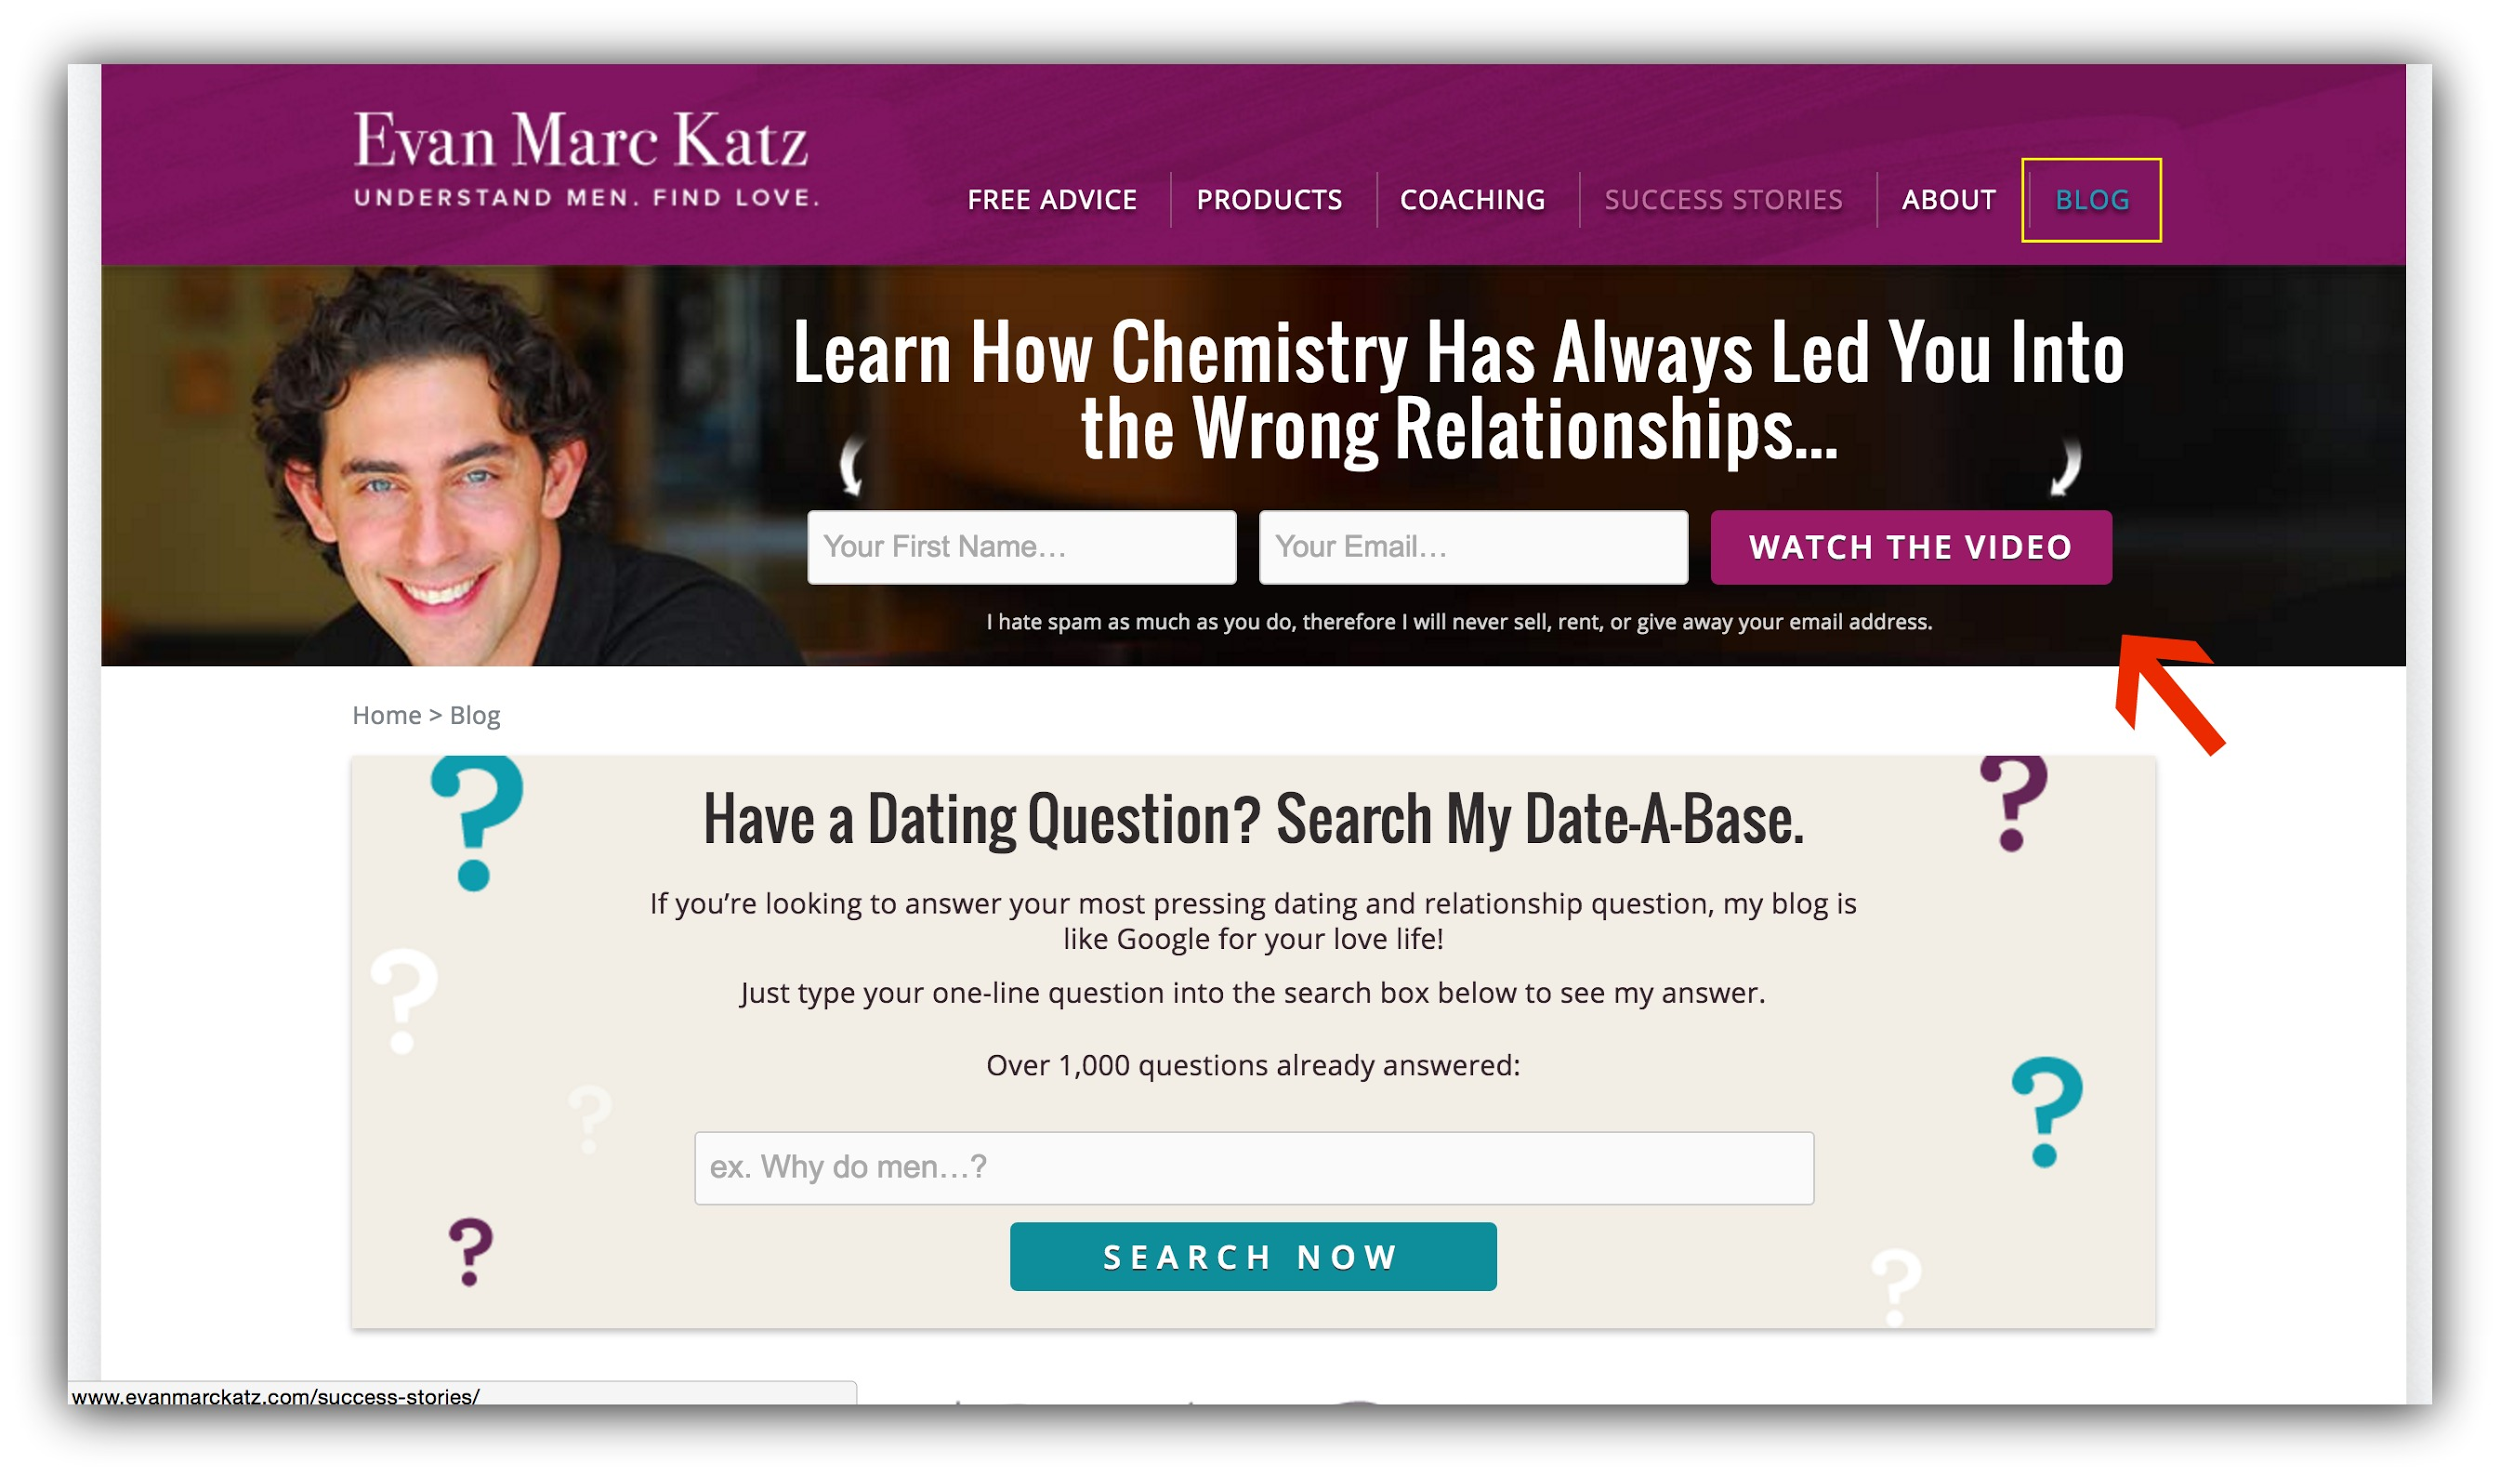
Even though the homepage on your site is definitely one of the most visited pages, there are many visitors who skip your homepage altogether when navigating your site.
For example, if they find a specific you through the Big G (Google, that is), they’ll miss your feature box and homepage opportunities all together.
This should supplement rather than replace your homepage opt-in opportunities, but is a great way to capture everybody that lands on your site.
How to Make This Work For You:
-
Use the best practices of a feature box.
-
If you want to play at a high level, you can change the call to action for each page to reflect what the page is about. For example, you might offer your content in an eBook on your archives page, and a discount CTA on your products pages.
-
-
Tools: You can use Plugmatter for these on your pages, but this is a bit fancy. Unless you have a developer or somebody to place it in the CSS of your site, you may not be able to do this.
Opt-In #10: On Your About Page
Expected Conversion Rate: 5-10%
If I were to pull up Google Analytics and check the stats on your website, I bet I know what I’d find.
I’d find that your About page is one of the top 5 most visited pages on your website.
And you know what that means, friends?
That means that your About page is ripe with opt-in potential. So you absolutely should include plenty of opt-in opportunities there.
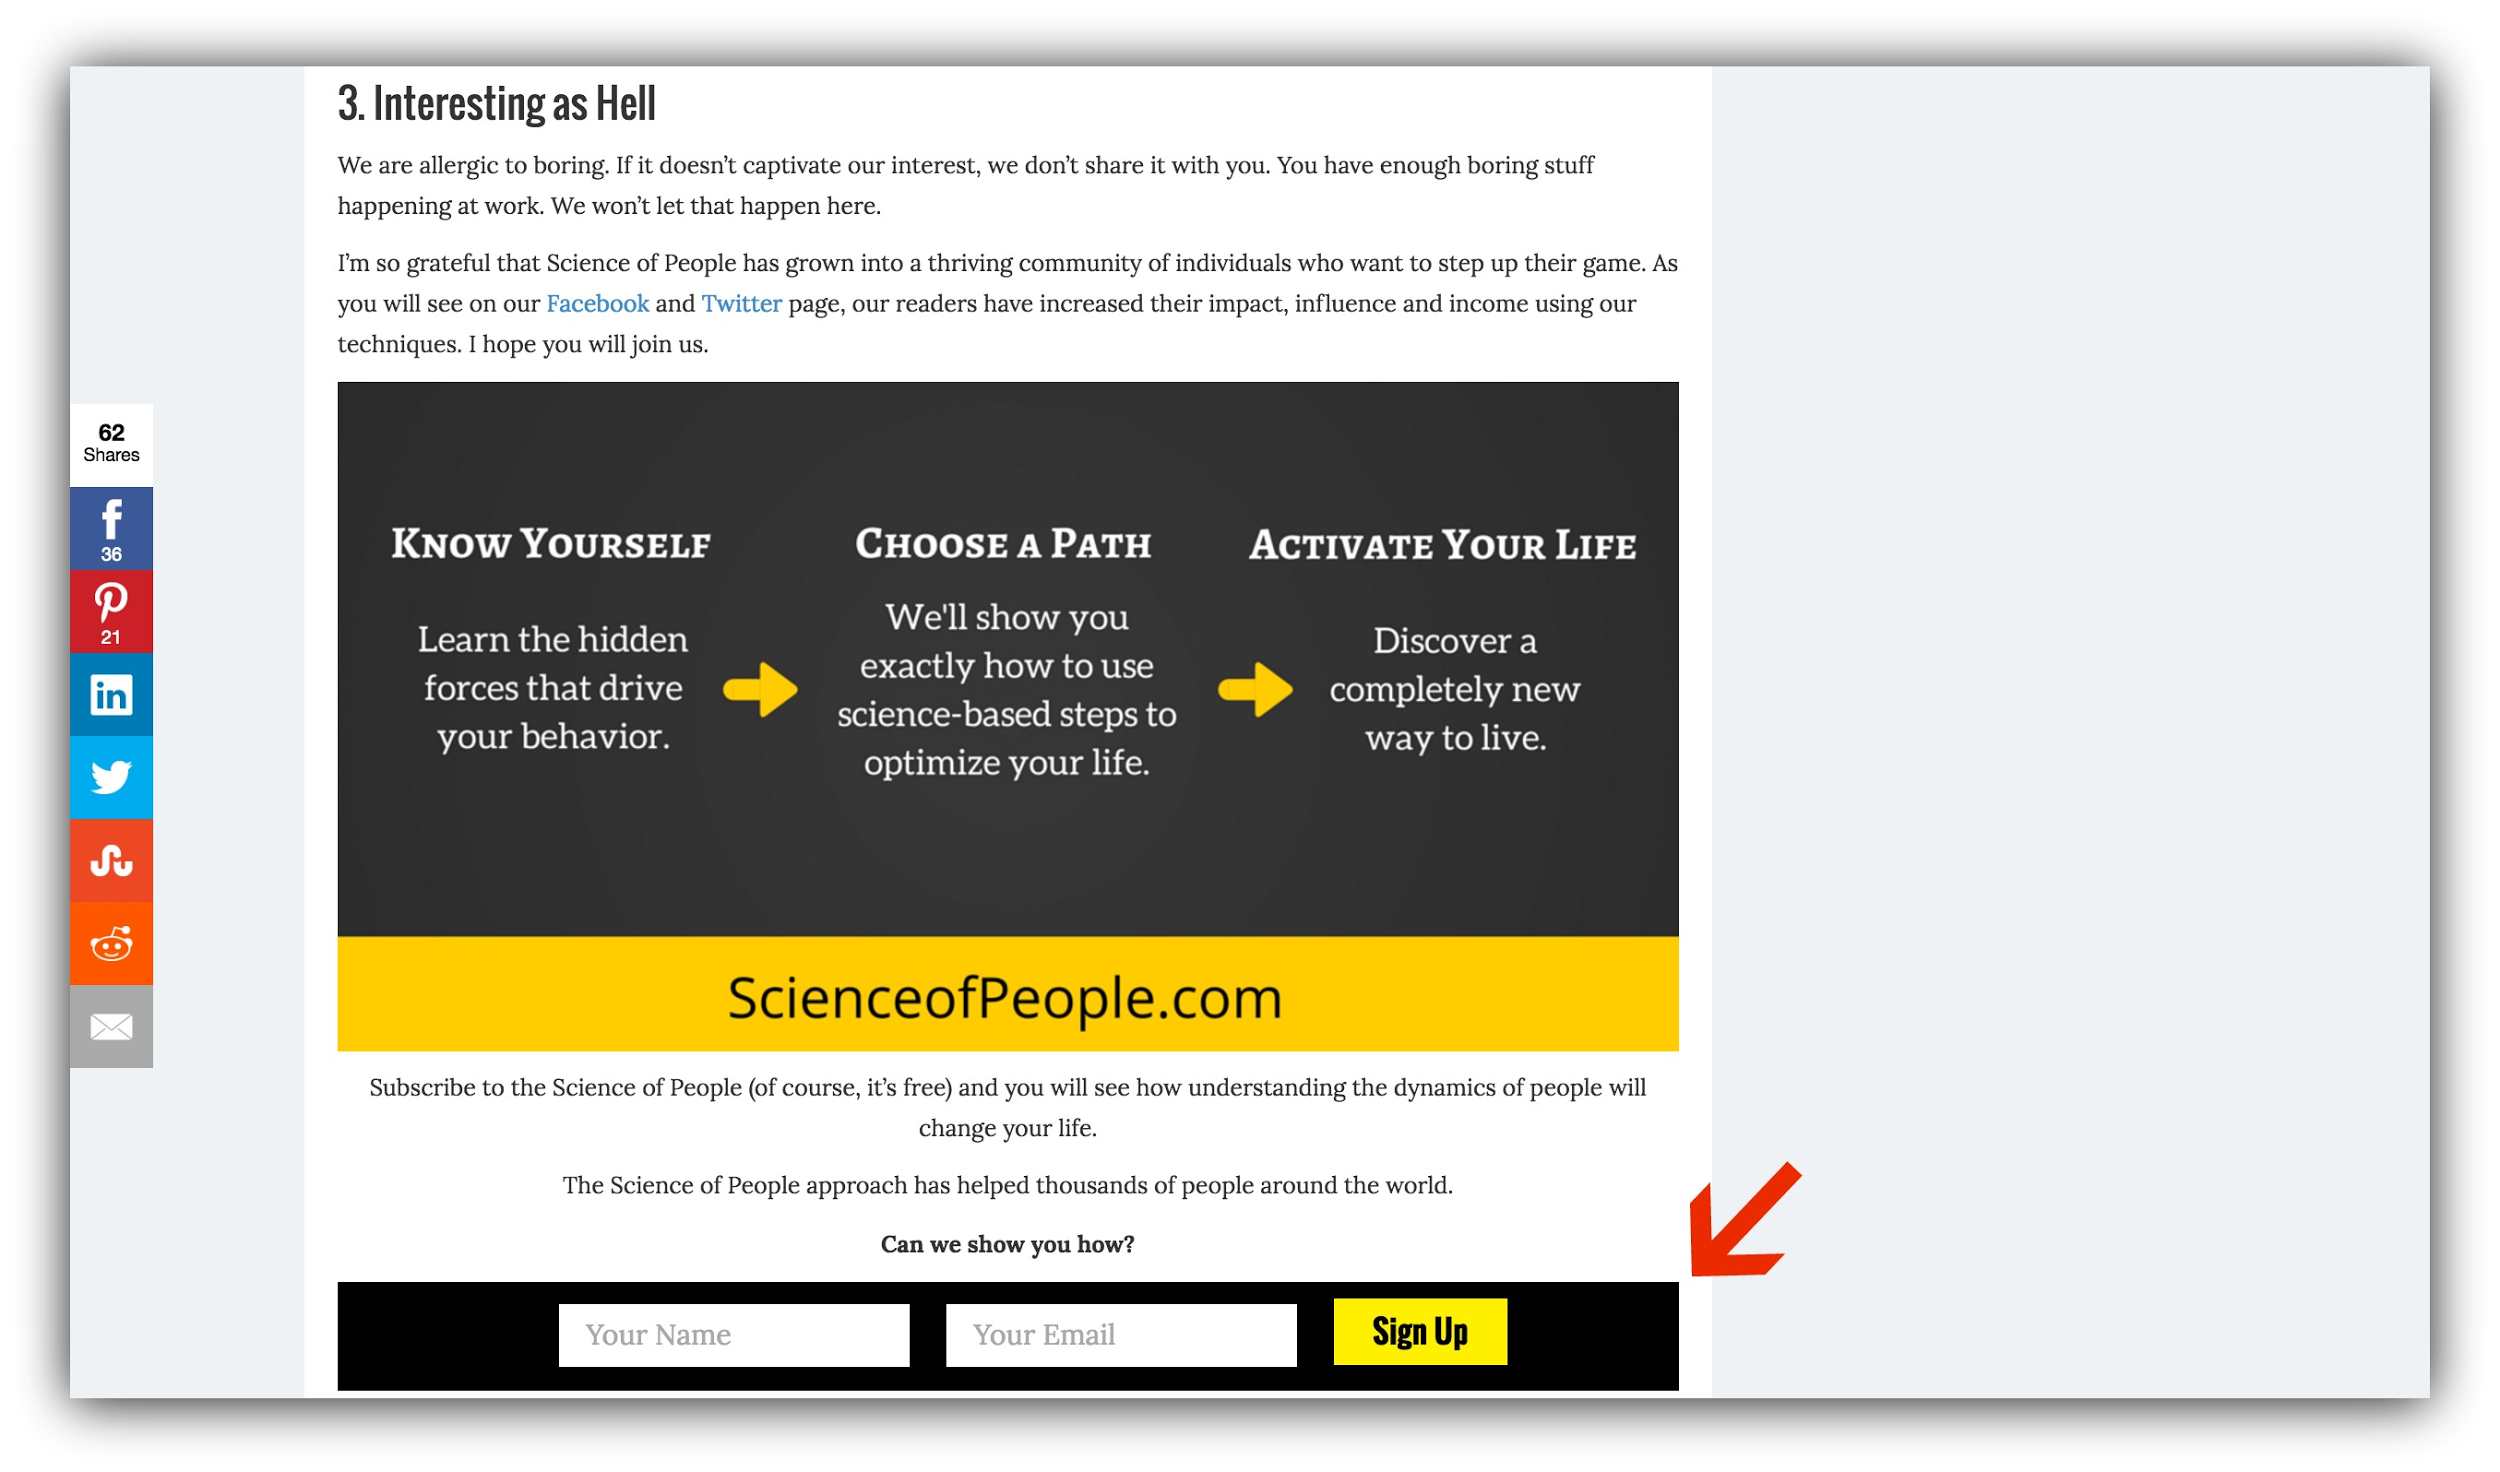
See how Vanessa Van Edwards from Science of People used her About page as an opportunity to collect emails?
It makes sense, too. If you think about it, only the visitors who are already engaged with your website end up on your About page.
After all, if they didn’t care what you were about, they wouldn’t be reading it.
That’s why these opt-in opportunities are some of the most effective ones out there. The people you’re putting them in front of are already engaged.
How to Make This Work For You:
-
Include at least three calls to action to opt-in to your list from your about page. The ideal places to put these CTAs are after your intro, after what you do to help the reader, and at the end of your page text.
-
Integrate your call to action into the text of the page. Don’t just throw it in the visitor’s face out of context – make it flow.
-
You can use opt-in boxes, links to landing pages, or links to Click Triggers. Any or all of these will be effective.
-
-
Tools: Plugins like PopUp Ally will allow you to customize forms and embed them into pages like your About page, but if you don’t want to spend money, you can use the forms provided by your email service provider. Almost all provide embeddable forms, including ConvertKit, Aweber, and MailChimp.
Opt-In #11: The Contact Page Capture
Expected Conversion Rate: 5-10%
Every month, you probably get a lot of emails.
At least some of those are likely from your "Contact" page on your website. And since the people who are sending you these emails are already typing their email address into your contact form, why not ask them if they’d like to subscribe?
This may not yield a ton of new emails, but it’s a low hanging fruit for collecting subscribers.
If your visitor is already contacting you, they’re probably not the lazy type of visitor who is just dropping by to consume your free information and leave forever. They likely have a purpose of being there, and they’ll probably return later too.
So give them the option to subscribe by adding a checkbox after your contact form.
How to Make This Work For You:
-
Make your email ask a checkbox rather than a form. The visitor is already entering their email address in the reply-to field, so take advantage of that easy win.
-
-
Tools: Many contact forms have the option to integrate with email service providers and include a checkbox to collect the emails. If you use MailChimp, the WordPress Plugin Chimpy allows you to add this checkbox to any registration or contact form.
Opt-In #12: The Slider Subscription Form
Expected Conversion Rate: 3-5%
We’ve already covered the feature box, which is an uber-effective means of collecting emails. But what about placing an opt-in opportunity in your slider?
If you’re not familiar (probably because you don’t have one), a slider is a feature on your homepage, usually placed above the fold, that flashes between images or calls to action.
To take advantage of this opportunity to collect emails, place an opt-in opportunity within your slider, like Effortlessgent.com:
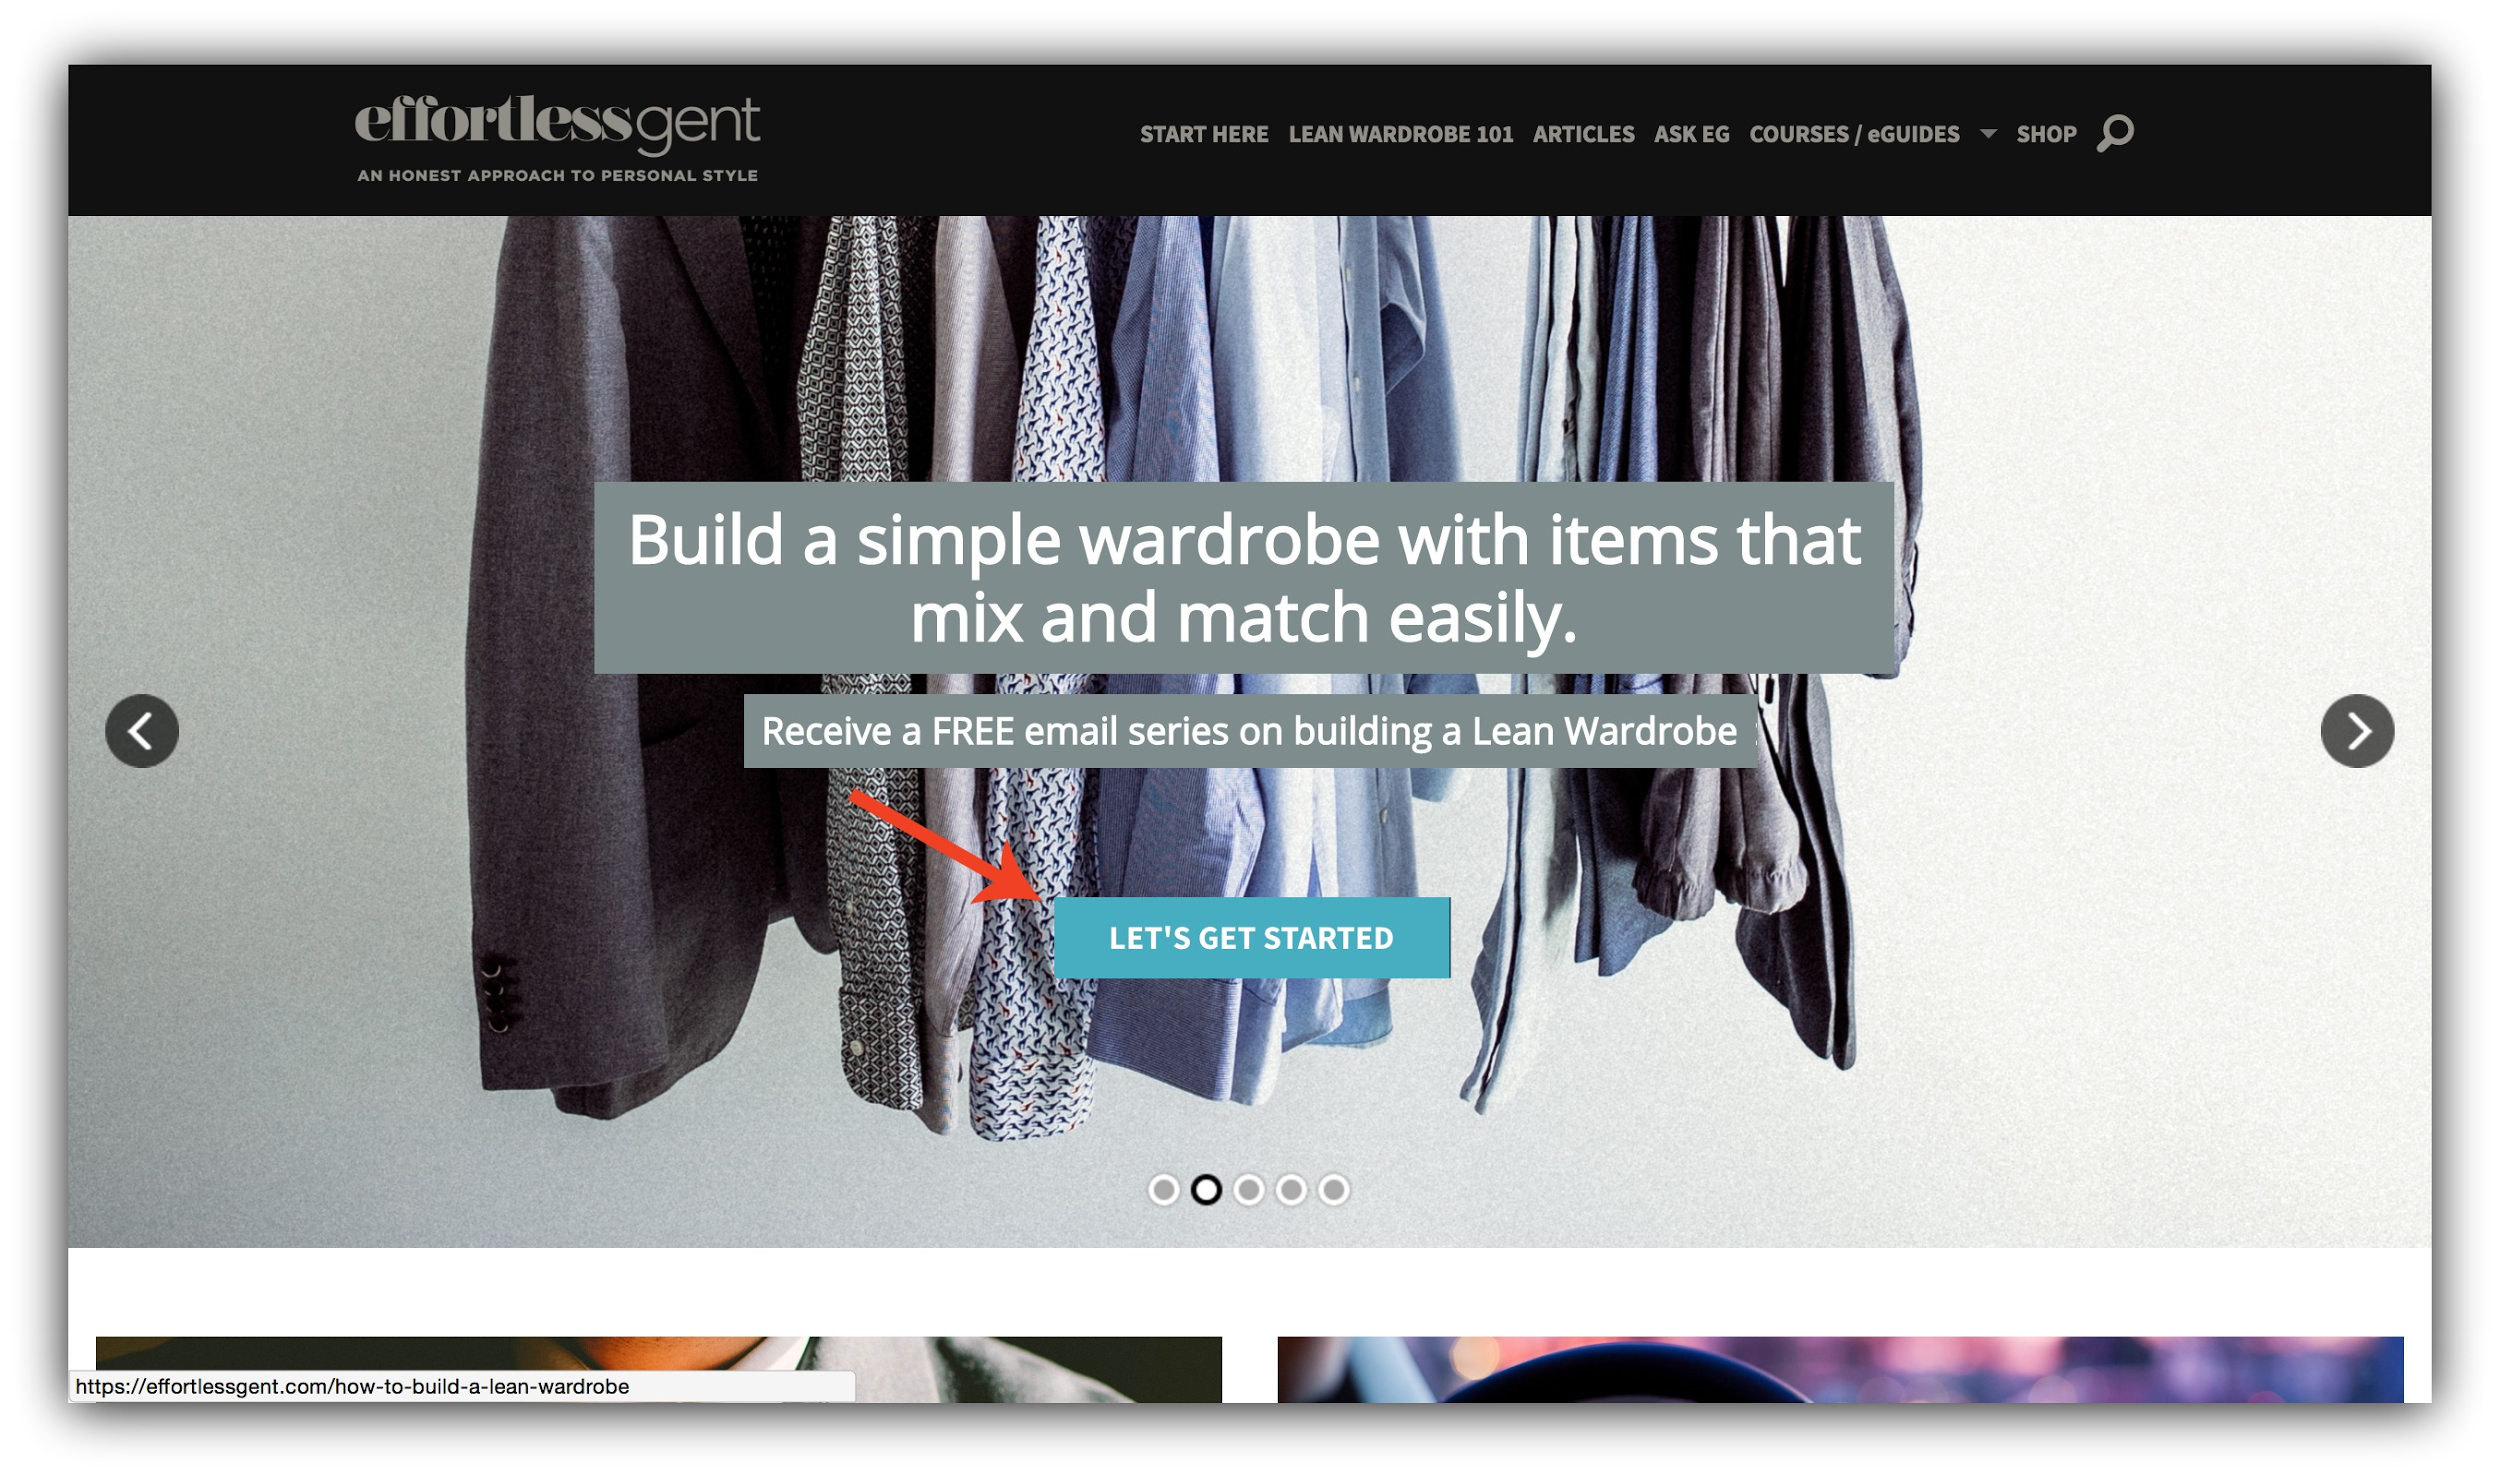
If you use a slider rather than a static element on your homepage, this is a great way to get your opt-ins above the fold in an area that commands a lot of attention – even if you can’t have a feature box.
How to Make This Work For You:
-
Because your slider moves automatically, it’s even more important that your call to action jumps off the page. You want to make sure your visitors see it before they miss it. Use bright colors and eye-catching headlines to draw attention.
-
Keep the text to a minimum, so your visitors don’t miss the offer before the slider moves on.
-
-
Tools: This usually has to be done within your theme. If your theme has a slider option, set up a button to either go to a landing page. If it instead brings up a pop-up or has a form inside it, your visitor may not have the chance to fill those things out before the slider… well, slides to the next slide.
Opt-In #13: The Side Pop-Out Button
Expected Conversion Rate: 3-5%
You’ve seen them before – the pop-out button.
But usually you see these in a different context, like one of those "contact us" buttons your bank has that leads you to an online chat.
But that doesn't mean you can’t use them as an opt-in opportunity.
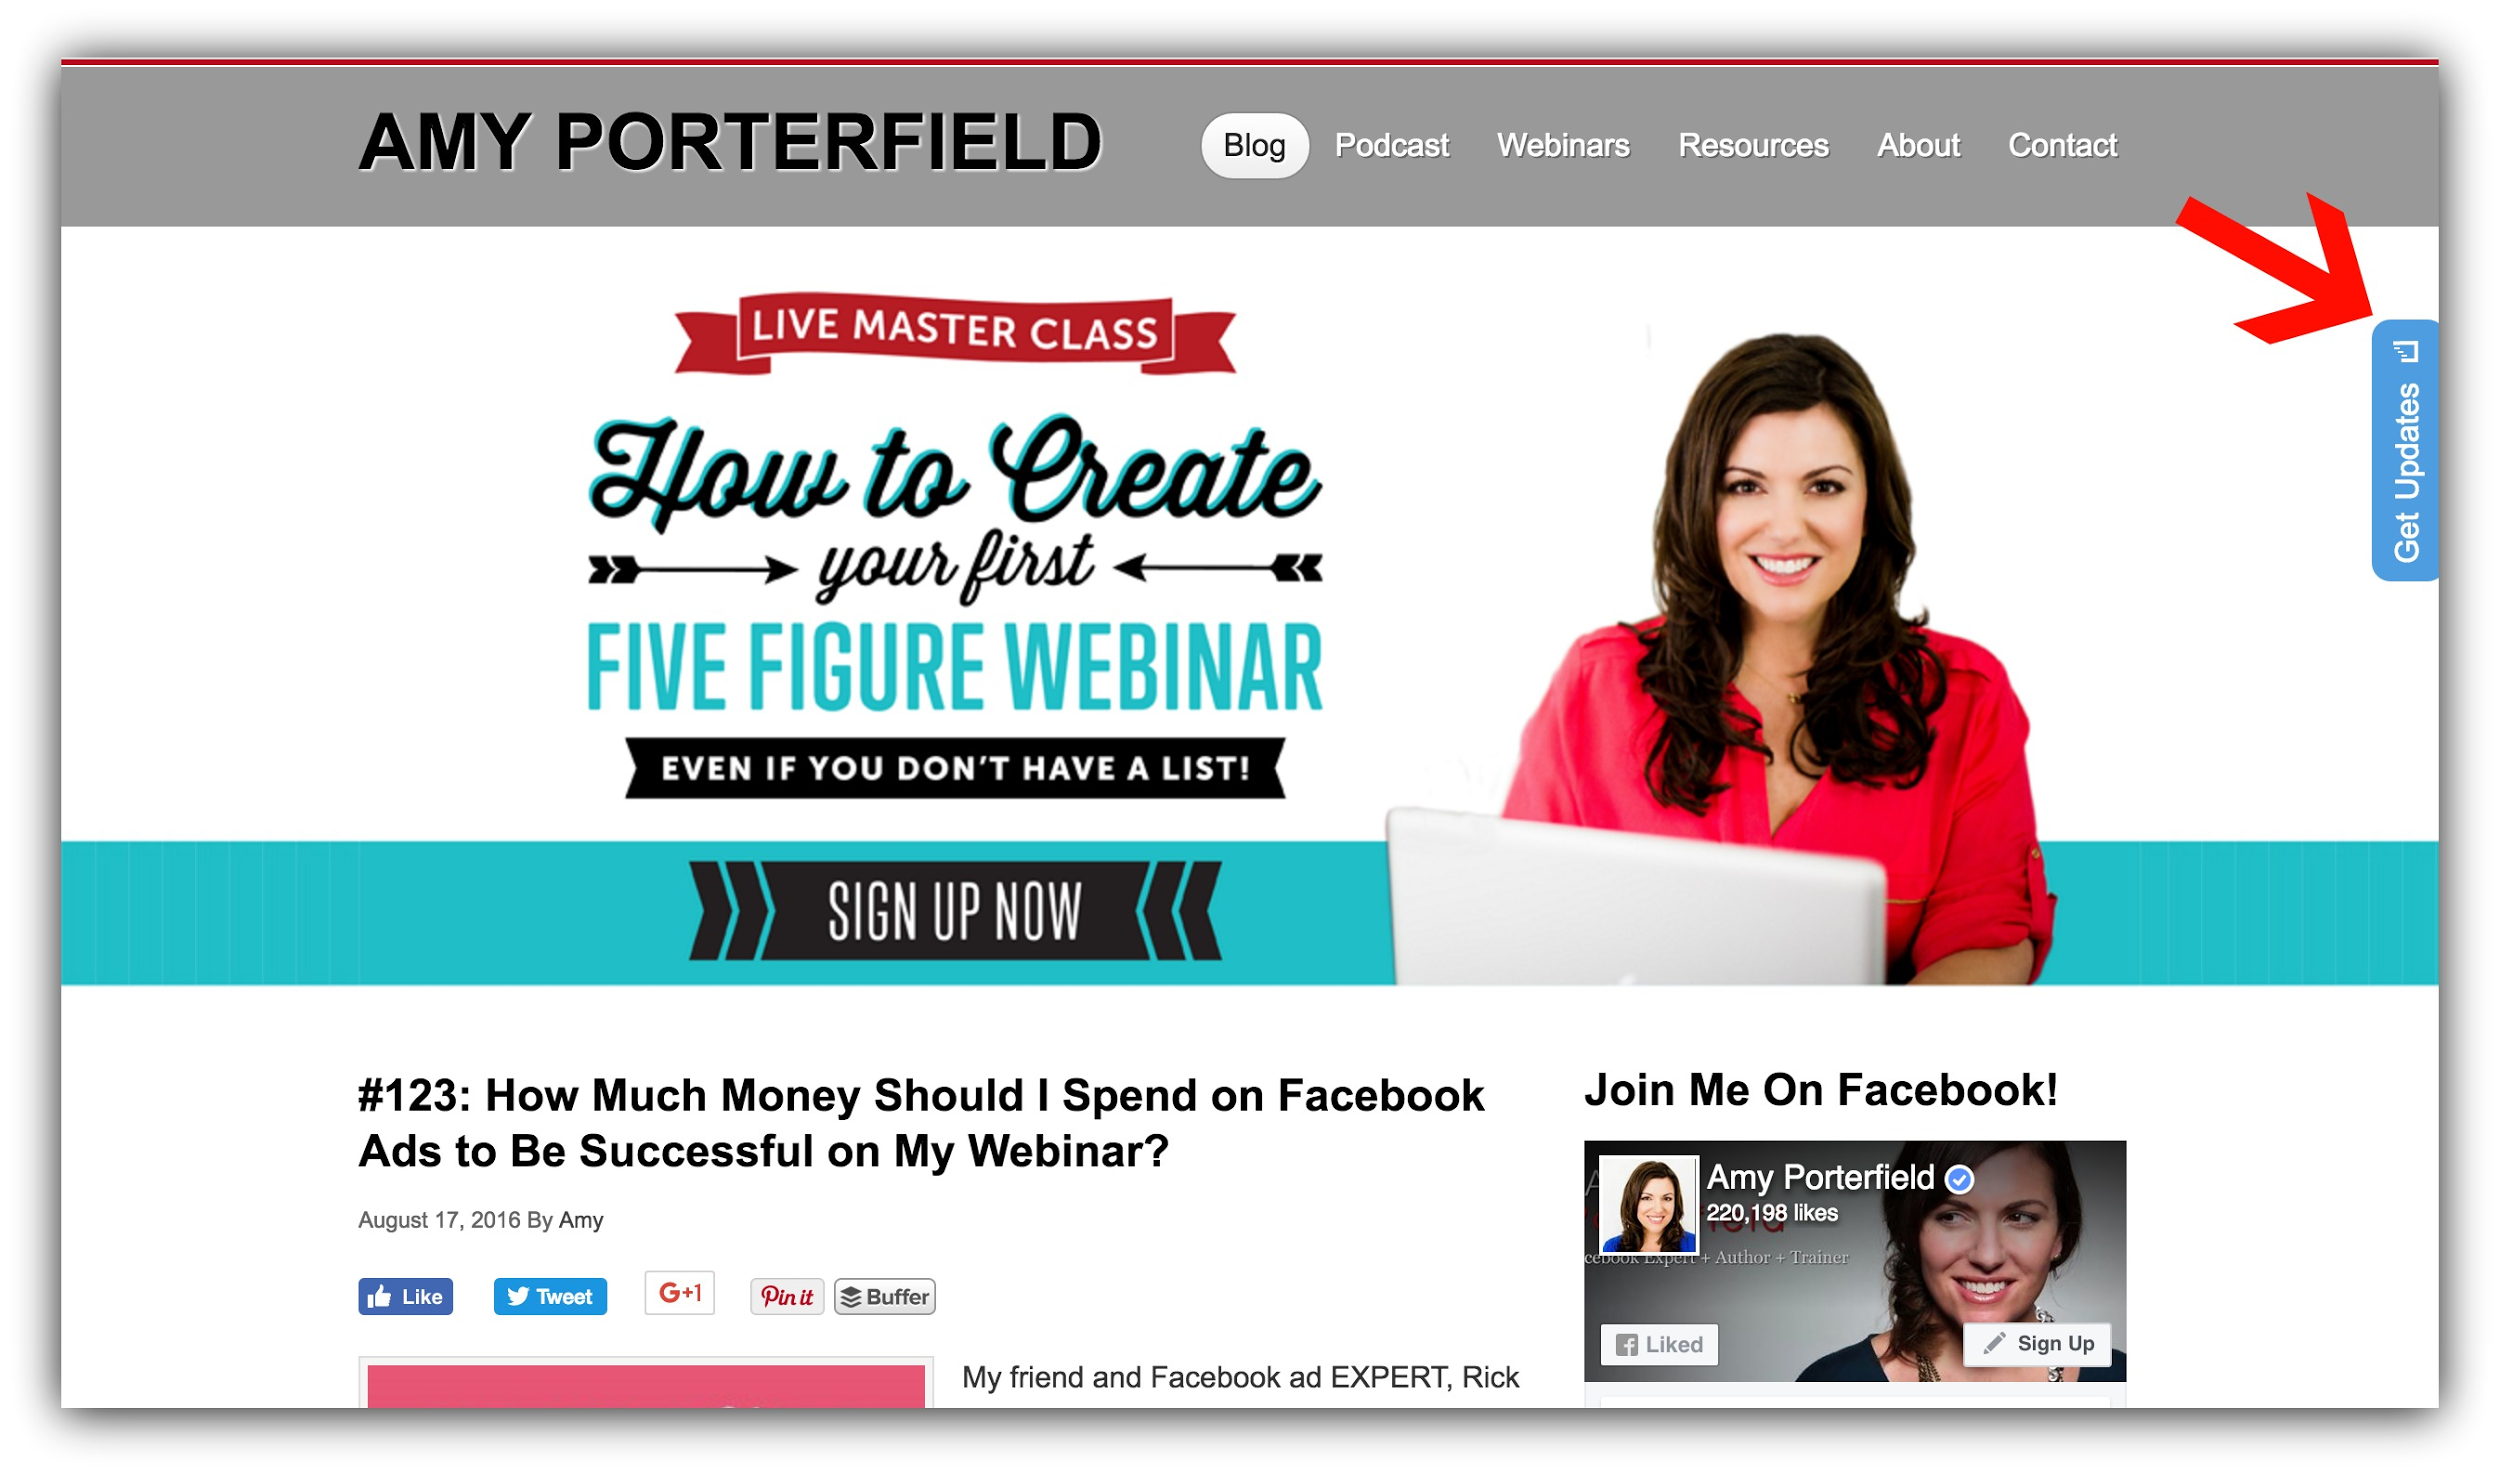
These are the unexpected version of the sidebar opt-in that actually captures attention.
How to Make This Work for You:
-
Make sure your pop-out button is an attention grabbing color. Otherwise it will blend in with your page.
-
Because these buttons usually either conflict with or override a sidebar, deactivate your sidebar if you’re using these.
-
-
Tools: There are many tools out there to allow you to do this with push notifications, but for an email collect this is something that should be done with a developer.
Opt-In #14: The Easy Comment Checkbox
Expected Conversion Rate: 3-5%
Let me paint a picture:
A member of your target audience sees a Tweet with an intriguing headline. They click it, and it leads them to your blog.
Excited, they begin to read. And they read and they read, and then eventually they get down to the comment form.
Eureka! You’ve impressed them enough to want to leave a comment. After all, they just read your entire piece of content. So they type up their comment in your comment form, add their name, and their email address… and then they see it.
The checkbox.
The wonderful checkbox asking them if they’d like to subscribe to your website:
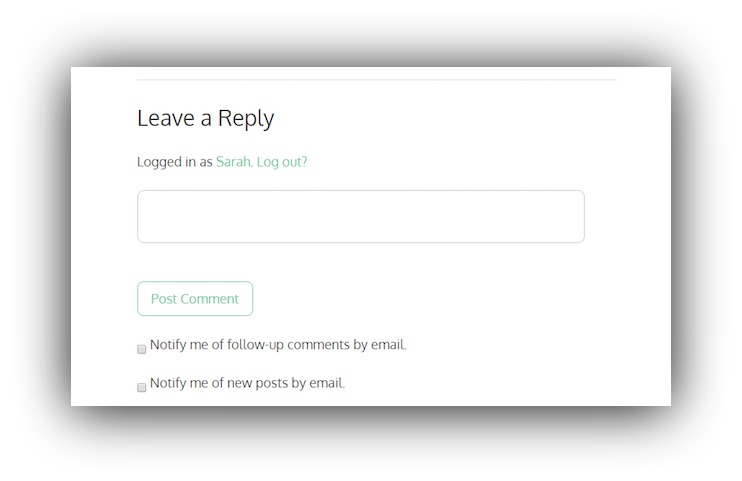
After all, they’ve just typed in their email address. And they were engaged enough to get to the bottom of your article and leave a comment.
So why not give them an opportunity to subscribe? Just like on your contact page, you can add a checkbox to the end of your comment form to capture their email addresses.
This is less effective than, say, a landing page, because you’re only capturing those emails of the small fraction of people who are inclined to leave a comment, but that doesn’t mean you shouldn’t do it.
This is just yet another way to capture emails.
How to Make This Work For You:
-
If you can control the call to action on your checkbox, don’t just make it say "Subscribe" or “Notify me of new posts”. Instead, include a compelling call to action, like getting your opt-in offer for free.
-
You can’t increase conversion rates with eye catching colors, images, or buttons in this method, so make sure your headline is solid.
-
-
Tools: If you use MailChimp, the WordPress Plugin Chimpy allows you to add this checkbox to any registration form, including comment forms. If you use Aweber, there is a plugin called Aweber Comment Optin – but note that we have never used it, and there are no reviews for it on WordPress. If you’re a programmer or know how to code scripts into your WordPress site, here are instructions on how to do so.
Opt-In #15: The 404 Squeeze Page
Expected Conversion Rate: 3-5%
It’s happened to all of us before.
You click an internal link in an article, fully anticipating being sucked down the rabbit hole of content.
And then… BAM:
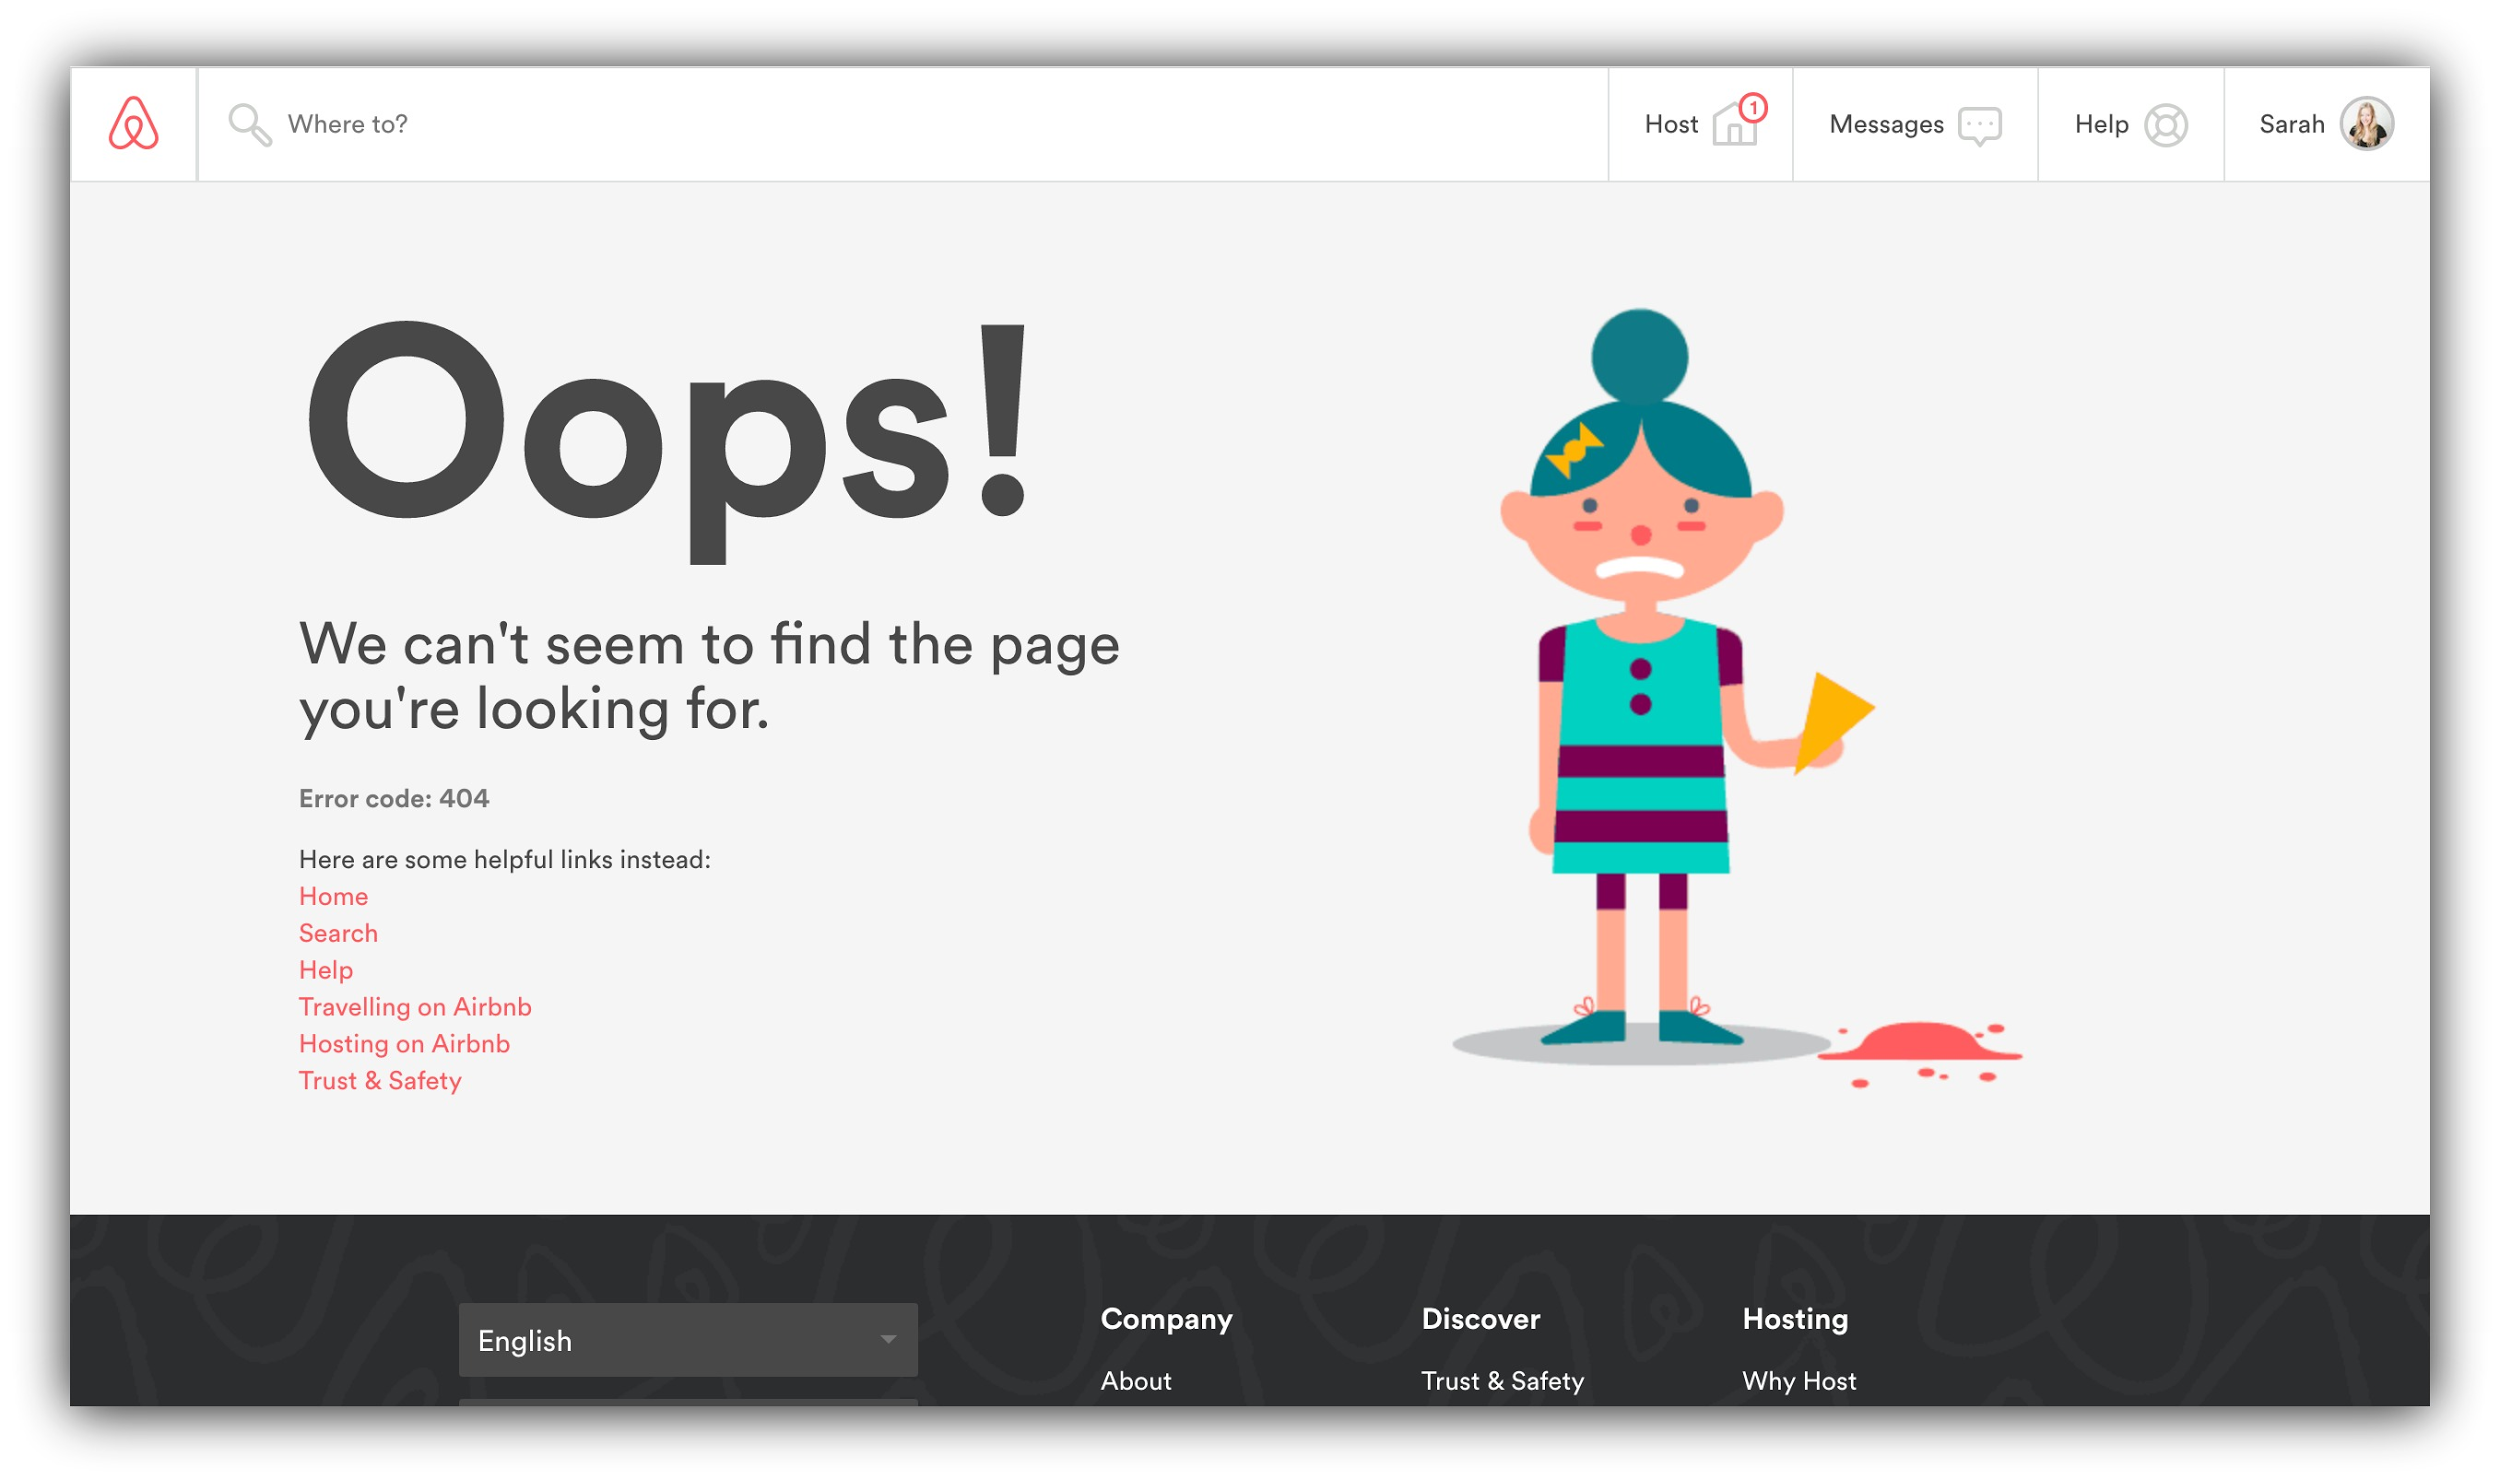
You get high centered on a 404 page. It seems as if that rabbit hole isn’t very deep.
Most websites 404 pages look generic. They simply tell the visitor that the content they were looking for can’t be found.
But if somebody’s on a roll with your website, why stop them in their tracks and forfeit all of that action-taking momentum?
Instead of just throwing up a normal 404 page in front of them, ask them for make that page serve a deeper purpose: the purpose of collecting emails.
How to Make This Work For You:
-
Treat your 404 page like a regular landing page. Follow the principles of a squeeze page that converts, and you’ll find your conversion rates are strong.
-
Because you (or your website) just inconvenienced your visitor with a 404 error, don’t just ask them for their email addresses for nothing in exchange. Instead, apologize with an offer – a discount on your products, a free downloadable eBook or PDF or a content upgrade.
-
-
Tools: SeedProd creates a plugin to help you customize your 404 page into a beautiful lead collection page.Most dedicated landing page programs have a 404 page template you can customize.
Opt-In #16: The Breadcrumbs Subscribe Link
Expected Conversion Rate: 1-3%
I’ve stressed the importance of headlines before.
The right headline can be the difference between 10 pageviews and 10,000 pageviews on the exact same article.
After all, it’s the headline that your audience sees on social media, and it’s competing with thousands of other headlines out there on similar topics.
Headlines are the number one reason why BuzzFeed is so successful, and why you find yourself clicking onto Facebook ads again and again.
So since you’re working so hard on your headline already, why not make it work a little harder for you to drive extra email signups?
Include an opt-in opportunity right under your headline to capture some of that attention your title is grabbing, like Steve Chou does:
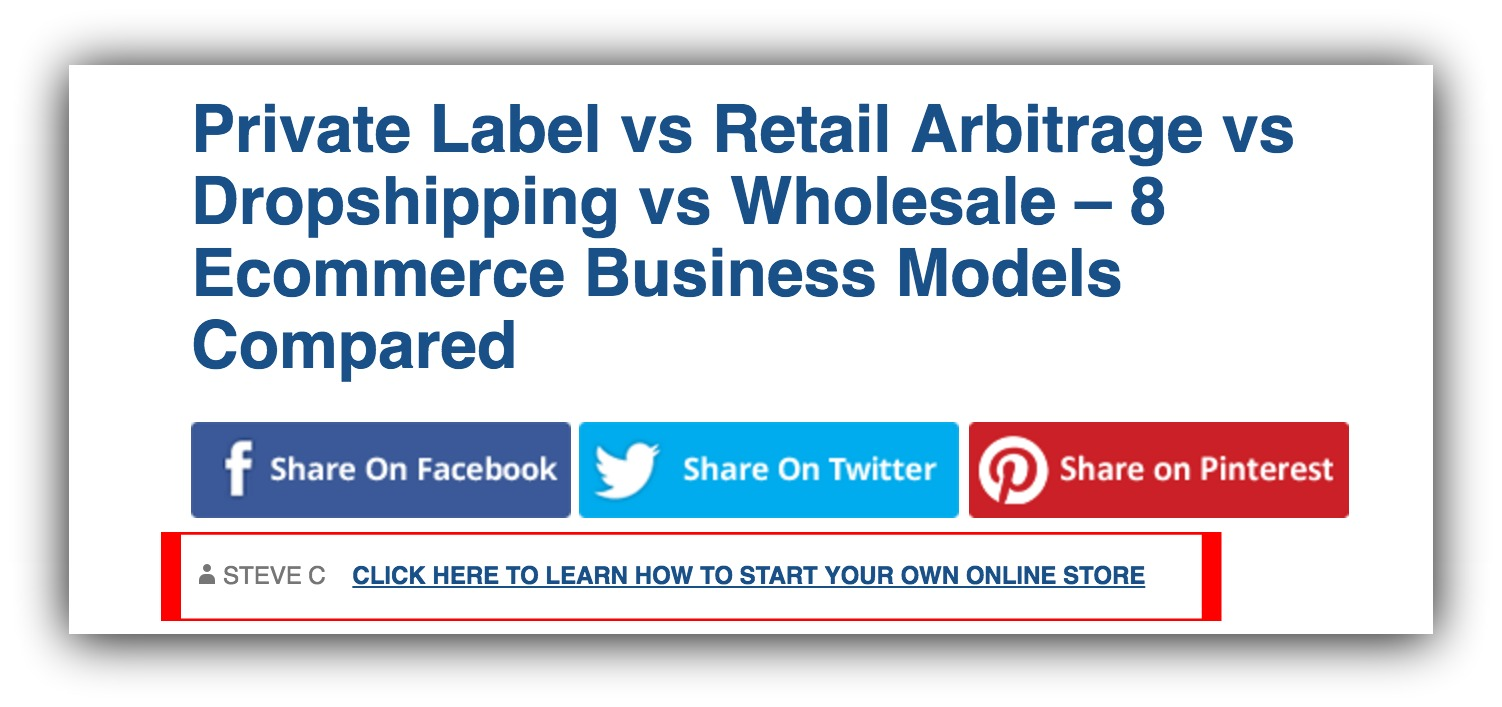
The area with the author and date underneath the headline on an article is called the "breadcrumbs", and you can take advantage of this usually dead space by adding your call to action.
How to Make This Work For You:
-
Don’t just set the text in your breadcrumbs call to action as "sign up" or “subscribe”. Like Steve does in the example above, ask the reader to “click here” to get your offer.
-
Because this opt-in opportunity is right under your headlines, make sure your offer is applicable to almost all of your content. Instead of placing a content upgrade here, offer your sitewide lead magnet.
-
-
Tools: This requires a bit of messing around in your CSS. If you’re not a professional, or don’t want to break your site, you can hire somebody on Fiverr to do this for you.When you have the breadcrumb link set up, send the people who click the link to a Click Trigger or a landing page. You can find Cick Triggers within List Builder or create a custom landing page with a free or paid program.
Opt-In #17: The Top Bar CTA
Expected Conversion Rate: <2%
They’re widely used..
That bar at the top of the page you see, usually collecting emails but occasionally advertising free shipping or something similar? Like this one used by Hello Focus:
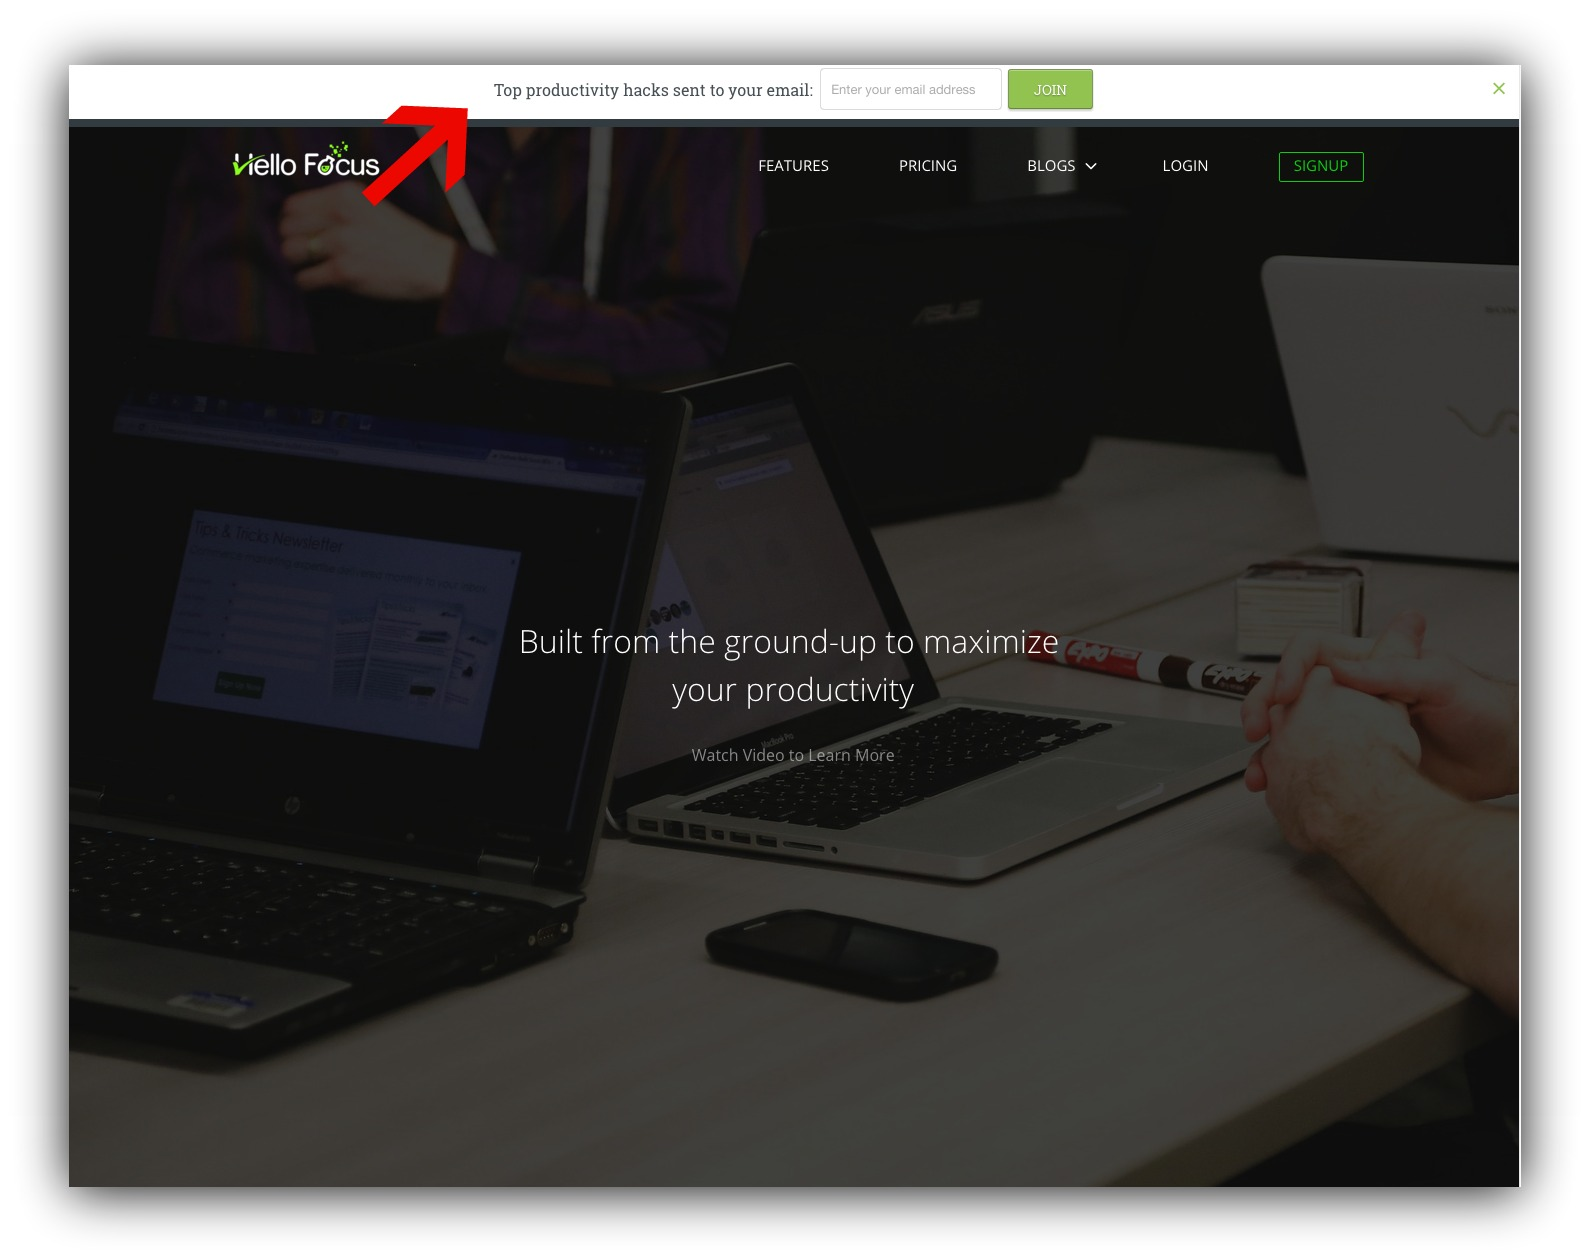
This is another opt-in opportunity you can include on your site to collect emails. Sumo creates an app to help you do this called Smart Bar.
But, this isn’t making one of the top spots for a reason.
With an average conversion rate of just 0.25%, our data shows that your Smart Bar is best left for a call to action rather than an email collect. Even the top 10% of top bar email collection users only see a 1.49% conversion rate, making it the lowest converting of the four Sumo email marketing apps.
Use Smart Bar to supplement other opt-in opportunities like a Welcome Mat or pop-up, rather than on it’s own.
How to Make This Work For You:
-
Since Smart Bars can easily be missed, make sure your bar is an eye-catching color that contrasts the rest of the colors on your page.
-
You can’t use lines of sight of other conversion techniques in a Smart Bar, so make sure your offer is solid and your headline is strong.
-
Pair your Smart Bar with a pop-up or another email collection opportunity so you don’t miss out on those valuable emails.
-
-
Tools: Install Smart Bar in your Sumo dashboard to display a mobile optimized call to action or sign up form at the top of your website.
Opt-In #18: The Traditional Sidebar Form
Expected Conversion Rate: <1%
It’s the most common opt-in opportunity: the sidebar.
You’ve probably seen it on hundreds of websites. Websites like Minimalist Baker:
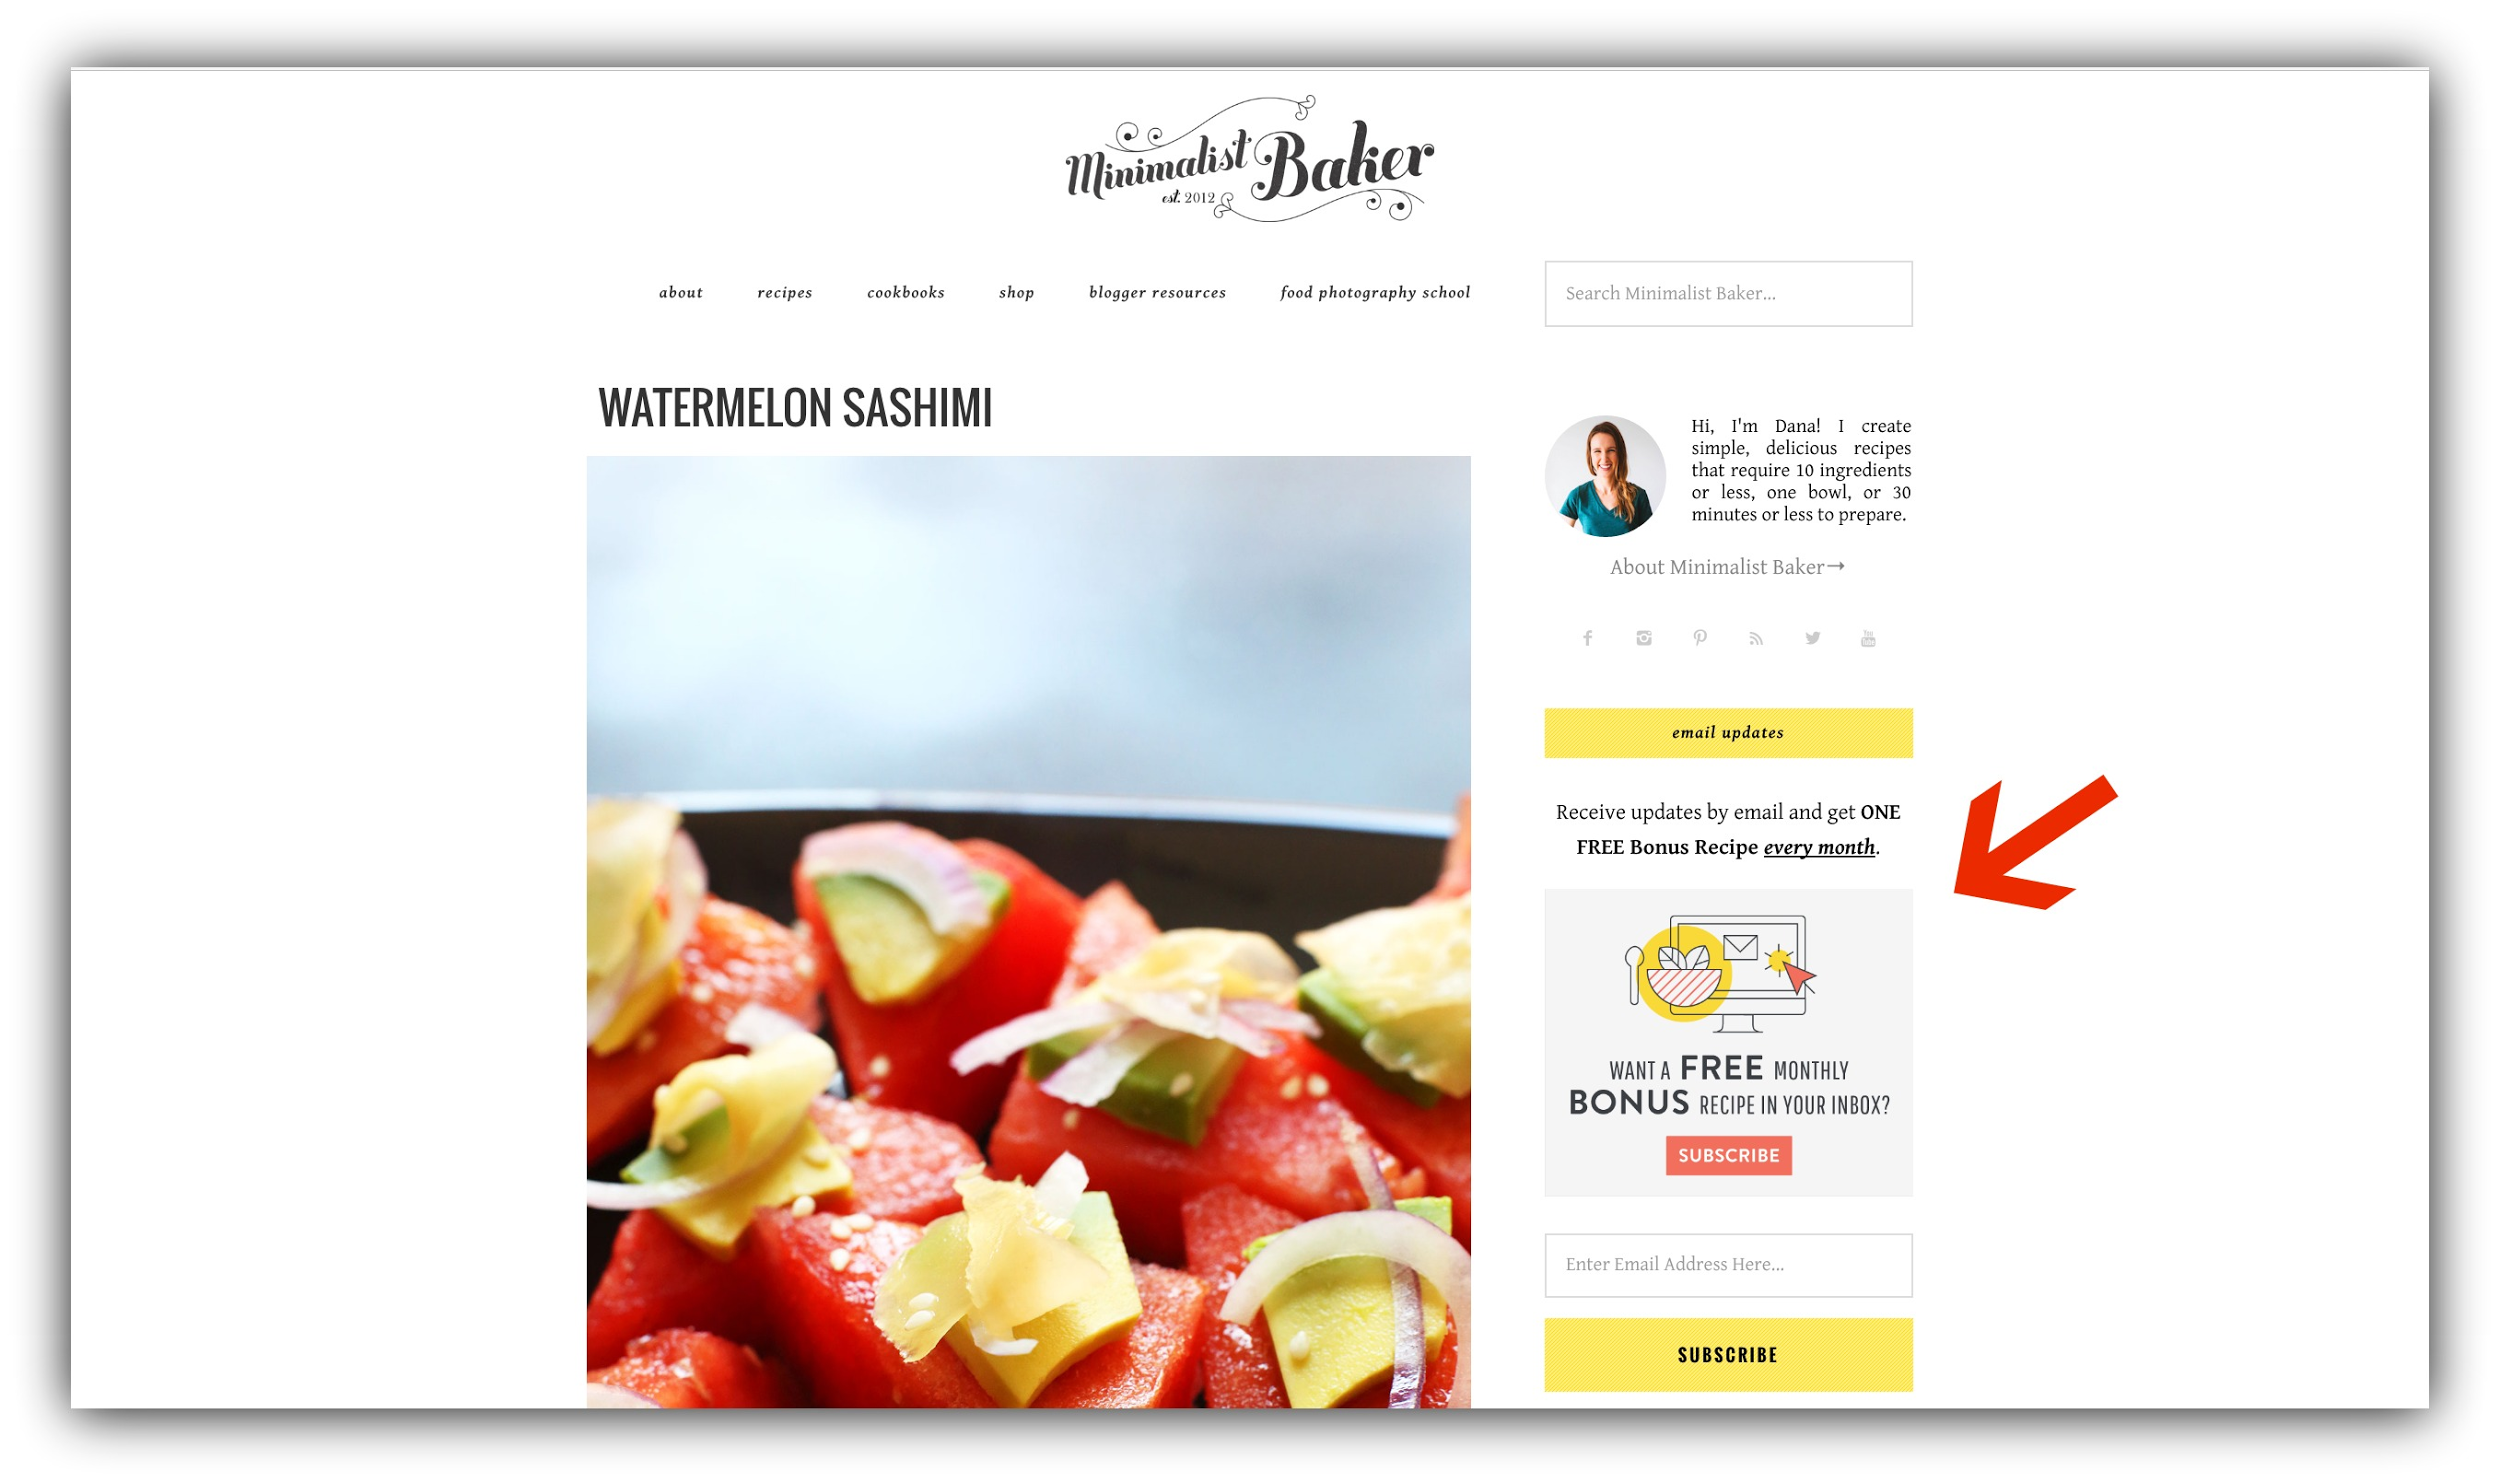
And even Entrepreneur.com:
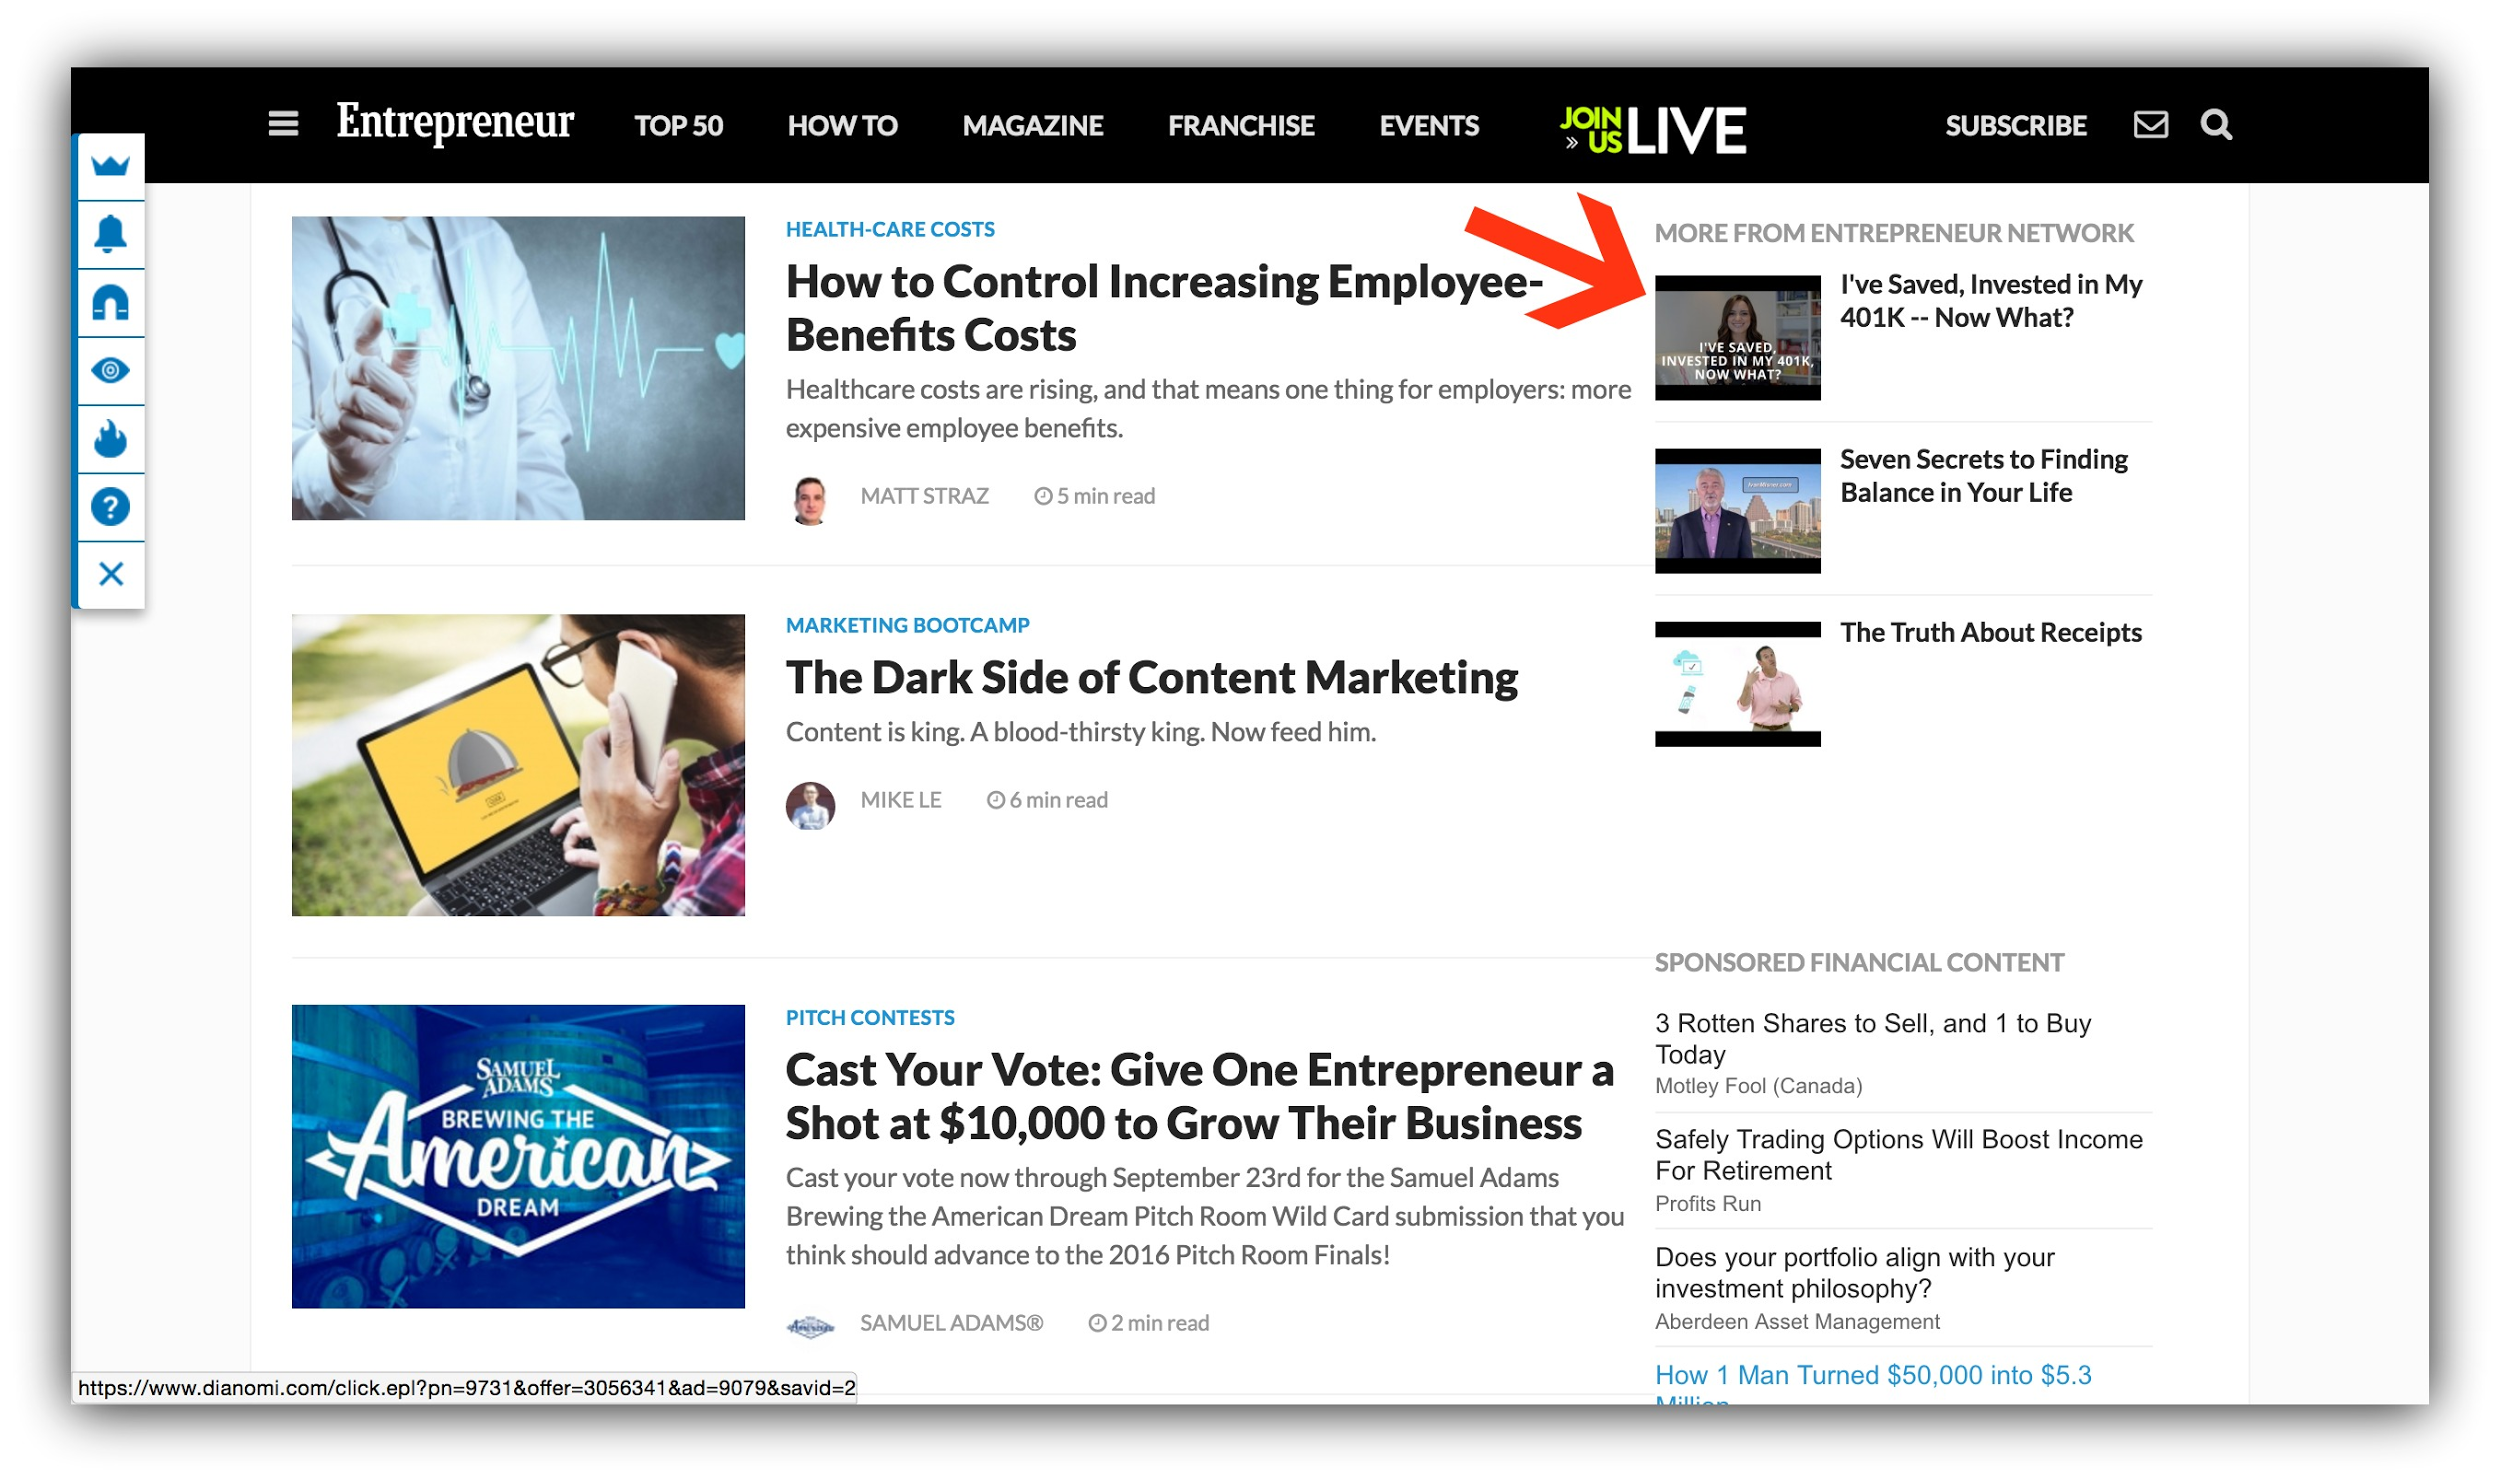
In terms of opt-in opportunities, the sidebar is usually the first place new bloggers and website owners put up an opt-in form on their websites, and it makes sense. It’s the easiest. Most email service providers like Aweber and Mailchimp offer simple drag-and-drop widgets that you can use to display opt-ins in your sidebar.
And yet…
It is precisely the sheer volume of usage of these opt-in forms that makes them wildly ineffective.
See, because sidebars have been around for so long, many internet users have developed what us internet marketers call "sidebar blindness", which is the tendency to block out sidebars because they’re so commonplace.
Think about it in terms of your grandma and her perfume. It’s so strong because she’s been wearing it for so long that she no longer smells it. She’s gotten used to it.
Same with your visitors and sidebars. They no longer see them. So why put your opt-ins somewhere your audience likely blocks out?
There are plenty of other (better) options in the guide above, but if you want to still have your sidebar opt-in, or if it works really well for you, here are some ways to make it work even harder.
How to Make This Work For You:
-
Because of sidebar blindness, try to incorporate something eye catching like motion into your sidebar opt-in form. If you can’t incorporate motion, ensure the form you’re using jumps off the page.
-
Remove all other options from your sidebar. Your visitors will get distracted by your social media profiles, badges, and widgets in your sidebar which will weaken your conversion rate.
-
-
Tools: Email service providers like Aweber, Mailchimp, ConvertKit, and Constant Contact all have sidebar opt-in forms. You can create your own with their templates, and install the HTML directly into your widgets area in WordPress.
Opt-In #18.1: The Custom Sidebar Capture
Expected Conversion Rate: 3-5%
Sidebar blindness aside, you want to give your visitors every opportunity to subscribe and see your offers.
And since only 20% of your visitors are reading your entire articles, getting your offers in front of your audience above the fold at every opportunity will help you convert far more people.
So what if, instead of throwing up your generic site-wide sidebar in front of your audience on your content, you instead employed a deadly conversion-increasing tool…
The custom sidebar?
Customizing your sidebar to offer a content upgrade or an offer specific to that piece of content or page your visitor is on is naturally going to convert better than a generic sidebar.
Check out how Jill has included CTA in a custom sidebar in the content on her blog, Screw the Nine to Five:
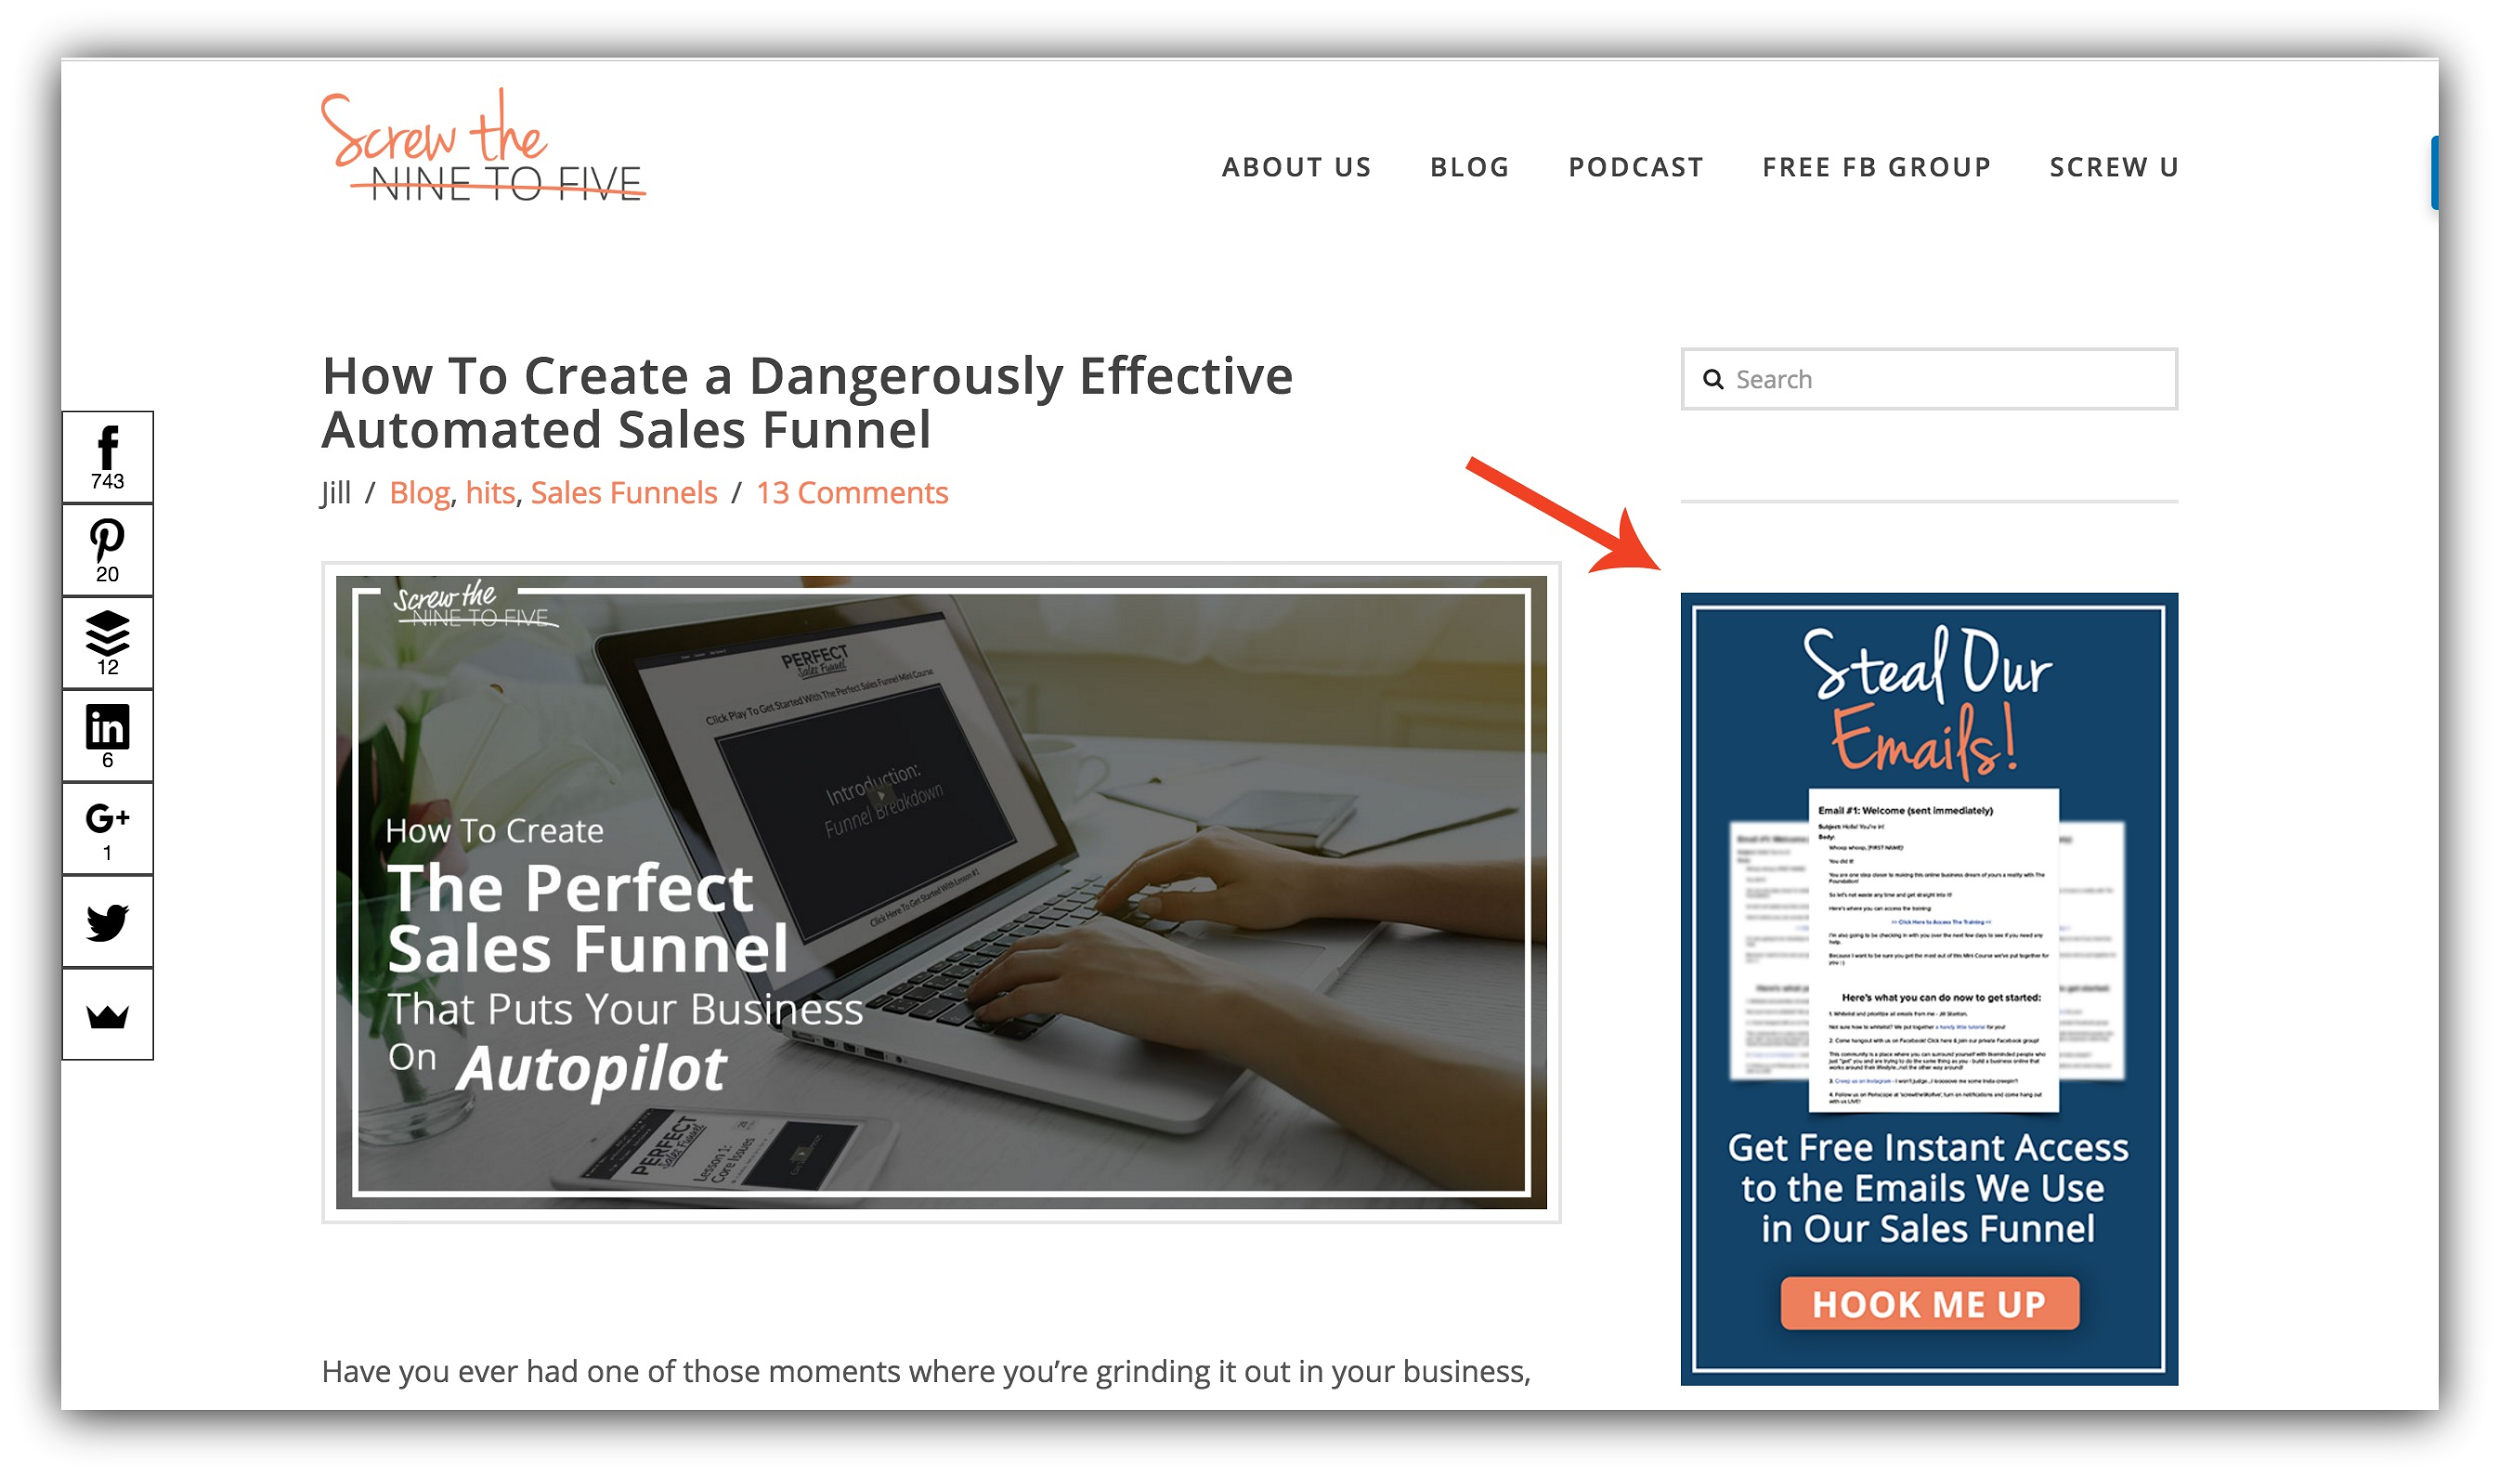
These are more effective than generic, cluttered sidebars, and can be paired with a content upgrade to really drive those emails.
How to Make This Work For You:
-
Isolate the call to action. Don’t put anything other than the offer in your custom sidebar!
-
Fight sidebar blindness by making sure your call to action is eye-catching.
-
-
Tools: You can get custom sidebars for your site by installing a WordPress plugin. There are a few options – the premium wpmudev WordPress Custom Sidebars Pro plugin, and the free (though admittedly more limited) Easy Custom Sidebars.
Opt-In #19: The RSS Subscription Link
Expected Conversion Rate: <1%
I know, I know.
RSS feeds are SO 2007.
But, some people do still use services like Feedly or even just Feedburner to subscribe to updates from your site. And technically, your RSS feed is part of your site.
You can find your RSS feed by typing in your url /feed.
So if your URL was the terribly inventive domain or YourSite.com, it might be http://yoursite.com/feed.
And you can actually include a call to action in your RSS feed. Bye including a call to action to subscribe to your email list in your RSS feed, you can get those awesome people who are subscribed to your feed onto your list.
After all, your reader is much more valuable as an email list subscriber than they are an RSS subscriber.
How to Make This Work For You:
-
Your RSS subscriber might not know the difference between being an email list subscriber and an RSS subscriber, so they may think they’re already signed up. Explain in your excerpt that by subscribing they get exclusive content they don’t get as an RSS subscriber.
-
If you have a content upgrade for your content, use this real estate to get your readers off Feedly or wherever they’re reading your feed, and onto your site to subscribe.
-
-
Tools: Yoast SEO is a plugin that allows you to add an excerpt at the the bottom of your RSS feeds to include a call to action. It also has about a bajillion other awesome functions that you should take advantage of.
Opt-In #20: The Hidden Footer Form
Expected Conversion Rate: <1%
Okay, so the footer opt-in form is admittedly not the most effective place for an opt-in form, because as our data shows, only 20% of the people reading your content get down to the bottom of the article – that’s not even mentioning your footer.
Sumo has a short homepage compared to most, and only 17% of our visitors even get to the footer:
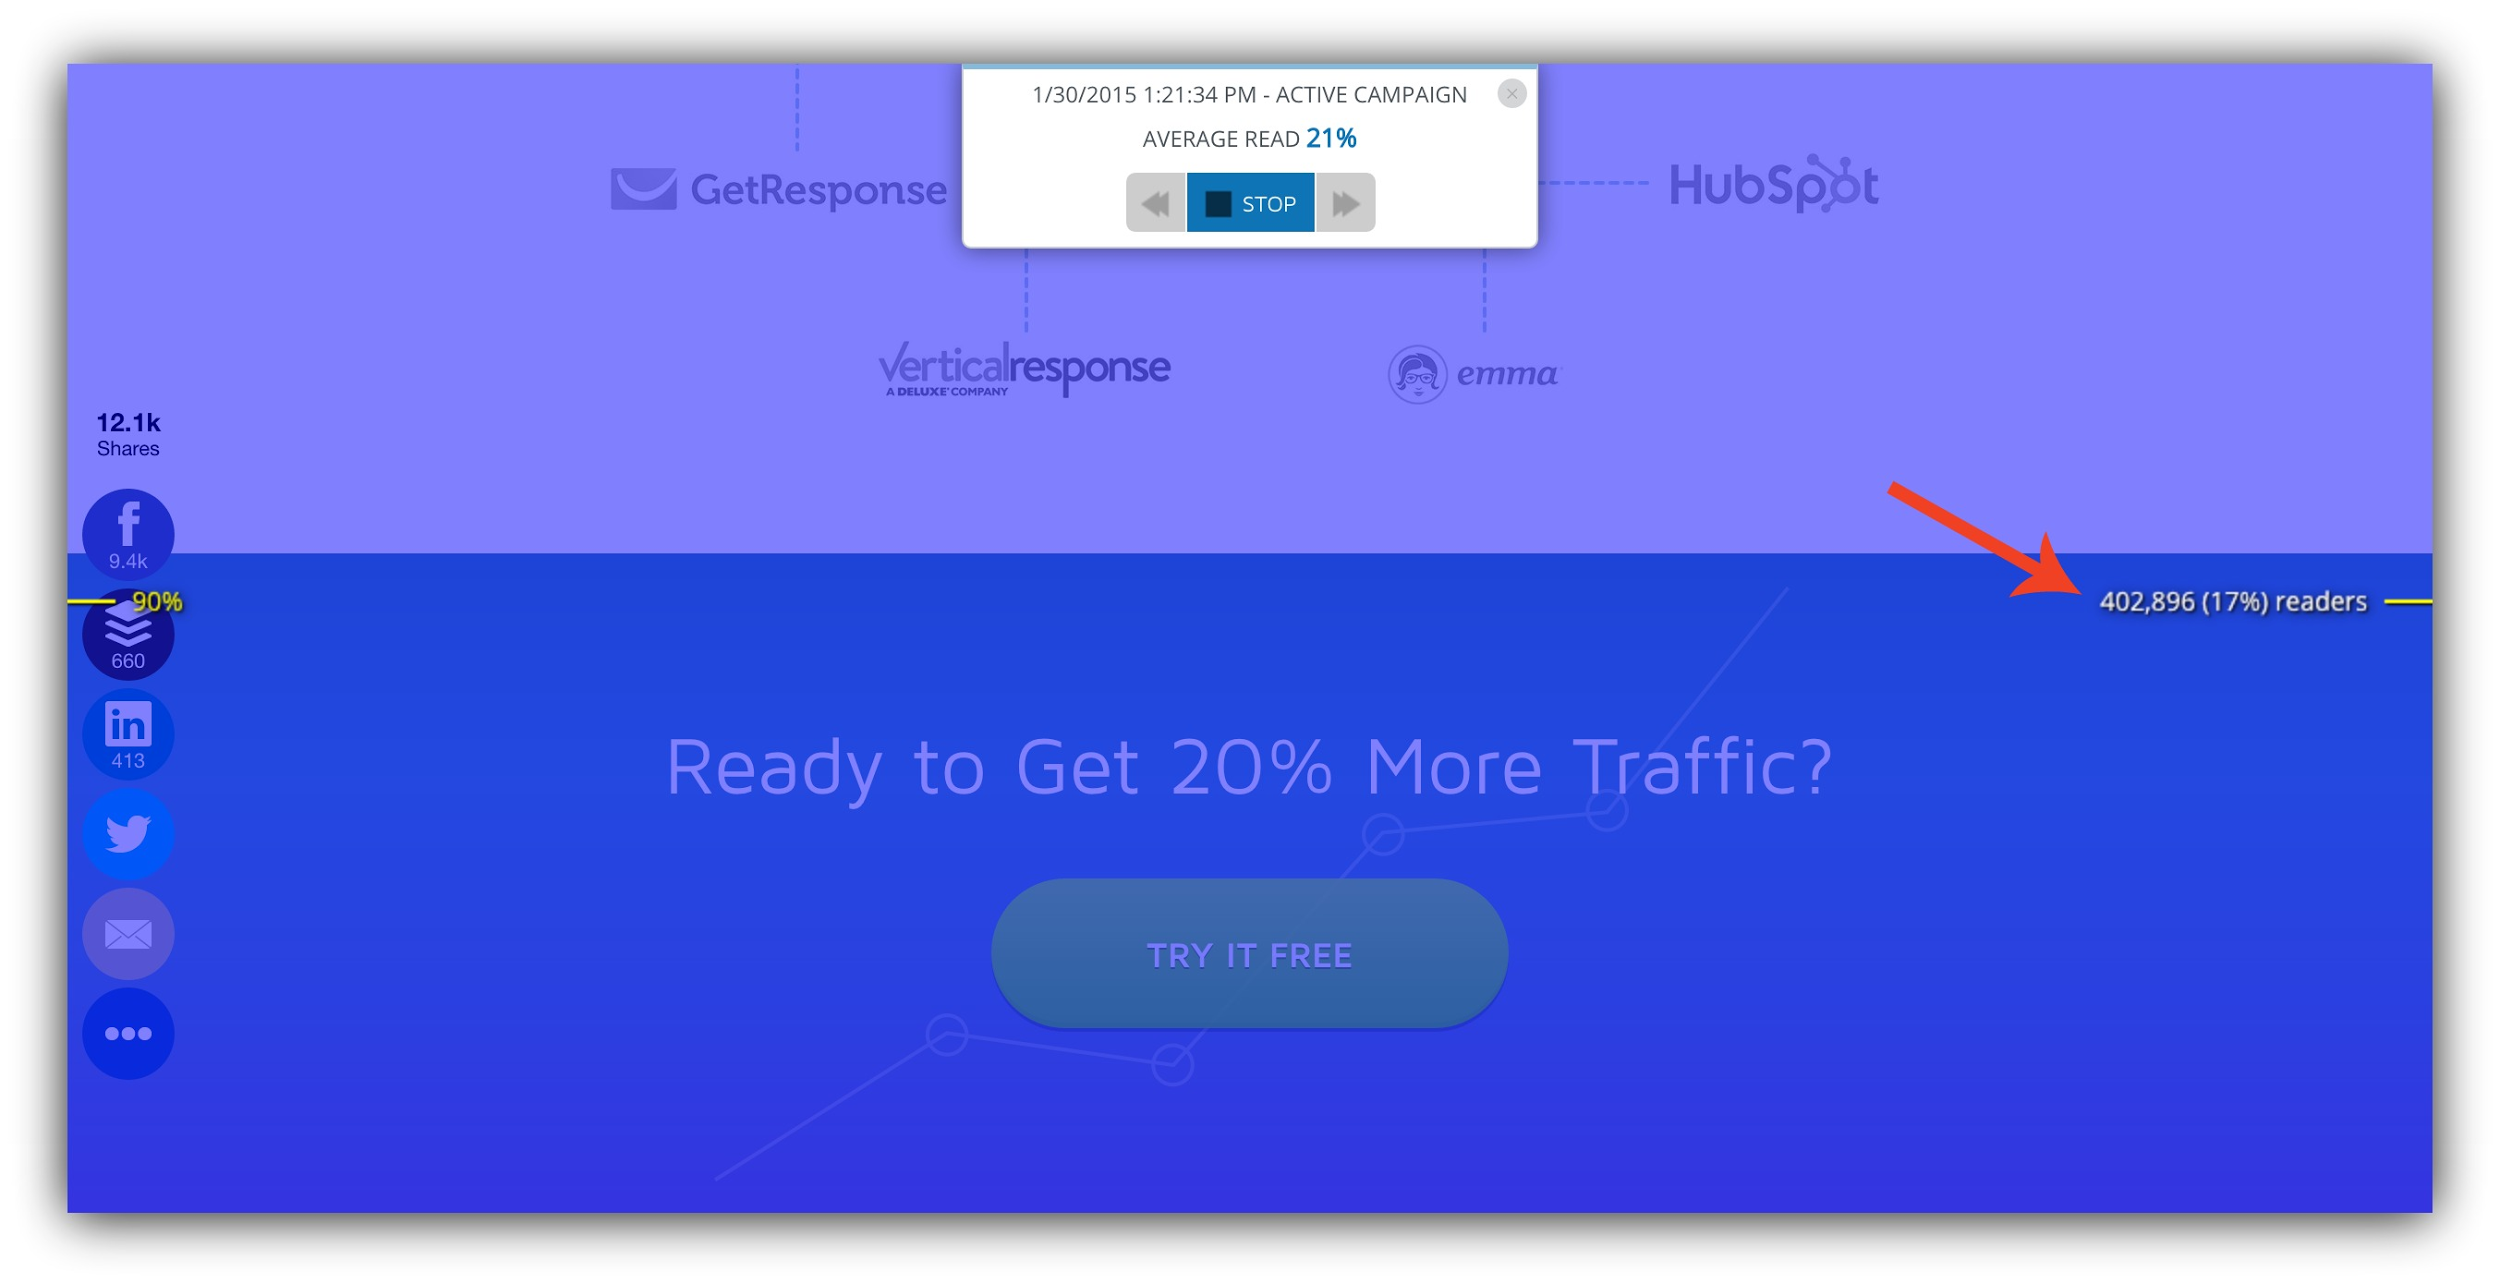
If they were going to opt in, chances are we would have captured them already through a Welcome Mat, pop-up, or one of the myriad of more effective means I’ve already listed in this guide.
But, just because it won’t convert as well as one of the top opt-in opportunities doesn’t mean it hurts, and usually the footer of your site isn’t really pulling it’s weight anyway, so of course the footer is an opt-in opportunity.
Check out how Joshua Becker uses his footer as an opt-in opportunity:
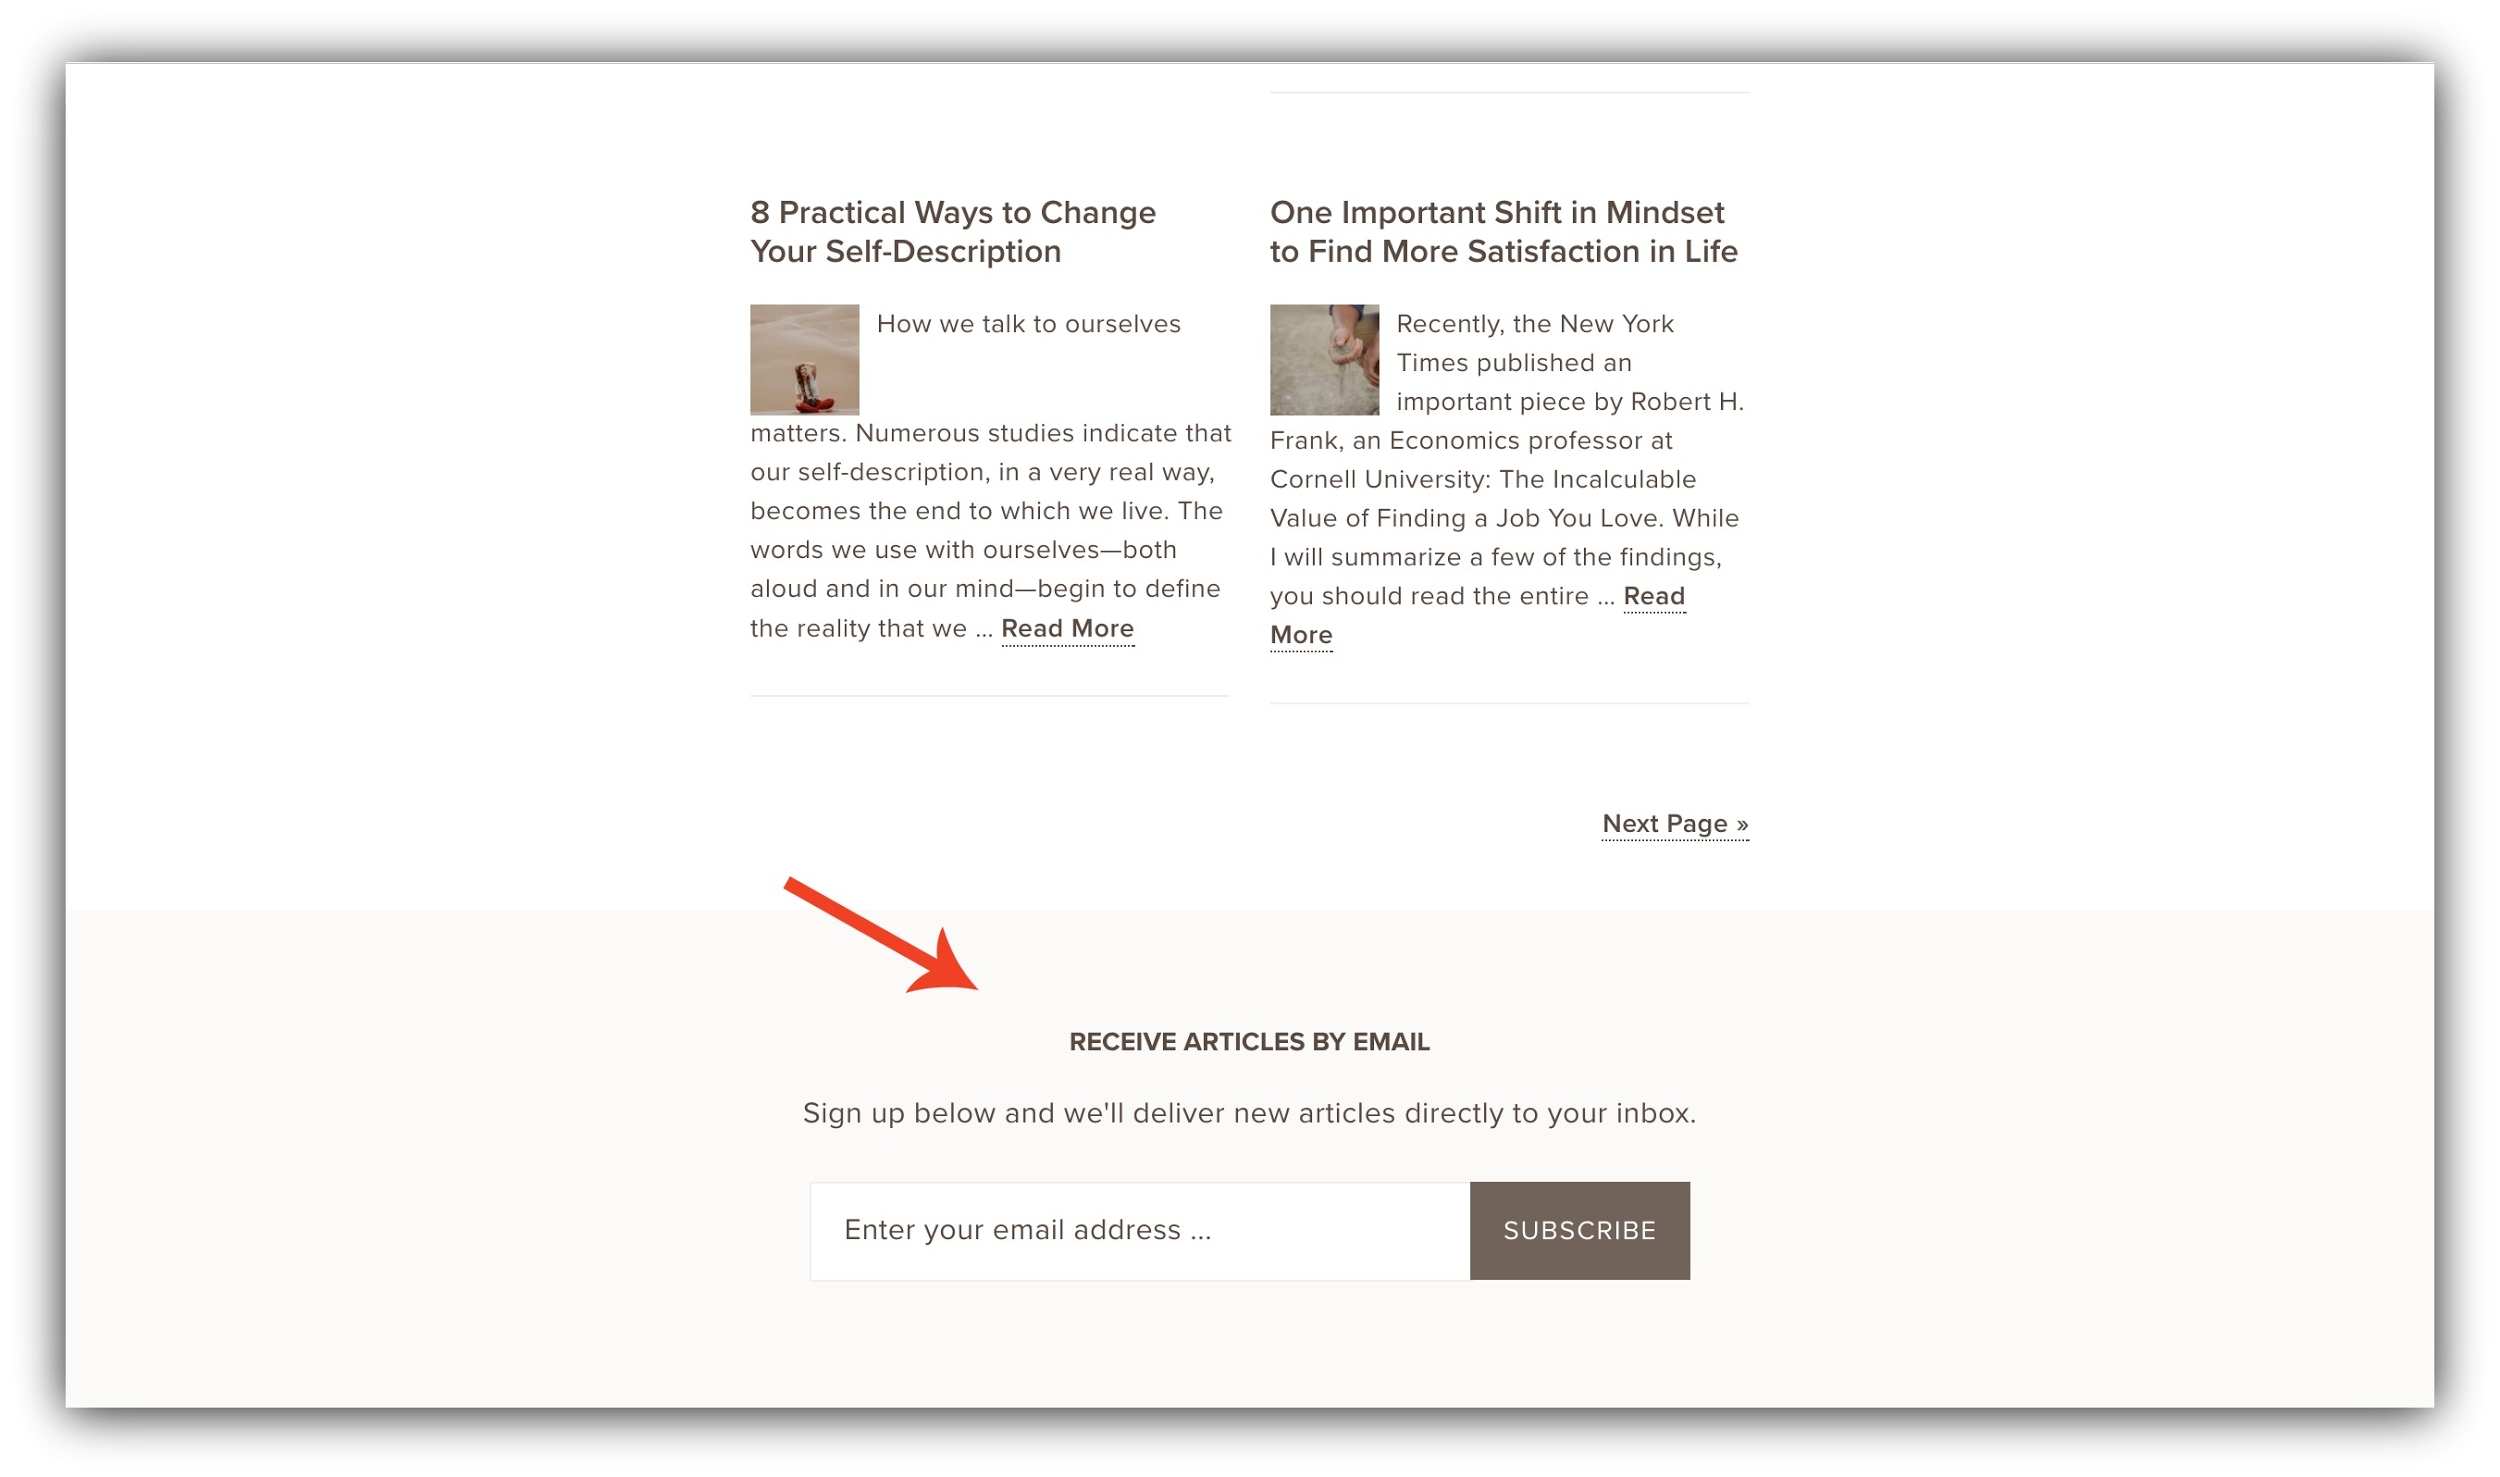
Most footer forms only get a very low conversion rate – usually < 0.25% – but unless your footer is being used for other important things, you may want to consider including one anyway.
How to Make This Work For You:
-
If you’re going to use the footer as an opt-in opportunity, don’t only use it. Use other more prominent placing on your site so you don’t miss tons of emails
-
Pair footer opt-ins with an offer or two step opt-ins for more success. This will boost your conversion rate.
-
-
Tools: If you want a one step opt-in, use the forms provided by your email service provider. They usually have forms you can embed right into the footer section. If you are using a two step opt-in, use Click Triggers. It’s a Sumo feature within List Builder that will allow you to embed a two step opt-in to any HTML.
Grow Your Email List With the Perfect Mix of Opt-in Opportunities
I’ve spent the last 7,000 words giving you a plethora of places on your website to collect emails.
I even ranked them and gave you best practices to make sure they work extra hard for you.
But you might be still a bit stuck on what to do next. I understand. You just absorbed a tremendous amount of information.
So where do you start?
Well, I can’t tell you what mix of email collection opportunities will work for your specific website, but I can help make your decision much easier. And how will I do that?
Well, I created a cheatsheet of all of all of these opt-in opportunities, ranked, including their expected conversion rates and the tools to make each happen.
Add A Comment
VIEW THE COMMENTS